Andrea Schewe Design
  • Home
  • Costumes
    • Reader's Gallery
    • Fantasy Costumes
    • Theatrical
    • Historic >
      • Easier to make
    • International
    • Costumes for Kid's and Babies
  • Crafts
    • Home Decor >
      • Pillows
    • Fashion Accessories
    • Doll Clothes
    • For Kids and Babies
  • Blog
    • Past Blogs by subject >
      • My patterns by number
      • Sewing basics
      • Personal sewing Projects
      • Fashion History
      • Fun and funny stuff
      • Guest Bloggers
      • Crafts and Home Dec
  • Links
  • Contact

Speed Skating attire

2/18/2014

3 Comments

 
Even though the figure skating costumes are more beautiful, the team uniform controversy this time is over what the American Speed Skaters wore for the the qualifying heats.  Apparently their suits were too aerodynamic and they've been forced to wear their older suits for the rest of the Olympic AND they have not been doing so well!

So, I thought it would be interesting to see how speed skating clothing has changed in the last 100 years.
Picture
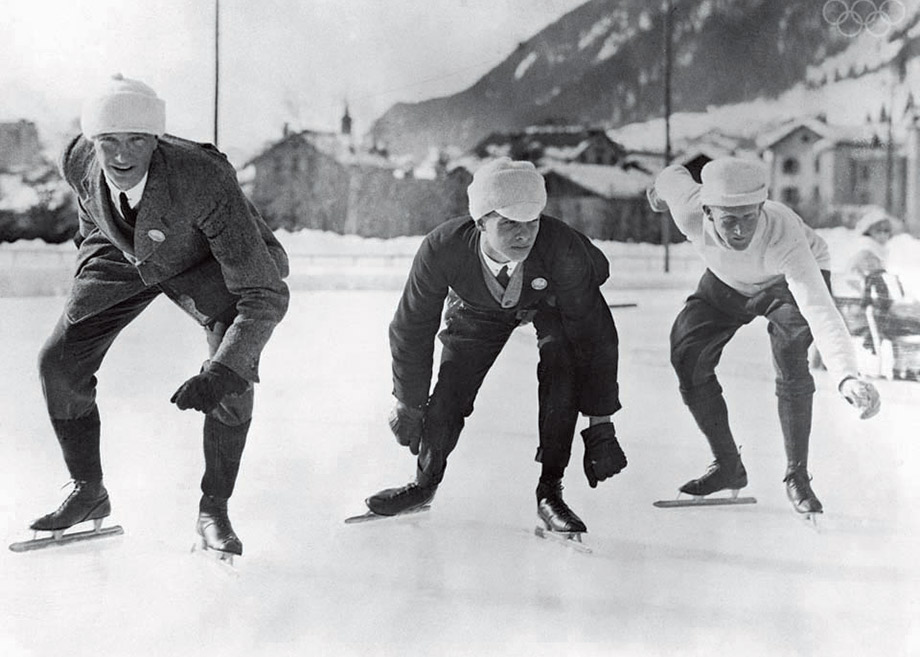
So, here is a line up of speed skaters ready to go at the 1924 Winter Olympics, the first full Winter Olympics.
Picture
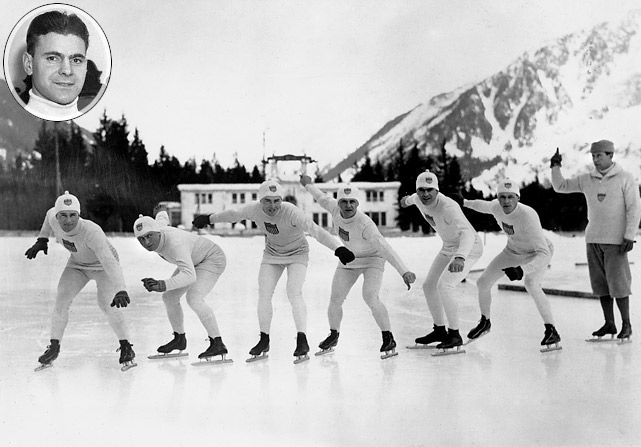
And here is the American team!! Again, the Americans have a sleeker uniform so it isn't surprising to find out the first gold medal in Speed Skating was given to an American (little photo in the upper left), Charles Jewtraw.
Picture
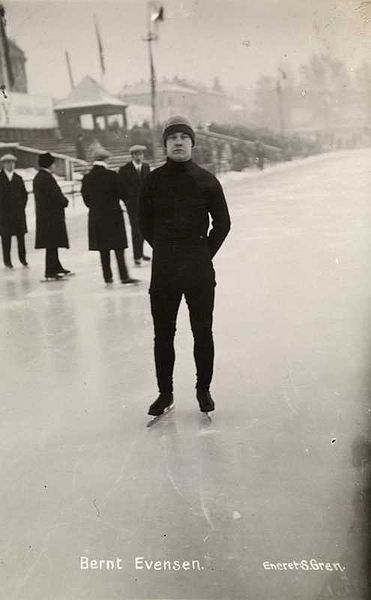
A Norwegian, Bernt Evensen, won the next time in 1928. He is wearing more sensible clothing.
Picture
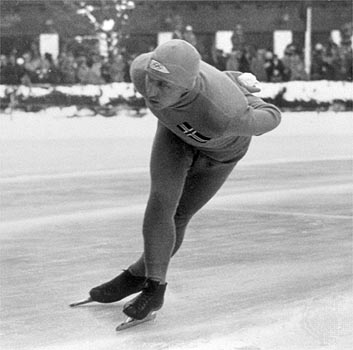
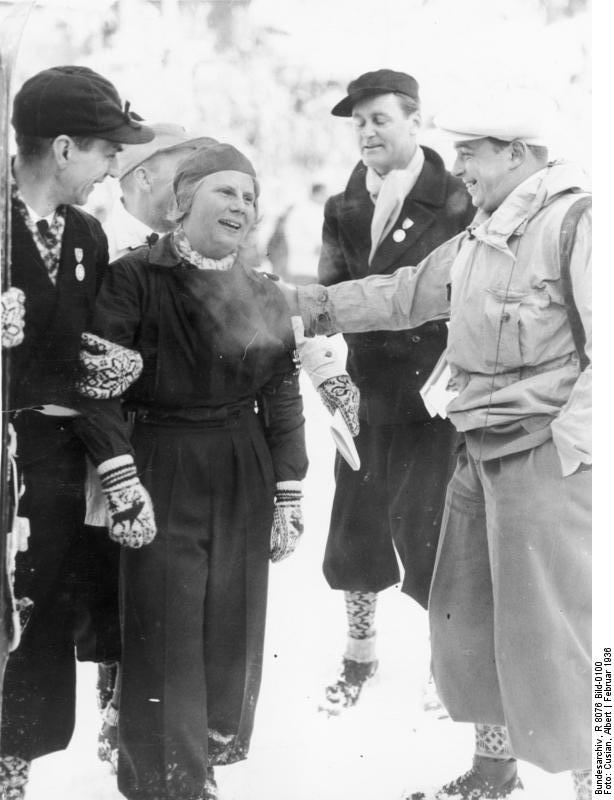
By 1936, the speed skaters are starting to look like they do today, just no sleek and shinny spandex. This is Ivar Ballangrud at the 1936 Winter Olympics.
Picture
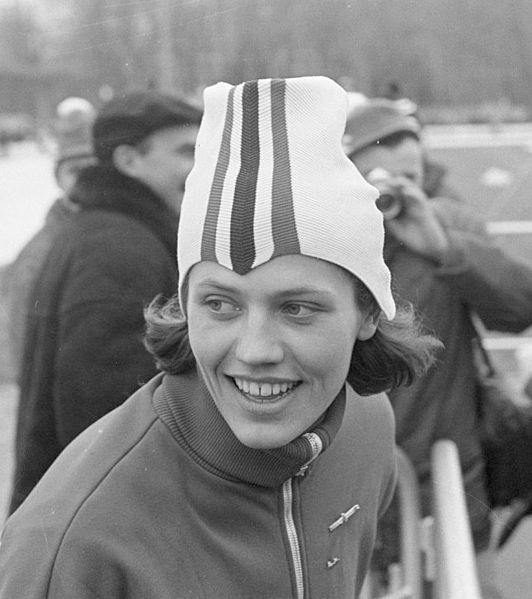
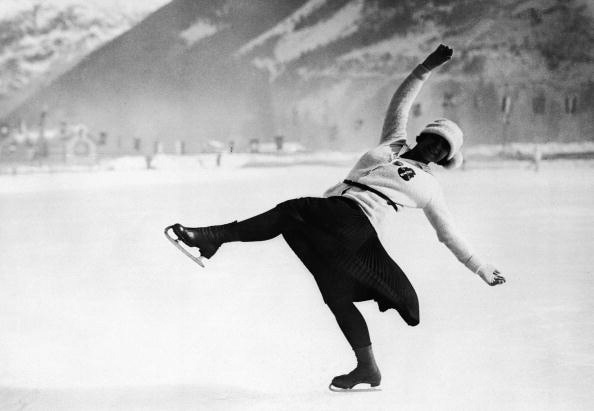
Women weren't allowed to compete at the Olympics until 1960, but there were still women speed skaters. Here is Norwegian, Laila Schou Nilsen, pioneer of women's speed skating in the 1930's. Her outfit looks like it would slow her down with those puffy wool trousers.
Picture
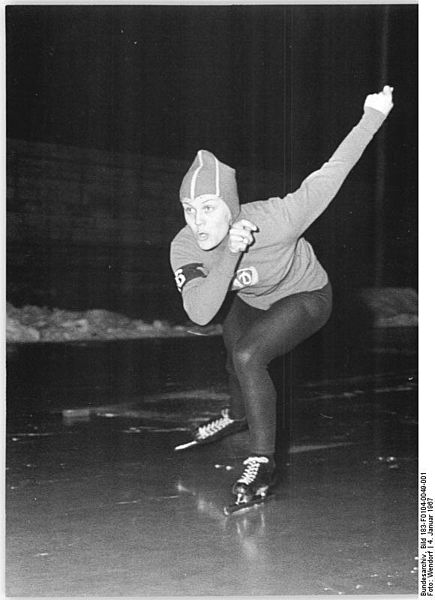
This is what the first woman Olympic gold medalist, Helga Haase, wore in 1960.
Picture
They must have thought hats like this would make you go faster.  All the skaters I'm finding from the 60's are wearing them.  This is gold medalist, Lyudmila Titova in 1968.

So, when did spandex work it's way into the uniforms ... I'm looking ...
Picture
1970 ... the hats are flattening out as we can see on gold medalist, Erhard Keller, but I'm not sure about the fabric in his clothing.  Could be some lycra, but not the super tight fitting things skaters wear now a days.
Picture
Picture
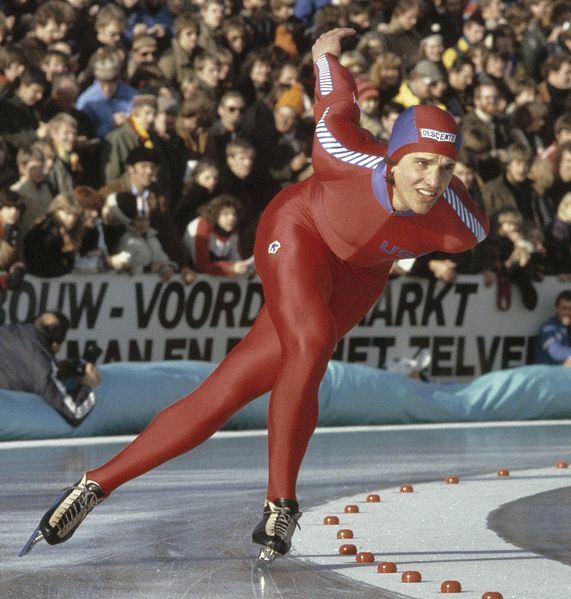
OK, here's a name I recognize, Eric Heiden.  It really looks like he is wearing spandex in 1977 and most definitely at the Olympics in 1980.  Since then, the uniform hasn't changed so much.
Picture
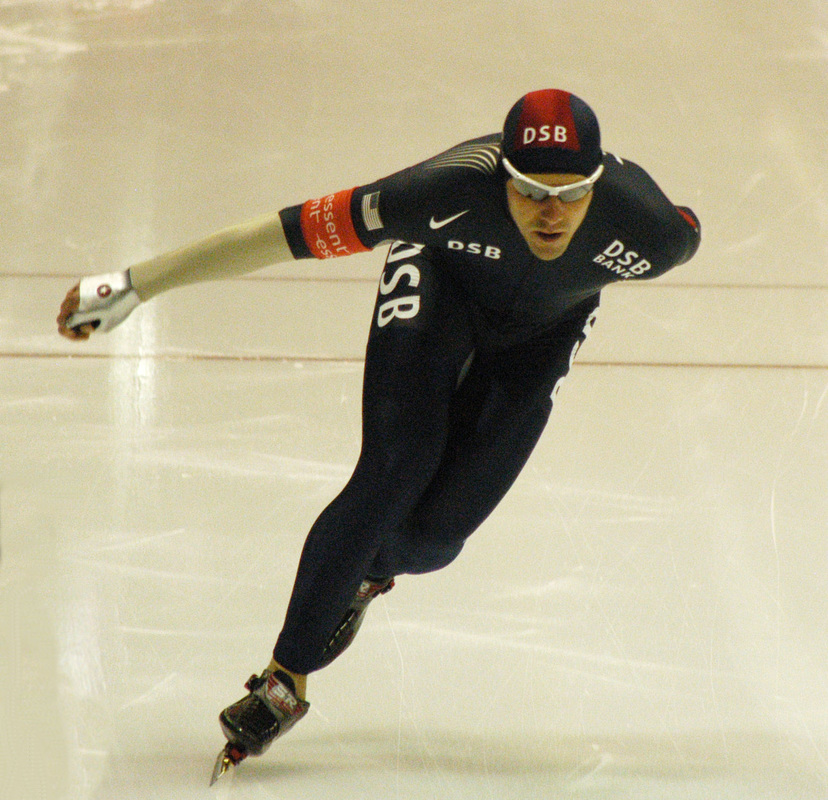
This is Chad Hedrick in 2008, I see a Nike swoosh, but this outfit isn't too decorated. I thought the speed skating suits were getting more and more colorful over time, but they're not really.  It seems some years they are dark and some times colorful ... no pattern I can detect.

Below is the outlawed uniform by UnderArmor, very dark and scary looking.
Picture
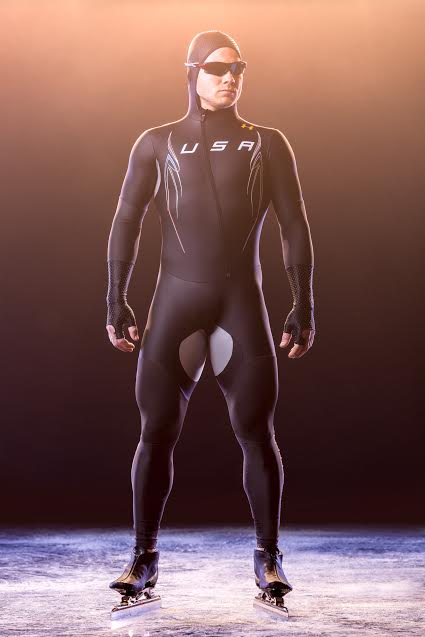
This garment is SO high tech!! If you want to know all the features, and there are many, go to this article ... Top Secret Speedskating Uniform.
3 Comments

Skating costumes - a retropective

2/17/2014

1 Comment

 
Last week as the Olympics were starting I heard a story on the radio about how upset some figure skaters were in the 1920's when the hem lines started to rise.  According to this story one skater in particular complained that her skirt was so short (6" below her knees).  She was worried people would see her bloomers when she jumped. 

I always love to watch the skating competition for the skating and, of course, the outfits!! 


... Remember Katarina Witt?
Picture
The outfits in the late 80's were starting to distract from the skating and shortly after that new rules were put in place to limit the amount of stuff that could go on a skating costume.

What happened to the simple skating dresses  like Peggy Fleming wore in the 1960's?
Picture
Until 1956 all Olympic ice skating competitions were held out side, except for Lake Placid in 1932.  So, the skaters needed warm outfits. Here's what Anna Hubler and Heinrich Burger, who captured the pairs figure skating competition, wore at the 1908 Summer Olympics, the first year for competitive Olympic skating.
Picture
Of course, I doubt they were doing any maneuvers like this.
Picture
And here is Madge Syers the Women's Champion at the same Olympics, with her ankle length skirt.
Picture
And below is Herma Szabo the Olympic champion in 1924 with a shockingly short skirt!! I don't see any bloomers!?!
Picture
Sonya Henie was the first big named famous figure skater.  She won the Olympic title in '28, '32, and '36. She was much more athletic and wore even shorter skirts.


Don't you just love this velvet?? I wonder what color it was?
Picture
See how tall and close fitting her boot is.  Until about the 1970's skating boots were very soft to allow for flexibility.  Even Peggy Fleming's boot were like that.  Skaters were not doing the wildly difficult jumps that require such substantial ankle support. Lots of spinning and squatting down low were the tricky things they were doing.


Next we have Olympic winner Barbara Ann Scott, the Canadian darling in 1948.  Now the skirts have gotten as short as they are now, but you can see she still is dressed very warmly with that adorable embroidered cap.
Picture
This is Tenley Albright, the 1956 Olympic Figure Skating Champion.  I find it so interesting to see the outfits evolve as the skaters become more athletic.
Picture
So, this brings us up to Peggy Fleming in the 1960's.  If you want to see more photos like this, check out these 3 articles.  

Cosmopolitan article
Sonya Henny popularized the wearing of short skirts
Older Skating outfits on Mintage Vintage Clothing
1 Comment

Sewing Machines in Art and Music

2/14/2014

1 Comment

 
Picture
The Artists Wife at the Sewing Machine, by Ignat Bednarik
I'm wrapping up Sewing Machine week with a little art and music.

Many artists have painted sewing machines and women using them. Sewing machines actually used to look like pieces of art.
Picture
I've seen many tables made with the legs and treadles of old machines.  This one here is particularly beautiful, I think.

Click this link for a whole page of fabulous imaginative furniture using old machines on Pinterest.
Picture
Sometimes sewing machine parts are used to make a piece of art like this piece "Walking Ship" by Greg Brotherton from the future Museum of Realist Art in East Boston. 
Picture
Have you ever been in an All Saint's store? The first one I saw was in London, but they are in many cities around the world now. There is one in New York, for sure. I should write about their clothing in some future blog, because it is really interesting, but everyone of their stores is filled with vintage sewing machines.  Usually in the windows, but often all over the store. Here is a photo from the New York store.
Picture
This man has done something really interesting with sewing machines. His name is Martin Messier.
Picture
This from the Youtube page ...
MESSIER DOESN'T SEW : HE RESUSCITATES OLD SINGERS PUT ASLEEP YEARS AGO IN ORDER TO RELEASE, IN SOME MAGICAL WAYS, THE LUMINOUS AND SONOROUS PRESENCE OF THE PAST. HE CARRIES HIS PUBLIC IN A DREAMLIKE UNIVERSE WHERE EACH MACHINE, AS SINGULAR SUBJECT, IS MAGNIFIED. AFTER YEARS OF SILENCE, SEWING MACHINE ORCHESTRA IS GIVING SPEECH TO THESE SURVIVING OBJECTS OF THE INDUSTRIAL ERA.
Here is another video of cool a musical sewing machine on Vimeo.  I can't figure out how to embed this one in my blog. You will have to click on the link to see it, but please do, it is really interesting. It is by lara grant - you can see her other work if you click on her name.
And I conclude with an honest to goodness "Sewing Orchestra" It is from the Ridtweld Academie Fashion in Amsterdam. Many of you know I am a flutist and a classical singer. My college degree is in music, so I particularly like this one.
1 Comment

Sewing machines meet the 21st Century

2/13/2014

0 Comments

 
I have to confess ... my wonderful, reliable 20 year old Bernina has been showing it's age.  A few years ago I had to have major, major repairs done to it.  And now, I just want something better.
Picture
THIS IS WHAT I'M GETTING!!!!

It will be my very first computerized machine, which is something I've been avoiding.  I've always felt I wanted a reliable uncomplicated machine.  But, HEY, this machine does all sorts of cool things, like cut the threads off with the touch of a button, inside the machine! And then start the next seam without the threads coming out of the needle or getting tangled.  It also adjusts for a wide variety of fabrics, by a menu on the touch screen.  And there are a bunch of useful and decorative stitches.  Now, I never use those fancy stitches, but this machine will write words!  That is something I might do.

It is an extra large machine, too.  The harp area is big, which will make sewing bulky things easier ... sigh ... but I have to wait a few weeks for it to arrive.

And the funny thing is, two days after I ordered this machine my 20 year old Bernina just stopped, mid seam. (I think it knew it was going to be set aside) So, I am now sewing on my 1970's Bernina.  It is the famous 830 that is so hard to find, because everyone wants one.  A very good back up machine!

I would love to hear from people about fancy sewing features on other sewing machines that they love. 

Please leave comments.


Now I'm getting into technology. I'm a relatively new iPhone owner, so I decided to see if there were any sewing machine apps.  And there are.
Picture
Picture
Here are a couple screen shots from an iPhone app called "DIY Household Sewing Machine" it walks you through maintenance for drop-in and bobbin case machines. I own this.  It cost $0.99.  Not bad. 
Picture
Picture
These are screen shots from an Android App called "Sewing Machine Master." It is an all encompassing how-to. Don't own it. It's free and there are reviews.  It gets 4.1 out of 5 stars.
Picture
Picture
These are from an Android App called "Sewing Guide." It sells for $1.37.  Again, not owning an Android Phone, I don't own it, but there are reviews if you go to the website by clicking on the highlighted words.
There actually are quite a few Android Apps. I found an article that reviews ten of them. Click this to go reviews of ten great Android sewing machine apps.

AND, there are even sewing machine games.  I've tried two of them, "Sew'em'up" and "Sewing Machine Race." Both of these require youthful coordination and reflexes and time to spend learning them.  Here are a couple screen shots for the "Sewing Machine Race", the most popular sewing game. It is basically a game where you have to chase this lady bug without running over buttons, bobbins and pins by tilting your phone back and forth ... HARD!
Picture
Picture
Unfortunately, my screen usually looks like this ...
Picture
And for the most interesting App I've run across, watch this.
And if you are thinking this app is too good to be true ... I'll just tell you it was released on 4-1-13. ;-)
Picture
And this is the current view out my studio window. Everything is closed today.  Guess, I'll spend some time sewing!
0 Comments

Zen and the Art of Sewing Machine Maintenance

2/12/2014

2 Comments

 
“The test of the machine is the satisfaction it gives you. There isn't any other test. If the machine produces tranquility it's right. If it disturbs you it's wrong until either the machine or your mind is changed.”  (― Robert Pirsig, Zen and the Art of Motorcycle Maintenance)

I can still hear my mother's voice ... "WHEN DID YOU LAST OIL MY MACHINE?? ... IT SOUNDS LIKE A THRASHING MACHINE!!!"


In addition to sewing on my treadle sewing machine when I was a kid, I did sew on my mother's machine when ever I could.  It could zig zag and make buttonholes after all.

And, she's right.  A sewing machine does sound like a trashing machine if it hasn't been cleaned and oiled for a while.
Picture
Fabric lint will work it's way in everywhere!
Picture
When I was a kid, oiling a machine was a much more tedious job than it is now a days. The diagram above is very similar to the one for my mother's machine.  Every place with a letter and an arrow was supposed to get a drop of oil.  And then after the machine was oiled, you needed to sew with some scrap fabric until any excess oil worked its way out of the system or oil would end up all over your project.

This was something a teenaged seamstress was not in the mood to do.  Especially when all she wanted was to see her finished garment.
Picture
But before I go any farther on this topic, I must say the most important part about oiling any machine is ...
CLEAN OUT ALL THE LINT FIRST !!!!
If you don't do this, the oil will glue the lint together and reek havoc in your machine. It will most likely mean a trip to the repairman.

“Is it hard?'
Not if you have the right attitudes. Its having the right attitudes thats hard.”
 (from Zen and the Art of Motorcycle Maintenance)

So, I confess.  I haven't changed that much since my youthful sewing days.  I still don't like to stop and clean my machine when I'm in the middle of things.  This is what my machine sounded like a few days ago.
YUP ... a thrashing machine ...

New machines only require the hook mechanism be oiled.  The upper part of the machine is lubricated with some fancy industrial stuff and my manual says never open it up.

Fine with me!

“One of the first warning signs of impatience is frustration at not being able to lay your hand on the tool you need right away.” 
(from Zen and the Art of Motorcycle Maintenance)

But, seriously, read the cleaning and oiling section of your machine manual thoroughly, when you first get your machine. This is the most important part.  The other sections you can read as needed.

Here are the steps I need to take when cleaning and oiling my machine.
Picture
open the bobbin trap door
Picture
remove the bobbin
Picture
take out the hook
Picture
brush everywhere you can reach underneath - blowing or canned air is good too, but not before you've brushed and used tweezers to get as much out as possible first
Picture
take off the foot and pop off the throat plate
Picture
release the ring that holds the hook mechanism in place
Picture
brush the feed dogs
Picture
THEN put a few drops of machine oil where the manual says to
I like to let the machine run a bit while I'm oiling.
Sounds better!  Even when all the parts are put back in place. No more metallic rattle.

“The place to improve the world is first in one's own heart and head and hands, and then work outward from there.” (from Zen and the Art of Motorcycle Maintenance)
“When you make mistakes yourself you at least get the benefit of some education.” 
(― Robert Pirsig, Zen and the Art of Motorcycle Maintenance)

If you want to read more quotes from the book, click on this - Quotes from ZenAnd The Art Of Motorcycle Maintenance: An Inquiry into Values

If you want to read the whole book, click on this -
PDF of Zen and the Art of Motorcycle Maintenance.
2 Comments

Bobbins - drop-in vs. bobbin case

2/11/2014

8 Comments

 
Picture
Which is your preference?

I've sewn on both, but have only owned one drop in bobbin machine. Every industrial machine I've ever worked has had the separate front loading bobbin. Well actually, machines that straight stitch only load the bobbin on the side, like my treadle machine I showed you yesterday and zig zag bobbin case machines load in the front.
Picture
I've been told by a couple repair men that machines with take out bobbin cases have a stronger stitch and don't go out of alignment as readily.  So, that clinched it for me. I'd always seemed to end up with front loading machine, but now that is all I will use, if given a choice.

Here are some other reasons why I prefer a front loading bobbin.
Picture
When the bobbin case is out of the machine you can adjust the tension with a little screw on the side.  The tension can be tested by holding the bobbin by a thread.  It should drop very slowing in this position if the tension is correct and stop after about 1 1/2".
Picture
AND! a couple years ago the screw on my bobbin case got stripped. The tension was just off ... way too loose, so I simply bought a new bobbin case and the machine ran like new.

Then I kept the old bobbin case with the too loose tension exclusively for elastic thread and that thick nylon thread that's good for gathering heavy fabric.
Picture
Now I realize not all drop in bobbins are the same.  The one I own is a 40 year old Elna Lotus.  It is all metal like the one above.  The bobbin tends to rattle around when sewing.  I loaned this machine to someone who was learning to sew a number of years ago and she found that it kept coming unthreaded and just couldn't use the machine.
Picture
This drop in bobbin looks much newer.  I'm sure the problems I had with my old drop in bobbin have been solved.  But, folks ... tell me why you like drop in bobbins.

I found a discussion on this topic on Etsy. Click to read the whole thing. Basically what I get out of it is, drop-in bobbin machines are easier to thread, but front loading bobbin case machines are hardier.

Now, of course, if you can get your hands on one of these old chain stitch machines, there are no bobbins at all to worry about!
Picture
A good friend of mine wrote me yesterday, after she read my Treadle sewing machine blog, to tell me that she learned to sew on one of these machines!

Read a very complete description about this machine on the Sew A Lot website.
Picture
This shows a diagram of how the stitch works under the throat plate.

And even better ... here is a short video showing this mechanism in action.
My friend said, on the up side, it was really easy to take out your mistakes ... but sometimes things came apart when you didn't want them too!
8 Comments

Treadle sewing machines

2/10/2014

5 Comments

 
Picture
This is the sewing machine I learned to sew on.  It is also the sewing machine my mother learned to sew on. It was my Grandmother's and she got it in 1920, the year she married my Grandfather.

It was giving to me on my tenth birthday, because my mother and her siblings decided to give my Grandmother her first new machine since she got married, a top of the line electric sewing machine for her 65th birthday.  The store where they bought this new machine was only going to give them $10 to trade in for the treadle one, so my mother decided to pay the $10 and give it to ME!! So much better than any toy sewing machine.
When you open the lid, there is a wire that pulls the machine up into working position.
Picture
I haven't pulled it out in a long time. I keep thinking I should clean it up so I can use it when we loose power, which happens more often that it should.

There are quite a few websites that support the use of treadle machines. They offer tutorials for cleaning and lubricating old machines and sell parts. If you are interested, I think Treadle-On is the best. Click here to check it out.
Picture
All the parts are here except the manual.  I found one on Ebay a few years ago.
Picture
It is so fun to see the instructions and illustrations in that book and then look at my machine and it looks exactly the same.
Picture
Picture
Someone about 100 years ago read this booklet and sewed herself something!
There are SO many feet!  A few I'm not quite sure what they do.
Picture
These feet will make double turned hems in 5 different sizes.
Picture
I'm guessing this foot guides folded fabric under the needle to make large tucks.
Picture
This one looks like it helps to apply ribbons and tapes on straight.
Picture
This foot makes lots of tiny little tucks, like gathers. I have a foot like this for my 1970s Bernina.
Picture
This one folds and applies bias tape.
Picture
And they all fit into this sturdy metal storage box.
Picture
Well, of course, every part of this machine is metal.  That's why these old machine still work so well when cleaned up.
This machine will only straight stitch forward.  It doesn't even go backwards, but I really used this machine, a lot, all the way through high school. It was very cool to be able to sew anytime I wanted, without asking permission or waiting until my mother's electric machine was unoccupied.

I tried all the feet, made doll clothes, my clothes, costumes, curtains for my bedroom and presents for people.

If you've never seen one of these in action there are a few Youtube videos you can watch.  This is the best, I think. It shows the correct placement for the feet is one foot forward and one foot back, not the feet side by side like another video I saw.
What was your first sewing machine experience? I love stories.
5 Comments

Sewing for Barbie

2/7/2014

9 Comments

 
I got my start as a designer sewing for Barbie and she has been the inspiration for many others.
Big named designers have created amazing outfits for her, mostly as one of a kind art pieces.
Picture
Wedding dress by British designer Freddy Fox
Picture
My family knows how important Barbie has been for me and over the years have giving me Barbie books.

The one on the right "Barbie, what a doll", is basically a photo album of lots and lots of her outfits from the beginning, 1959, until 1994 when the book was published.

I love this book because it has good studio shots of what the Barbie clothes I own looked like before I played with them to death, like this beautiful wool knit career suit. Barbie started off as "the teenage fashion model." I still have all the pieces to this outfit, except the neat red hat box!
Picture
The middle book, "The collectible Barbie" focuses on collecting, no surprise. This book has a photo of MY Barbie case ... very exciting!

Read my previous blogs to see the one I own filled with clothes.
Barbie blog
Ken Blog
Picture
The book I like the best, is "Barbie, her life and times" by BillyBoy.  It is a detailed account of Barbie's origins filled with beautiful photos of Barbies from 1959 - 1987, when it was published.  But, all I care about, really, are the early Barbies.  This is one of my favorite photos in this book. It shows another outfit I own, in perfect condition.
Picture
I don't think there has ever been such a Barbie fan as BillyBoy. He convinced a huge number of very famous designers in the late '80s from France, Italy, England, and America to create wild ensembles for Barbie and Ken.  Below are just a few.
Picture
Picture
Gown by Valentino, hair by Sergio Valenti!
Picture
Sweaters by Perry Ellis
Picture
Fun outfit by Kenzo
Picture
two outfits by Yves Saint Laurent
As a professional toy designer and designer of patterns for home sewing, I have gotten to design and make lots of clothing for Barbie and Barbie sized dolls.
Picture
Picture
These two were for a Hanna Montana doll (now that was a few years ago!) and were meant to be sewn in a factory not by the home sewer.

When making something that will be sewn in a factory, I know exactly what fabric will be used for each piece and that can make a big difference in the fit of the garment. Also the ladies who sew these clothes are experts in working on this scale.  The seam allowance used is 3/16" instead of 1/4" that I use when making home sewing patterns. So, the fit of factory made dolls clothes will be much better.
Picture
Picture
Picture
These are my reference photos of the most recent fashion doll clothes I made for Simplicity. Including, below, front and side of Kate Middleton's wedding dress.


The original concept for this pattern was to make REALLY simple pieces in 3 sizes for Barbie, Bratz, Liv, Moxie, etc.  But, half way through Simplicity called and asked me to include the wedding dress.  So, pretty much these are easy piece, except for the wedding dress.


There is a lesson for sewing tiny doll clothes on the Simplicity website I wrote when I made this pattern.  It talks about fabric choices and has tips such as using tweezers to guide the fabric under the machine needle.  Click here to check it out.

One more word of caution about this pattern.  The sizing can be confusing because Simplicity judged the 3 sizes by height, but it should really go by body measurements.  Barbie and Liv are Large, Moxie is Medium and Bratz is small.

Here are my basic body measurements for these dolls. I'm going to give you 4 measurements in this order ... Bust, Waist, Hip and back waist length (nape to waist) for each size.  Then measure your doll to determine the size.

Large -    5"-    3 1/8" -   5" -      2 1/4"
Medium - 4" -   2 7/8" -  4 1/8" - 1 5/8"
Small -  3 1/2" - 2 3/8" -  3 5/8" - 1 3/8"

Please write with any questions about these clothes!

Picture
Picture
Well, this has turned out to be Barbie week.  I forgot how much I loved playing with her.
9 Comments
<<Previous
Forward>>

    From Andrea 

    I am a commercial pattern maker who is now "sewing over 50"!
    I love to sew and hope to encourage others to come back to sewing.
    The water is fine!!

    Archives

    August 2019
    July 2019
    June 2019
    May 2019
    April 2019
    March 2019
    August 2017
    July 2017
    June 2017
    May 2017
    April 2017
    March 2017
    February 2017
    July 2016
    June 2016
    May 2016
    April 2016
    March 2016
    February 2016
    January 2016
    December 2015
    November 2015
    October 2015
    September 2015
    August 2015
    July 2015
    June 2015
    May 2015
    April 2015
    March 2015
    February 2015
    January 2015
    December 2014
    November 2014
    October 2014
    September 2014
    August 2014
    July 2014
    June 2014
    May 2014
    April 2014
    March 2014
    February 2014
    January 2014
    December 2013
    November 2013
    October 2013
    September 2013
    August 2013
    July 2013
    June 2013
    May 2013

    Archives by Subject

    To search for blog posts in specific categories, use the drop down menu above by hovering over the word "Blog"

    Enter your email address:

    Delivered by FeedBurner

    RSS Feed

    Andrea Schewe participates in Amazon's associates program.