Andrea Schewe Design
  • Home
  • Costumes
    • Reader's Gallery
    • Fantasy Costumes
    • Theatrical
    • Historic >
      • Easier to make
    • International
    • Costumes for Kid's and Babies
  • Crafts
    • Home Decor >
      • Pillows
    • Fashion Accessories
    • Doll Clothes
    • For Kids and Babies
  • Blog
    • Past Blogs by subject >
      • My patterns by number
      • Sewing basics
      • Personal sewing Projects
      • Fashion History
      • Fun and funny stuff
      • Guest Bloggers
      • Crafts and Home Dec
  • Links
  • Contact

Dress Doctor - ripped wedding veil!!!

7/30/2014

3 Comments

 
Picture
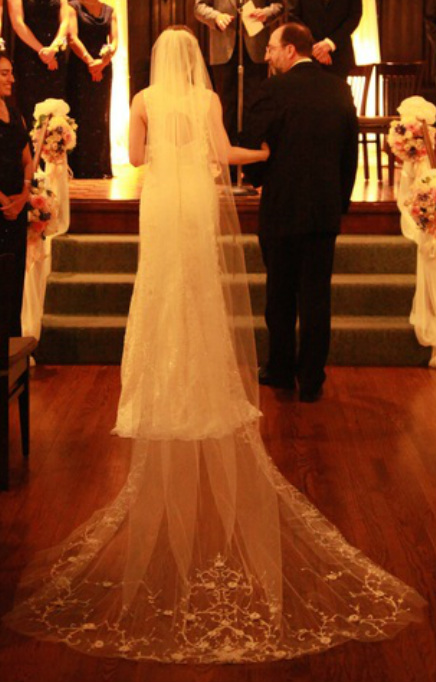
Isn't this the prettiest veil!

I recently attended the wedding of really close family friends.  We all became friends because the bride and my older son were in the same kindergarten class. I've known this bride since she was five.

So, I was happy to be able to help them out in their hour of need.

It was maybe 4 hours before the wedding and as I came out of the shower I glanced at my cell phone and saw that the Mother of the Bride (hence forth referred to as MOB) had left me a voice mail. WELL! one does not ignore a voice mail from the MOB 4 hours before a wedding.  It must be important ... and it was!

This beautiful wedding veil was ripped.  I asked if the tear was vertical or horizontal, figuring a vertical tear might be able to support the weight of the beading, but no ... it was horizontal. She said someone there was talking about trying to fix it with double sided tape. I knew that wasn't going to work.
Picture
Picture
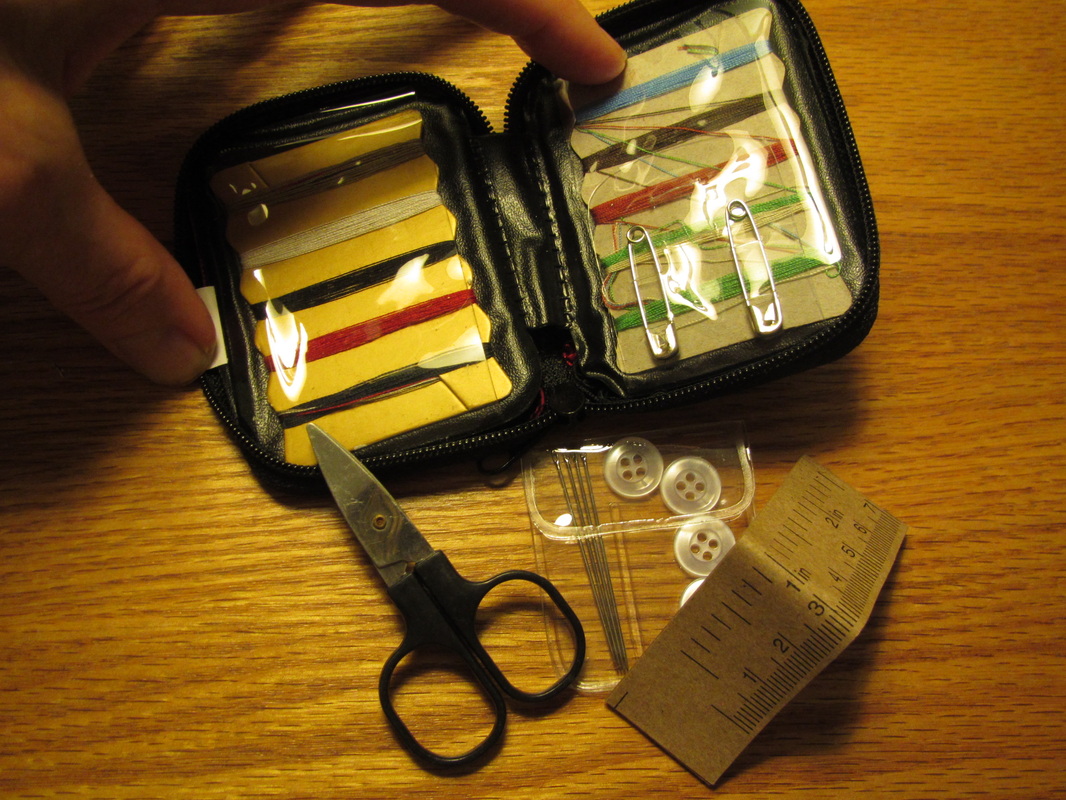
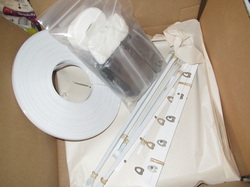
Then, I remembered I had thrown this little mending kit in my suitcase. It had been thrust in my hand by a generous vendor at Costume Con this year in Toronto.

THANK YOU KELLY-FRANCIS

In it was just the perfect shade of slightly off white thread to match the veil.
Picture
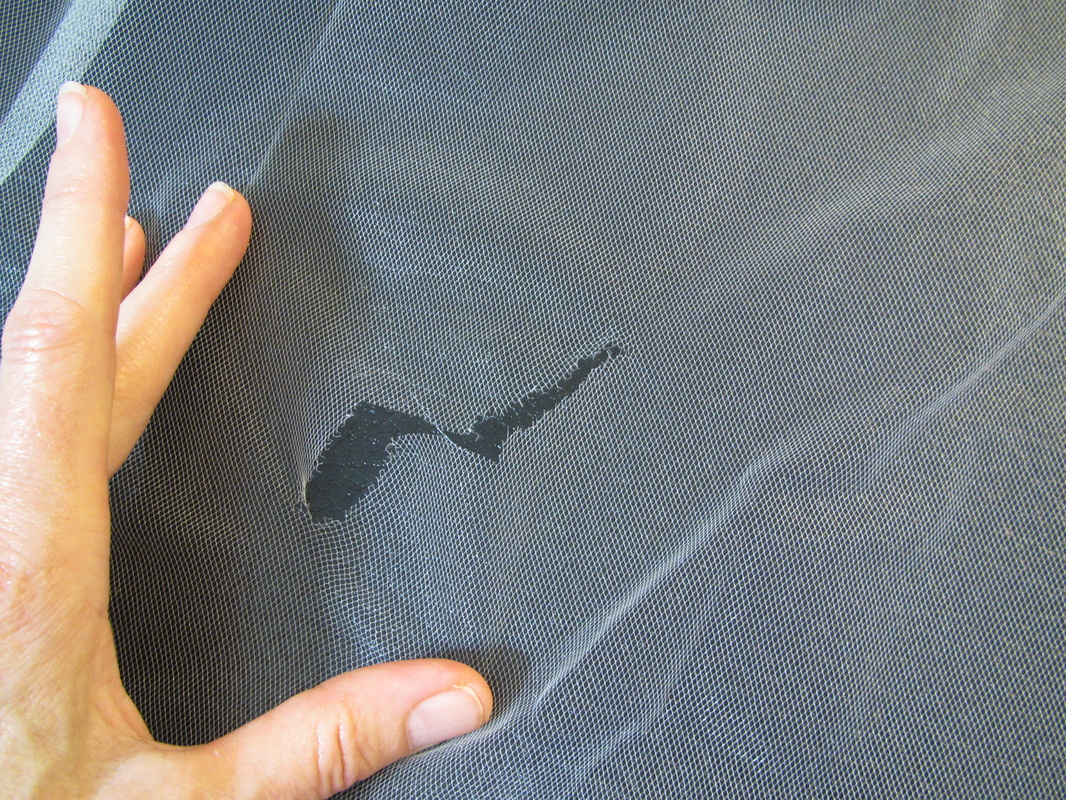
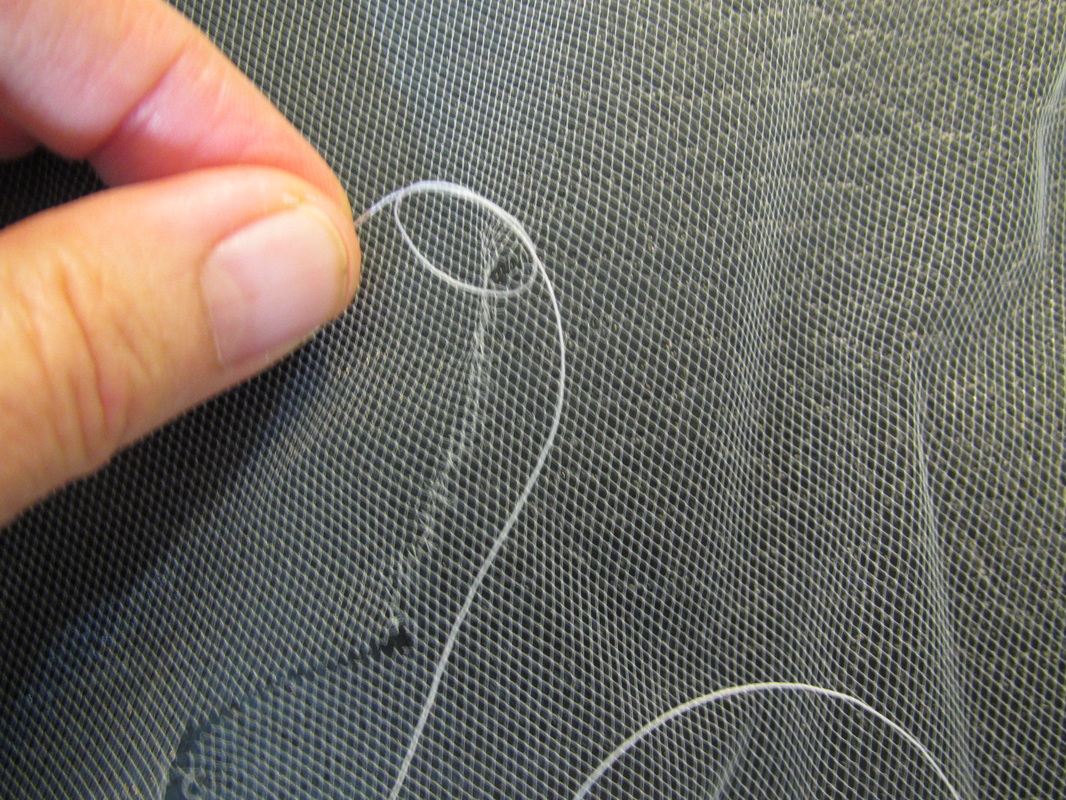
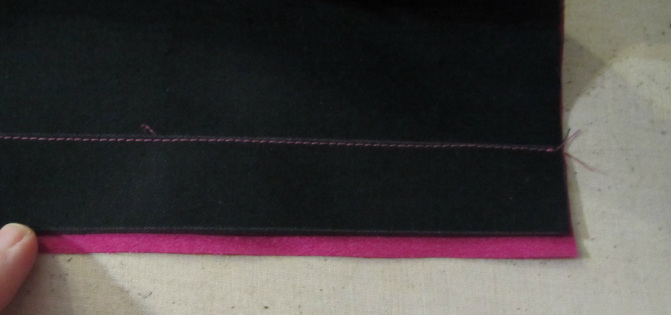
The MOB had the white wedding dress hidden the white sheets of the hotel bed. OY! white on white on white. I looked around for something black to put under the tear so I could see it more clearly, and this is what it looked like.

In case you are wondering, no, I didn't take photos of the mending process in the panic before the wedding. This is a recreated rip.
Picture
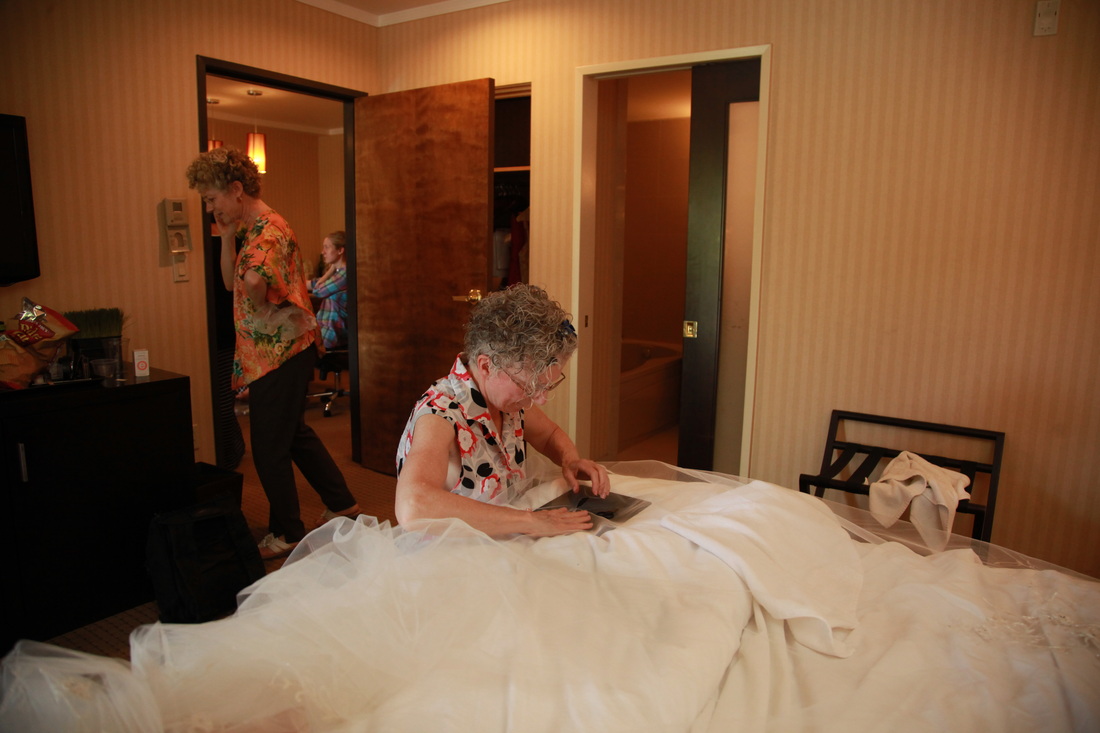
But, this photo IS me actually mending the veil. And, no, you are not seeing double. That is the Mother of the Bride, my dear friend, behind. We are often mistaken for sisters, even twins sometimes.
Picture
So much so, that several members of the groom's family, who had just met my friend for the first time the day before at the rehearsal dinner, mistook me for her as we were waiting around for the wedding to begin.  


We even dressed like twins for Halloween once, but I digress ...

Picture
So, this is how I made an emergency mend in this lovely veil.

First I slipped the thread through and tied a simple double knot and then pick up a tiny bit of the netting going from one side to the other.
Picture
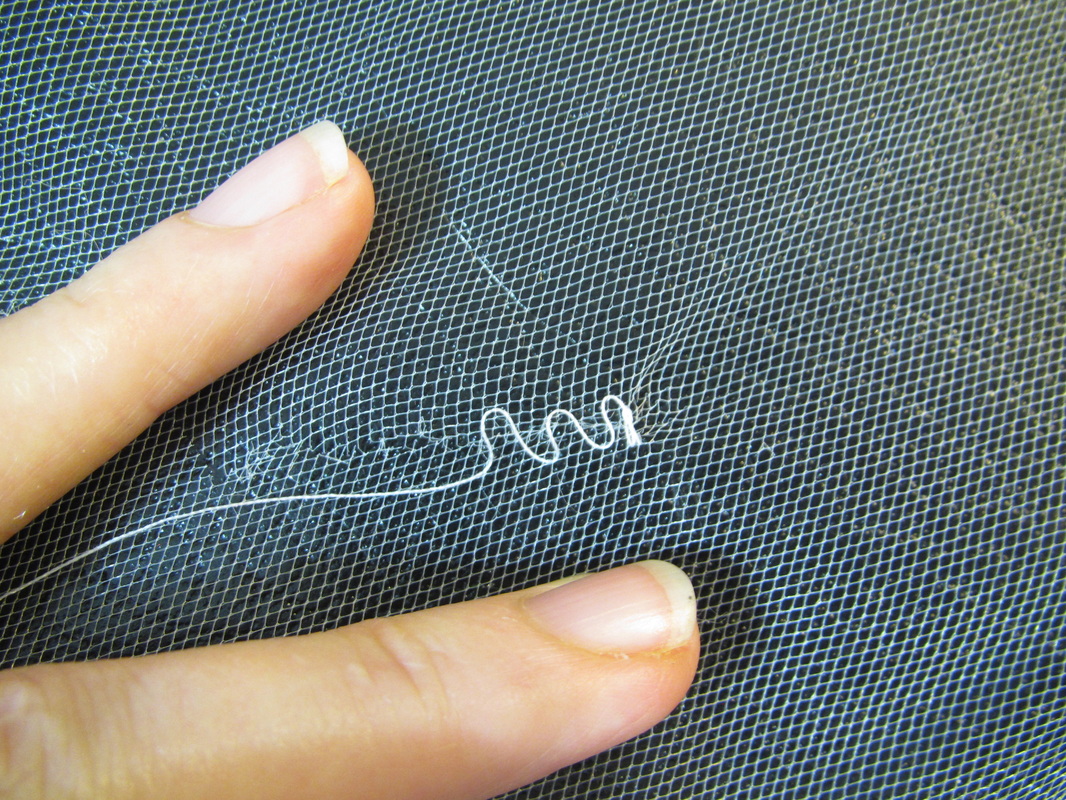
I am making sure to pull the stitches tight enough to hold the edges together but no so tight that it puckers.
Picture
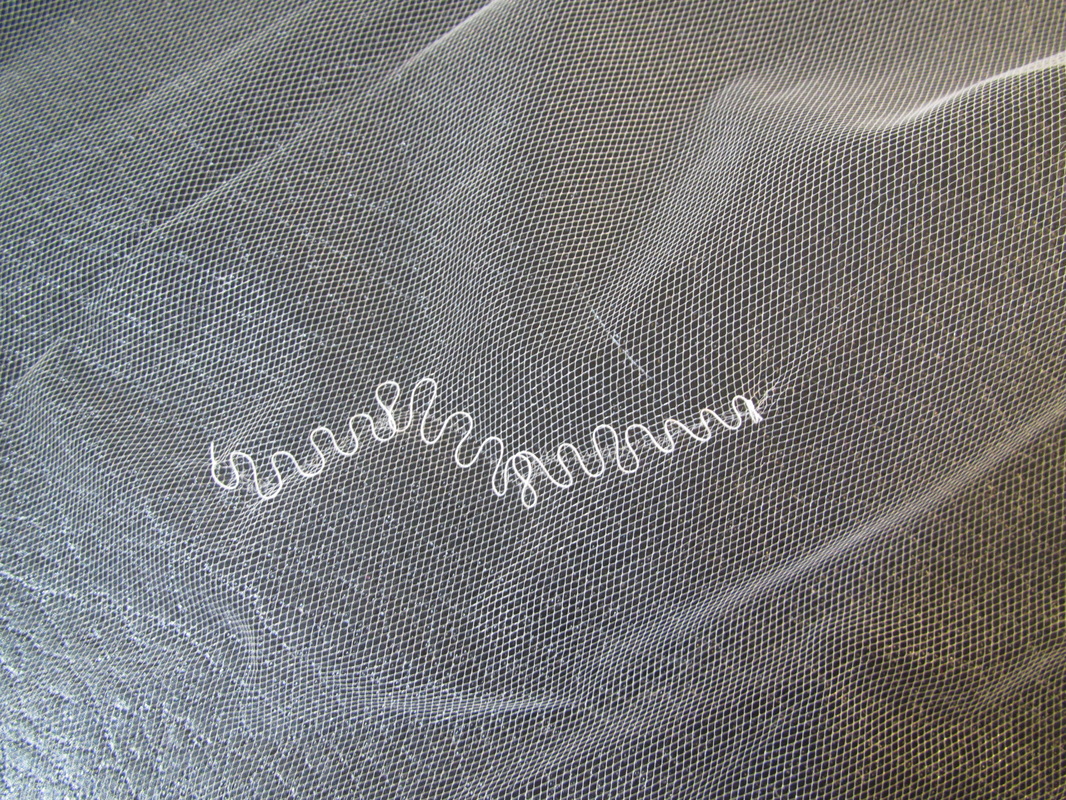
Here is it finished. I ended with a simple double knot like I began with.  Against the black, it looks like a really obvious bunch of stitching.
Picture
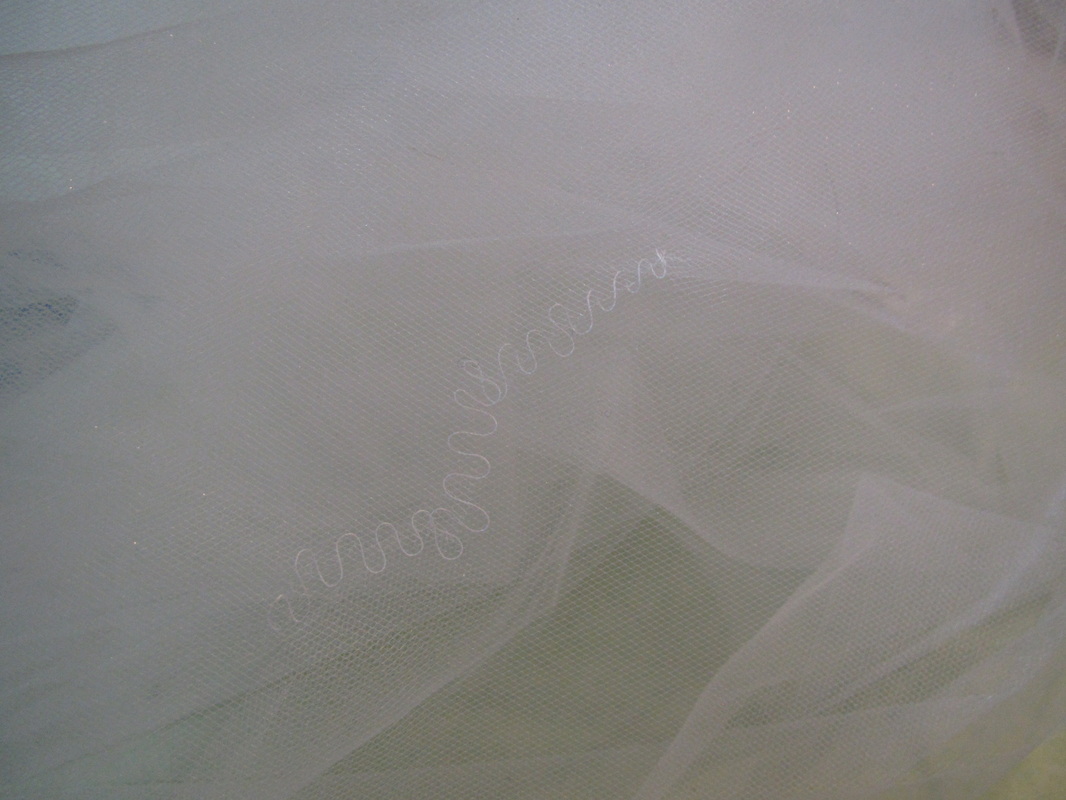
But, when it is put in front of the rest of the veil it starts to blend in. And this photo is still very close up.  As hard as I looked, I could not see the mend in the actual veil at the wedding ceremony.

On the one hand,I'm sorry the veil had to tear, but on the other, it felt good to be needed and to experience the fun and excitement of the bride and all her bridesmaids as they were getting ready for the ceremony.

It was a beautiful wedding and, I think, will be a great marriage!


Congratulations V & T!
3 Comments

Pattern #1345 - corset sewing

7/28/2014

2 Comments

 
Picture
Back in March, I spent about two weeks writing about corsets. Once I got started I just keep finding more things that needed to say.  Here are links to all those blog posts. You might want to check them out, or even re-read them.

Corsets and fashion silhouette
Corset history 1500-1900
Corset history 1900-present
Corset making - fabrics and bones
Corset making - other stuff
Corset making - bone tape
Corset - mock up fitting
Corset wearing

Today, I am going to to share some photos I made while sewing the corsets for this new pattern. 
Picture
Here is my final muslin I made for seams and balance of the shapes of the front panels. This is a very basic corset. Not from any history period.
Picture
I took the pattern for a good fitting corset and rearranged all the seams so there could be three color breaks for the design of the rainbow corset. 
Picture
This corset is sewn together with no boning yet, the front busk and back lacing in place for fitting. Ideally a muslin version has been fit before sewing up the real fabric. (read blog about fitting - link above) Corsets aren't really that hard to sew. As you can see it is just a bunch of parallel panels and seams. But a few of the seams are curvy and need clipping. Sometimes BEFORE the seam is sewn, so the two pieces can fit together better.  
Picture
Remember pattern piece should match in length along the stitching line, not the cutting line. This means that if the sides of the piece are very curvy, the cutting line and the stitching line can have different lengths and clipping into towards the stitching line allows the outer edges of the pieces to stretch which makes sewing the seams easier.
Picture
Here is the box of supplies I ordered from CorsetMaking.com. There are links to other suppliers in corset blogs I wrote. (links above) The roll of white stuff on the left is Rigilene that I've purchased just to have on hand for future work.

This set of corsets is being made with all the recommended materials for a strong durable corset. I'm using coutil for the interlining and steel boning with bone tape for support, and official front busk closures.
Picture
Inserting a front busk closure is very straight forward. I guess that's a joke ... ; )
Anyway, first mark the spacing for the clasps on the front facing piece.
Picture
Sew the facing to the front, skipping over the spaces marked for the clasps. Be sure to back stitch at each point.
Picture
Slip the clasps into the slots.
Picture
And edge stitch the facing down. A zipper foot is needed to get close to the busk. 
Picture
For the knobs on the corresponding busk piece, match up the two fronts and make a dot in the opening of each clasp.
Picture
Then use an awl to poke a hole through all layers at each marked dot. Using an official awl makes all the difference.  It doesn't break the threads of the fabric, but simply pushes them aside. AND it creates the exact size hole needed to work that little knob through.

Totally worth the investment. Here is the link to Wawak where you can buy one for $2.25.
Picture
Depending on the fabric you are using and how many layers, working the busk knob through the holes made with the awl can be easy or hard. But, no matter how hard it may seem, it will go through. Full disclosure though ... I have broken one or two nails doing this.
Picture
This is the fold-back at the center back which makes the casing for the back boning. This place does not need bone tape because the bone casing will be created by folding back the fabrics and stitching the casing line.

Note that I have first run a line of stitching on the fold line that will keep the fabrics together when they are folded. Also, see how I've trimmed back the coutil interlining.  
Picture
Coutil is very stiff fabric, so for the 1/4" hem fold, I like to trim it back so the outer fabric can fold around it. Then I stitch the hem through that.

If you look back up at the photo where I am slipping the busk piece with the clasps into place, you can see I've trimmed back the coutil for the facing piece in the same way.
Picture
After the final fitting and all adjustments are made, the seams all need to be trimmed back to 1/4" so the boning tape can be sewn over them and the boning inserted. Then the top and bottom edges are finished with bias binding. I still need to finish the ends of the bias tape on this one.
Picture
Now, a word on lacing.  If you really want to cinch in the waist of a corset tightly, the best way to prepare the lacing is like this. Allow long loops to come out at the waistline.
Picture
This means the the lacing needs to be tied with a small knot like this at the bottom on the inside.
Picture
Next ... pull tight! Tell the wearer to breathe in!
Picture
And tie.  I actually like the look of a bow made with double looped lacing.
Picture
I laced up all these corsets like that.


I hope you have fun with this corset pattern and don't feel as if you need to copy any of my versions ... let your imagination run wild!
2 Comments

Sexy skirts #1346 - Orange and the new Black

7/25/2014

0 Comments

 
Picture
At least, Simplicity made it into a new Orange and Black skirt after I sent it up to them.  This is what this skirt looked like when I finished with it.
Picture
You see, I already had this GREAT corset with the neat organdy ruffle-shrug thing for the neck and shoulders. It needed a skirt.
Picture
This was the sketch I had made for this skirt. I based it on a photograph of skirt I had seen, but that skirt was made of tulle. Also that skirt, I bet, had half of it long and half of it short.


I, on the other hand, had to make this skirt out of organdy to go with the cool neck/shoulder ruffle thing, that I loved so much I wasn't going to change.  And, I had to use the same pattern pieces I was using for some of the other skirts, which meant that the back/longer part was 2/3's of the skirt and the front part was only 1/3 of the skirt, which didn't allow the legs to show very well.


This is what I got ...

Picture
Not what I wanted ... grrrr ... think, think, think!

deadline looming .... 
Picture
What to do? So, I started playing around with ways to pull the fulness to the back.
Picture
First idea ... looked good from the front, but the back was kind of stupid.
Picture
Picture
So then I starting thinking about how wedding dresses are bustled and pinned the front corners of the long section together in the back. I pinned the black and orange layers separately.
Picture
For this effect.
Picture
And I pinned the sides of the outer organdy skirt to the short lining skirt to puff it out and hold it back.
Picture
Like this.
Picture
This is what I sent up to Simplicity with my samples. But, I have to admit it was a complicated solution.  
Picture
And after all that, look what happened to it in New York!  The perfect and simple solution!


I, also, put this diagram in the box with all the samples.
Picture
It shows how to arrange the feathers for the bustle.


Three feather boas are simply pinned to the bustle pillow that is part of the whole skirt/apron thing. Sewing feather boas is a super pain.  The thread is constantly getting caught up in the feathers.  I thought this would be a good solution AND later, if you want, you can take the boas off and use them for something else.
Picture


next time ...


the corsets.

0 Comments

Patterns #1345 & #1346 - design process

7/23/2014

8 Comments

 
Picture
The people at Simplicity noticed that many young people are dressing for Halloween by mixing and matching different elements, so they asked me to come up with a set of themed corsets and skirts that could be used in this way.

For some reason I found this more difficult to design that other patterns I've done, so I thought I would share with you some of this design process that started with their request for mix and match corsets and skirts and ended up with what you see in the photo above.
Picture
Take a look at my first sketch. 

For this I got the comment "good start!" I just wasn't quite understanding what the design department wanted yet.

With this sketch I sent along this note.


Current thoughts on potential Corset Pattern

I like very much the look of shabby chic and using lighter colors, but it would be nice to work in at least one view that is suggestive of Steampunk.  That would be a lighter colored Steampunk, not black, not leather look.

How many views are wanted???
Then, what variations are best ... mix and match
I really love the lacy one with the shaggy lace collar and rose. I also like having a little shrug that can be worn with a corset either with cap sleeves and/or long. And a stand up collar looks good.

So, when I know more what everyone likes, I will refine and sketch again.


I was told the shaggy lace one that I loved so much was too much of a "fashion" look, not the costume look they wanted.
Picture
What they wanted were specific themes and four views for each pattern.  So this is what it ended up being ... a witch, a rainbow unicorn, a saloon girl and a quasi steampunk look.
Picture
Even though it was to be two separate patterns, I designed each skirt to coordinate with each corset. They like to do what is call "editorial" shots for the catalog and I knew they would combine the pieces for some nice pictures like the one at the top of this blog.

Now take note of my hand written comment at the bottom of the skirt sketch, you will see what happened with that later. HA

Next came the choosing of the fabrics, which also I found difficult.  Simplicity has it's own line of trims and always prefers if I use them. And this time they sent me a big box of different trims and said "use these." So, I was doing my best to find fabrics that would work well with their trims.
Picture
Picture
The witch was easy. Black lace over orange ... no brainer and there were several interesting black trims. Choosing the fabrics for the rainbow one was fun. They wanted me to specifically use the rainbow rick rack. You should have seen my shopping cart at Joann's. I kept changing my mind as to the exact shade of the different colors of fabric, so I must have had 20 bolts loaded in there, falling off and bumping into things as I walked down the isles.
Picture
Picture
Again, to use the trims sent to me, I chose black and brown for the steampunk view. And because I wanted to add a long skirt, I chose this orange and purple stripe, which looked great with a couple of the purple trims. It was a stripy month for me!
Picture
Picture
All these trims were just making it so hard for me to see the forest for the trees. I found this terrific metallic magenta fabric for the saloon girl's corset and I was trying and trying to see which trims looked best.
Picture
But the choices weren't over ... sigh ... I had to find a fabric for the skirt! Nothing looked good to me.  But, I kind of liked this gold.  And I thought an optional long skirt would be a nice thing to offer.

Confession ... I'm always trying to put in too many choices in my patterns. I want to give people options, but it often ends up looking too busy and confusing.  So, you will see what Simplicity did to this when they got their hands on it.
Picture
I also sent in a photo of the the materials I wanted to use inside the corsets.  If you want your corset to open and close in the front, there really is nothing that will work as well as a busk closure that has to be purchased from a corset supplier. So, you may as well use steel bones and everything else you can get from places like that. That stuff just makes a better corset.

Picture
Don't you think this long skirt and bustle is CUTE!

I did.

But Simplicity, not wanting to confuse the message, thought all the skirts should be short and sexy, so chopped it off and re-hemmed it.  But, you can make it long again, if you want!
Picture
Picture
And look what happened to this one.  After I sent it in I got a call saying they thought the gathered apron was too full and could they cut it down.  I said, of course. But didn't realize they were going to totally remake it in another color, but I like what they did.

And the orange and black skirt went through an equally big change I will show you next time.

I am SO glad this wasn't my first project with them. I don't think I would have ever been hired back to do another. So many mistakes and false starts, but we are all human!!
Picture
8 Comments

Toddler Owl - pattern #1351

7/21/2014

0 Comments

 
Picture
Picture
Back to Halloween and my newest patterns this week.


A couple weeks ago I  posted two blogs about this set of toddler costumes.


Today I'm going to show you how I worked on the face for the owl, and share a couple "oops" I made along the way.

Picture
Owls have been pretty popular lately so I had no trouble finding cute images on line which helped me make my sketch to get started.
Picture
The first thing is to partially sew the hood together and hem the front edge.

Then, I felt confident about the color I wanted the larger eye mask to be, so I appliquéd it on with a small zig zag stitch, but I wasn't sure about the rest, so I cut out felt shapes to experiment.  The black line around the eyes proved to be too strong, I thought.
Picture
So I opted to outline the eye with the same color as the body, a rich mustard yellow.
Picture
The first time round with the zig zag was showing too much of the fabric through the stitches, so I made a second pass.
Picture
It is usually better to do two times with a looser zig zag than once with a super close together one.  Close zig zagging can make the fabric ripple and the more I looked at the stitching around the larger eye mask, it was really bothering me how ripply it was. (look at the photos above) I couldn't steam it out either.  So ... out comes the good old seam ripper.
Picture
And I CAREFULLY picked out the stitches all around the light yellow eye mask, inside and out.
Picture
And restitched it with a looser zig zag.  It's polar fleece and the thread is going over fabric the exact same color, so a close stitch really isn't needed.
Picture
Now for the beak.  Even though the seam allowance was small to start off with, I trimmed it down to about 1/8" so it would look smooth after turning and stuffing.
Picture
Then I stuffed it and pinned it in place.
Picture
And zig zagged around it ... pretty cute!
Picture
BUT!!! &#*%#)!

Dang ... I hate it when that happens! I caught some of the other part of the hood when stitching the beak ... well I'm getting a good workout with the seam ripper ... ha ha!
Picture
Here he is all done.  The wings were very easy.  Separate shapes with batting inside then just hand tacked to the sleeves.


Next time ... the costume corsets and skirts.
0 Comments

T-Shirt - ombre tie dye - first attempt!

7/18/2014

0 Comments

 
Picture
OK, it turned out better than I thought. But, there will be a second attempt to incorporate what I learned doing this one.
Picture
Anyway, back to the dye pots. I did a bunch of tie dye projects last summer with varying degrees of success. The two dresses I still love and wear regularly.  

Here are links to those posts.
 Tie dye dress second try. ... First tie dye dress saved!
Picture
Picture
I've seen this style of ombre tie dye on a few people recently.  I wanted to make mine with three colors and first pulled out 3 different greens, but after some consideration I thought it would be safer to use grey to dark blue.
Picture
I wanted the color breaks to be just under the bust so I drew a line at roughly that point. (you can see in the finished photo above, I'm a little off, I should have tried the shirt on before marking this spot, that's why this is the first attempt)
Picture
I like the look of organized tie dye pleats, so I made two double rows of wide parallel hand hand gathering.
Picture
Then pulled these gathers up really tight and wrapped each section with all the remaining thread and tied off securely.
Picture
Following the instructions for the brand of dye I'm using, I maked a dye bath of the grey only and dipped just the upper portion of the shirt into it.  I waved it back and forth in the pot for about 5 or so minutes then just squeezed the excess out as best I could while wearing rubber gloves.
Picture
For the next color, I dumped out HALF the pot of dye. Filled it back up with water and put in some of the medium blue.  This will give the middle section some of the hue of the upper section. I hope this will make the colors go together better. It can be risky just using 3 totally different colors without doing text samples of all the colors. 

I don't want to spend the time to do that AND that would mean making up 3 separate pots of dye because once I got a color I liked, I would want to save that color. Which would mean I would need 3 pots AND I only own one dye pot.  I really don't want to use my cooking pots for this.

So, I forge ahead with my method of keeping a bit of color #1 when mixing in color #2.

When dye bath #2 is ready, this time I dipped the lower 2/3's of the shirt, swished it around for 5 or so minutes and squeezed it really well, again.
Picture
When I tinker with color in a pot, I add dye, a little bit at a time, about as much as in this picture. If you don't like the color of something you are dying, you can add some dye of one color or another and re-dip the piece. You don't need to rinse it or anything. That's why it's good to start with the dye bath on the light side. Once it gets too dark, the only thing to do is dump it out and start again. Plus your piece is probably too dark, too.
Picture
For the third color I actually didn't think the color was dark enough the first time I dipped the lower part of the shirt.  I added more dye to the pot and did it a second time.

Just the lower third got dipped this time. This means the middle section was dipped once and the bottom part twice, which is perfect since it is supposed to be the darkest.
Picture
Now the shirt must be rinsed really well and then the thread can be taken off.
Picture
As I've said before, in my opinion, the neckline of any t-shirt needs to be changed.  They are just not very attractive. And, in my opinion, this shirt is too long.
Picture
I wanted to keep this shirt simple, so I simply trimmed a little off to open the neck up a bit.
Picture
I considered adding a narrow trim at the neck, but it wasn't right. I did re-hem it 2" shorter though.
Picture
Well, this will be a great shirt for home and especially for the gym. It fits closely enough I think I can wear it in my Yoga class. If your shirt is too loose, it starts to go over your head when doing downward facing dog!
Picture
OK, one more lesson learned.  See those color spots? They are like flavor nuggets when you pour water into freeze dried food and not all of it dissolves.


I should have stirred the dye around more before putting the shirt into the dye.  Some of the granules were not dissolved yet and this is what happens.  Live and learn!


I WILL do another one of these.
0 Comments

T-Shirt - plain to pretty

7/16/2014

0 Comments

 
Picture
This is the summer of the altered and embellished t-shirt. I have gotten lots of compliments on the other two I made a little while ago.  Here are links to those blogs ... adding a lace yoke and combining two shirts. 

And, clearly, I spend too much time at Joann Fabrics.  Every time I go the t-shirts are on sale. It is hard to resist a shirt for $3 or $4.
Picture
I bought two bright shirts this time. I made sure to wash them first, especially since they are 100% cotton. I know they will shrink!  
Picture
My challenge is to not buy anything extra when working on one of these shirts. So, I pull out my box of lace trim and you can see above that I've chosen a wide black lace.
Picture
Picture
I find when working with a basic t-shirt the two things that must be changed are the neckline and the hems.  The proportions are just off.

I decide to use the blue shirt and try it on. It looks way too long for my taste. So, I fold it up until I find the length I like.
Picture
I cut the bottom off where it was folded and cut the sleeve right above the hem stitching.  I think slightly shorter sleeves are cuter.
Picture
After hemming the bottom and sleeves with black thread using my serger's rolled hem setting it's time to play around with the lace.
Picture
Picture
You know, I really thought I would like the straight across positioning of the lace. I had been seeing it in my minds eye like that the whole time, but I hated it when I saw it with my actual eyes so the Vee neck won out.

Now I have to mitre the lace.  Maybe that's why I wanted the straight across version.  There would be no mitering.  But, it's not so hard.

After finding the center of the lace, making sure to allow a little extra (because you never know!). I fold the lace making sure to match up the motifs. Then with the lace positioned on the shirt where I want it, I draw a vertical line for the mitre.
Picture
Machine stitch on that line. Cut along the fold and press open.
Picture
Then I want to be triple sure that mitre will be placed EXACTLY along the center front of the shirt, so I fold it in half and pin the side seams and sleeve seams together and mark the center front line.
Picture
I pin and pin, and measure and measure, until I like what I see.
Picture
The lace has to be clipped along the motifs and lapped a bit at each shoulder, kind of like a dart. Once it's stitched over, you won't see it.
Picture
Using a small zig zag stitch, the lace gets stitched in place, top and bottom and along those shoulder lapped places.

Note that I'm stitching in a bit from the exact outer edge of the lace.  I want the shirt to be attached in a bit from the edge of the lace, because the top of the shirt is going to be cut away, and it will look nicer if after it is cut, there is a bit of airy lace on the edge.
Picture
Now that I've worked my way to the back, it will get a mitered Vee as well.
Picture
Stitching done ...
Picture
All that's left is to CAREFULLY cut away the unwanted neck area of the shirt ...


AND ...


I've got a cool new summer top, unlike any other in the whole world.
0 Comments

Dress Doctor - transformation

7/14/2014

1 Comment

 
Picture
Time for a break from costume sewing.  Something for ME to wear on a hot summer day! 
Picture
Picture
This dress/upper garment (?) that my son and daughter-in-law brought me from India was STILL on my dress form waiting for me to do something with it.  I was thinking of changing it into some kind of top or jacket.  Someone suggested using the fabric to make pillows. The fabric is so nice and I wanted something I can wear.

Then it hit me.  When the weather is beastly hot, like it is right now, my favorite thing to wear around home is this loose, sleeveless, knee length dress.  So, I should make this Indian garment into something like that.
Picture
First, I laid the orange one over the red one to see the length I wanted and cut the red one off the same as the orange allowing for a small hem.
Picture
But, I also need to take the sleeves off.  Look at the inside ... this garment is made really well!  All the seams are french seams.  WOW 

I like that big pocket ... will keep that for sure.
Picture
Because I never want to waist anything ... after I take off the sleeves, I cut each of them into 3 same sized triangles (6 total) that I will use for godets all around the hem, to give it a little flair.
Picture
I will put the godets in each of the side seams and two equally spaced slits in the front and two back coming up from the bottom of the skirt and insert these godets. I'm using 1/4" seams and finishing them with a tiny zig zag. I think this is hand woven fabric.  It frays easily.
Picture
After putting in a narrow rolled hem, the bottom part of the dress is finished.  But what to do for the neck and armholes?
Picture
Instead of trying to match the main red color I decided to use orange bias tape to finish the armhole to bring out the dotted orange stripes.
Picture
And for the neck, I have some tiny green rick rack to go with the green in the fabric. I want the neck a little more open, so I will cut it down to the place where I've placed the rick rack in this photo.
Picture
I set the rick rack in the seam and finish the edge with more orange bias tape.  I really like the look of just half of tiny rick rack showing.  
Picture
When I lowered the neck line I had to remove the label, but I still wanted it and put it back on. And it has useful information on it.
Picture
I love the the care label. It advises to dry this garment in the shade.  That assumes you routinely air dry your clothes, which I have done ever since I visited my son 9 years ago, when he was living in Egypt. It just makes so much sense.  

In the summer I dry outside, so the dyer doesn't heat up my house and in the winter I set these racks up inside. The wet clothes add some humidity to my house while they dry and I save electricity.  
Picture
This is what my deck looks like every Sunday in summer.  I lay out my napkins and kitchen towels to sun bleach out any stains that haven't come out in the wash.

I have the best drying racks, too.  They are the kind people use in Europe and Egypt and are hard to find here in the US.  But, if you are interested here are links to two places you could buy them.  Amazon or Ebay

OK ... I'm off my soap box.  I have a couple tee shirts I'm doing things to. I plan to write about those later this week.
1 Comment
<<Previous

    From Andrea 

    I am a commercial pattern maker who is now "sewing over 50"!
    I love to sew and hope to encourage others to come back to sewing.
    The water is fine!!

    Archives

    May 2019
    April 2019
    March 2019
    August 2017
    July 2017
    June 2017
    May 2017
    April 2017
    March 2017
    February 2017
    July 2016
    June 2016
    May 2016
    April 2016
    March 2016
    February 2016
    January 2016
    December 2015
    November 2015
    October 2015
    September 2015
    August 2015
    July 2015
    June 2015
    May 2015
    April 2015
    March 2015
    February 2015
    January 2015
    December 2014
    November 2014
    October 2014
    September 2014
    August 2014
    July 2014
    June 2014
    May 2014
    April 2014
    March 2014
    February 2014
    January 2014
    December 2013
    November 2013
    October 2013
    September 2013
    August 2013
    July 2013
    June 2013
    May 2013

    Archives by Subject

    To search for blog posts in specific categories, use the drop down menu above by hovering over the word "Blog"

    Enter your email address:

    Delivered by FeedBurner

    RSS Feed

    Andrea Schewe participates in Amazon's associates program.