Andrea Schewe Design
  • Home
  • Costumes
    • Reader's Gallery
    • Fantasy Costumes
    • Theatrical
    • Historic >
      • Easier to make
    • International
    • Costumes for Kid's and Babies
  • Crafts
    • Home Decor >
      • Pillows
    • Fashion Accessories
    • Doll Clothes
    • For Kids and Babies
  • Blog
    • Past Blogs by subject >
      • My patterns by number
      • Sewing basics
      • Personal sewing Projects
      • Fashion History
      • Fun and funny stuff
      • Guest Bloggers
      • Crafts and Home Dec
  • Links
  • Contact

Amazing Fit Corset #1183 - making the Plus size

2/27/2015

5 Comments

 
Picture
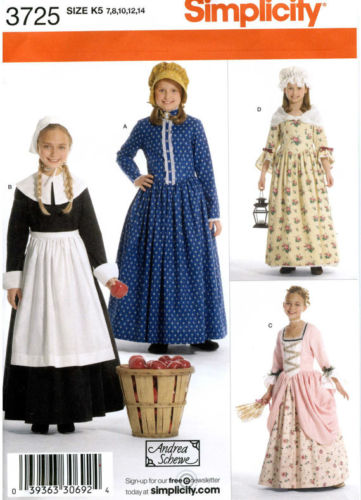
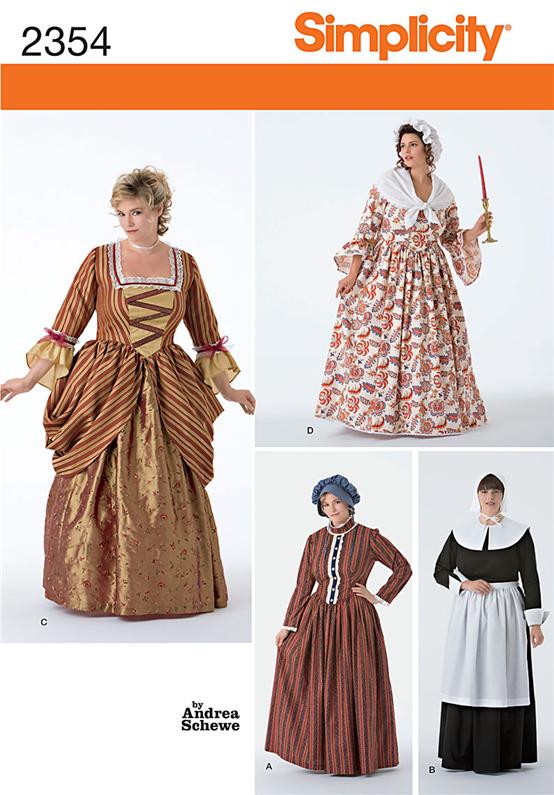
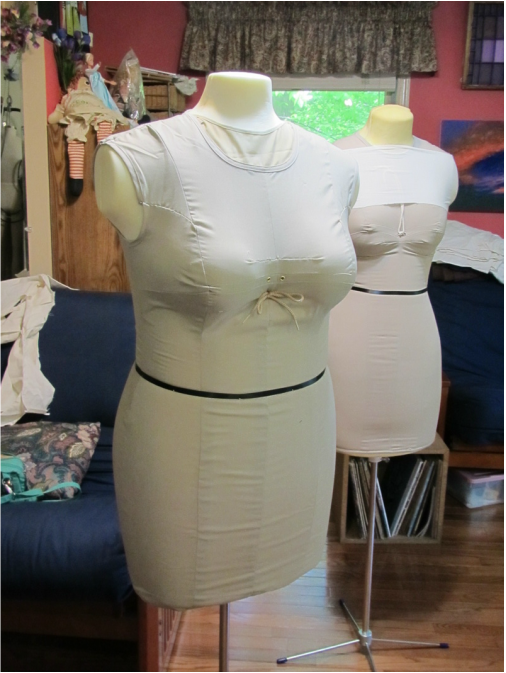
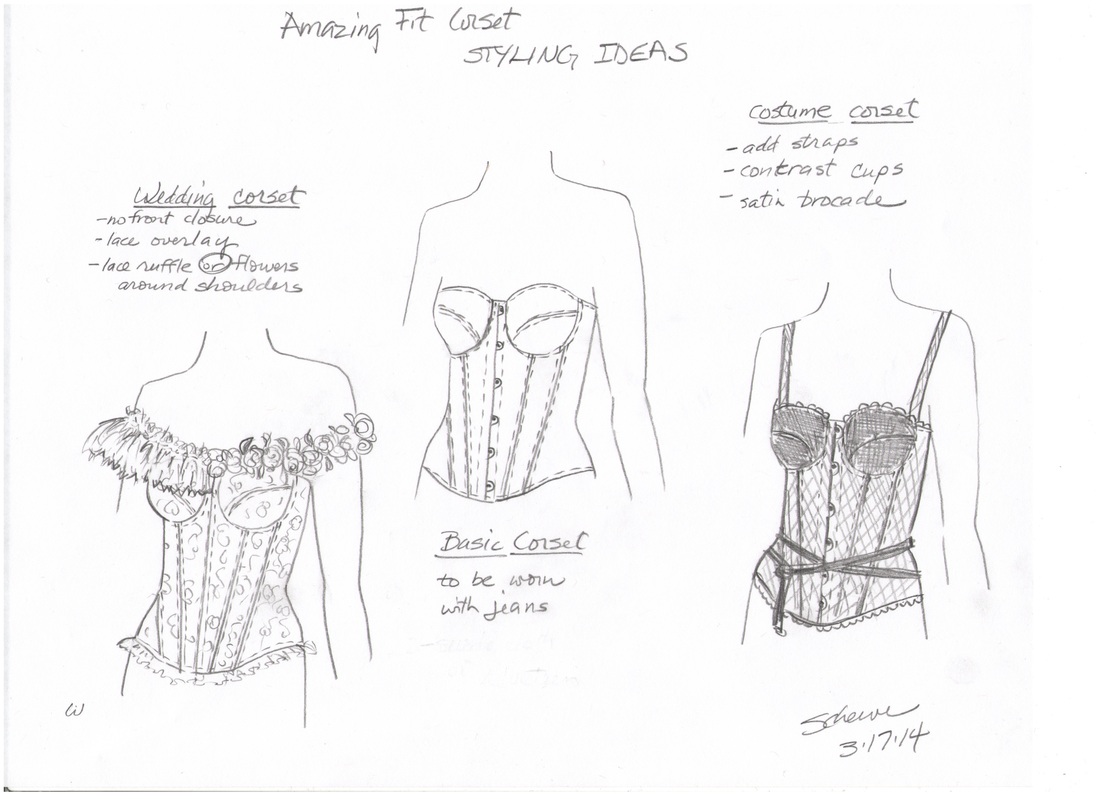
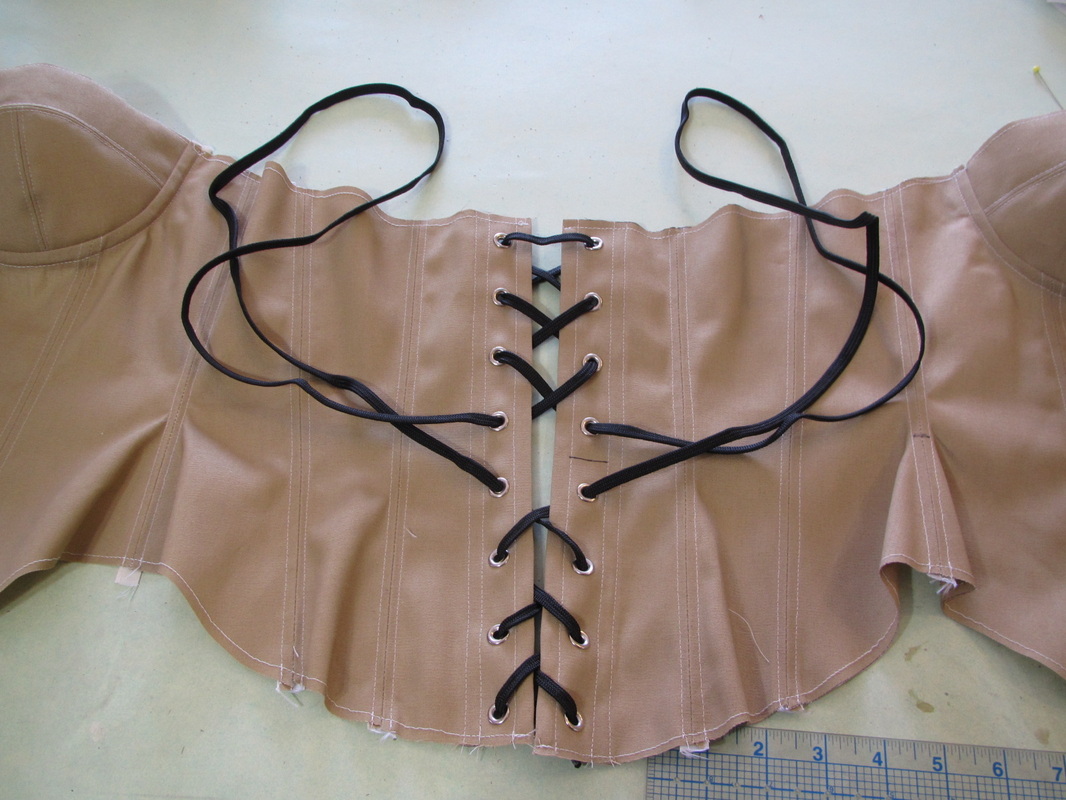
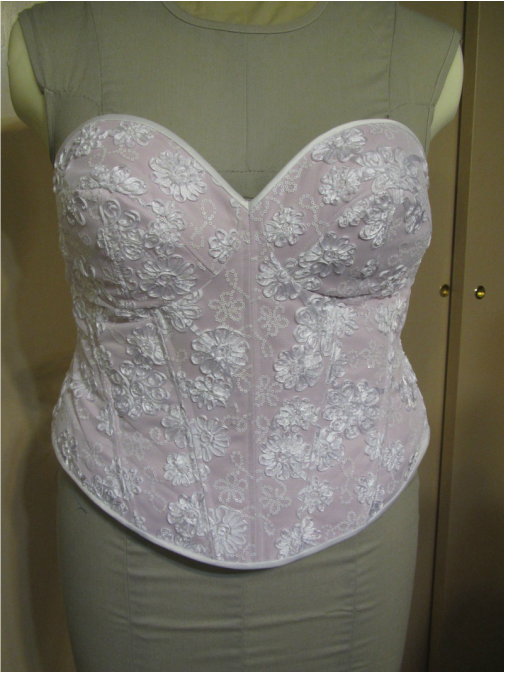
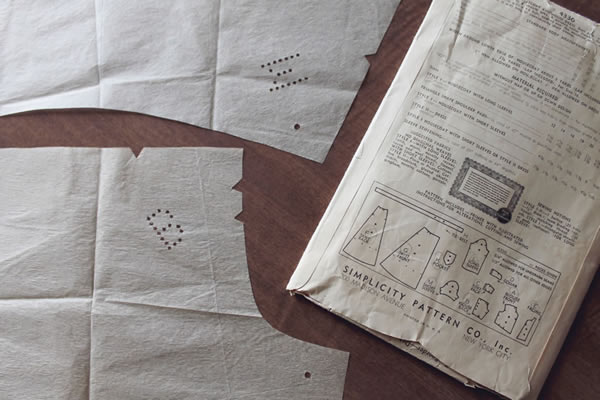
OK, so I'm getting closer to fixing all the problems I'm having with this bust cup corset and now need to turn my head to the plus size sample. The Misses and the Plus size have to be exactly the same, same number of pieces, same basic configuration, just different sizes.
Picture
Picture
Picture
I've had to do this many times before when making the same pattern in different size ranges. I had to put in a tiny (not really needed) dart in the front bodice of the size 4 child, because the Misses size had a dart there. 


So, how to approach this ... hmmm
Picture
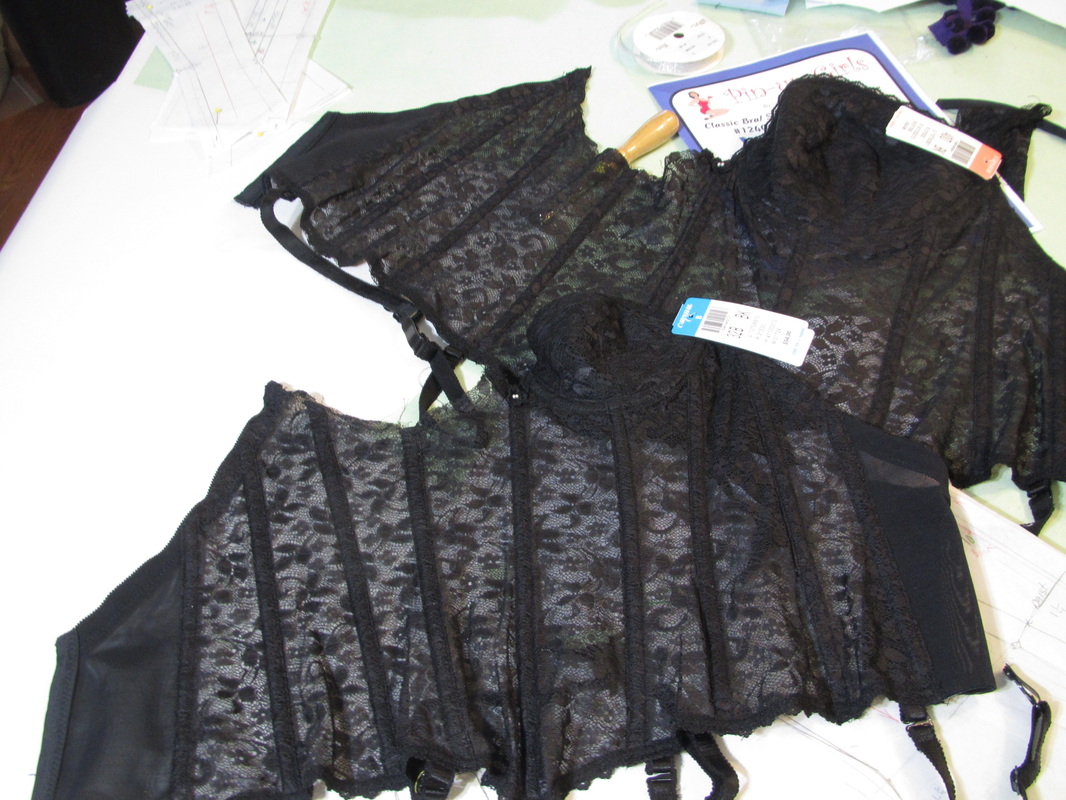
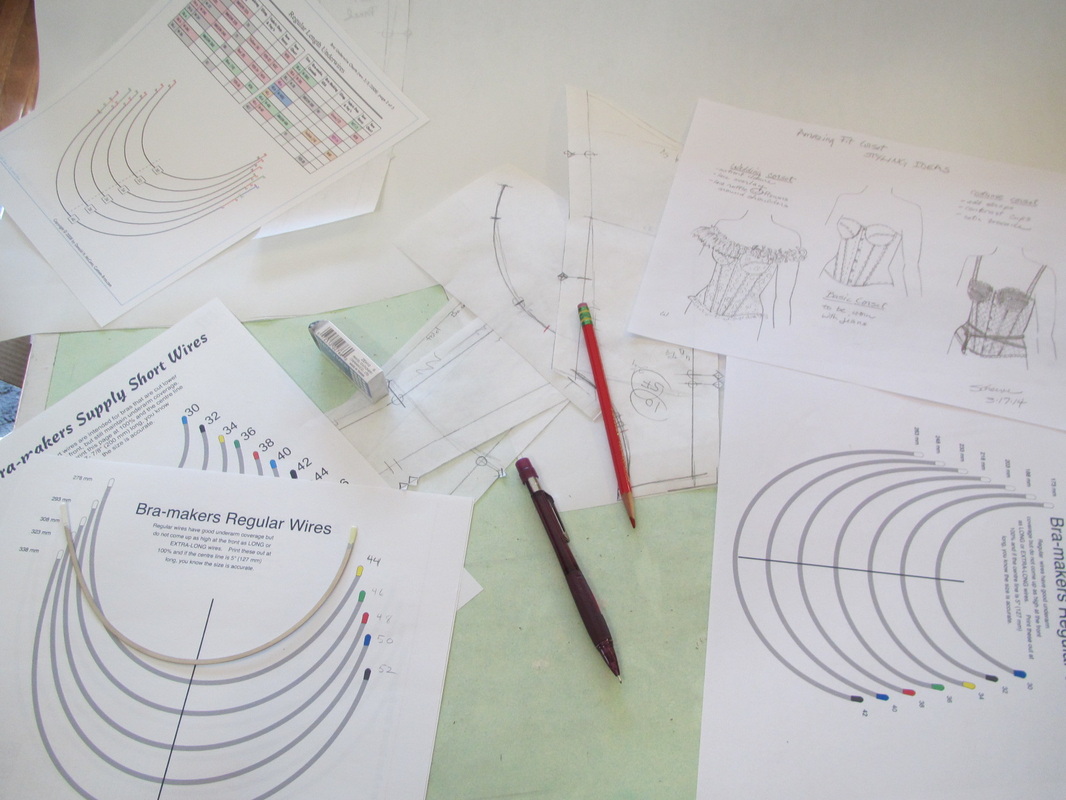
By this point I already have every bra pattern I could get my hands on and now I bought identical long line strapless bras in the two sizes I needed, 32B and 44D.  These two garments were seamed and patterned exactly the same as each other, just what I needed to do the same with my pattern.  

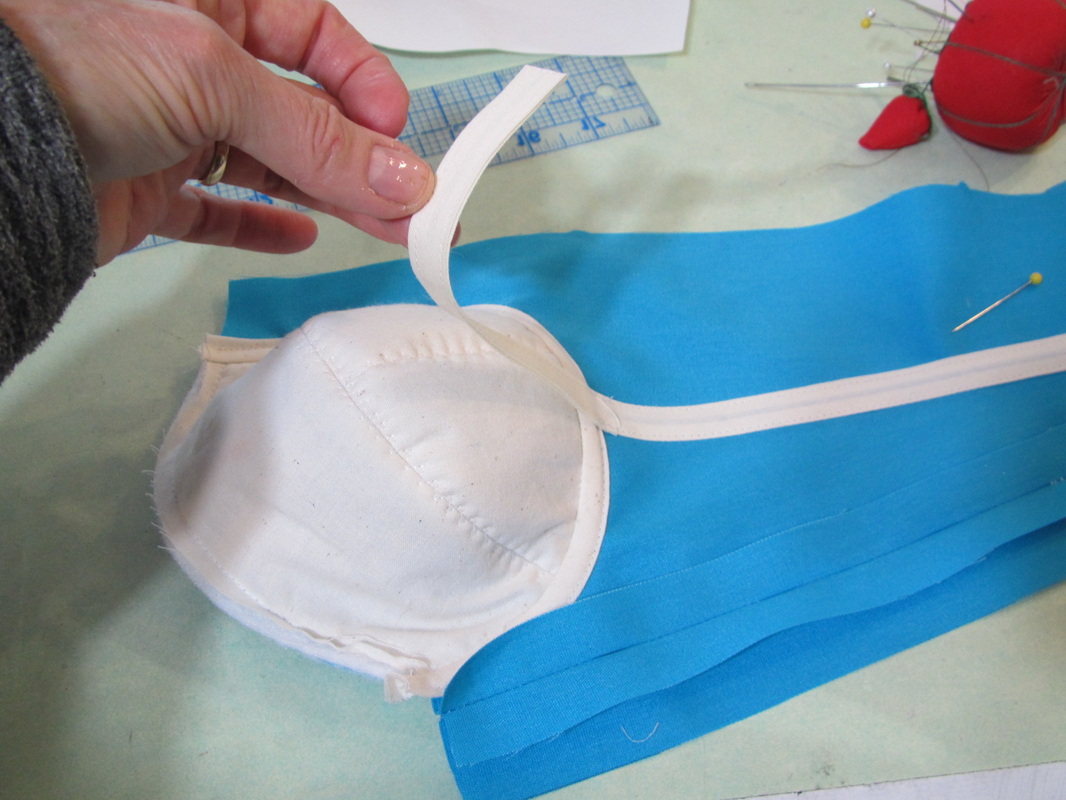
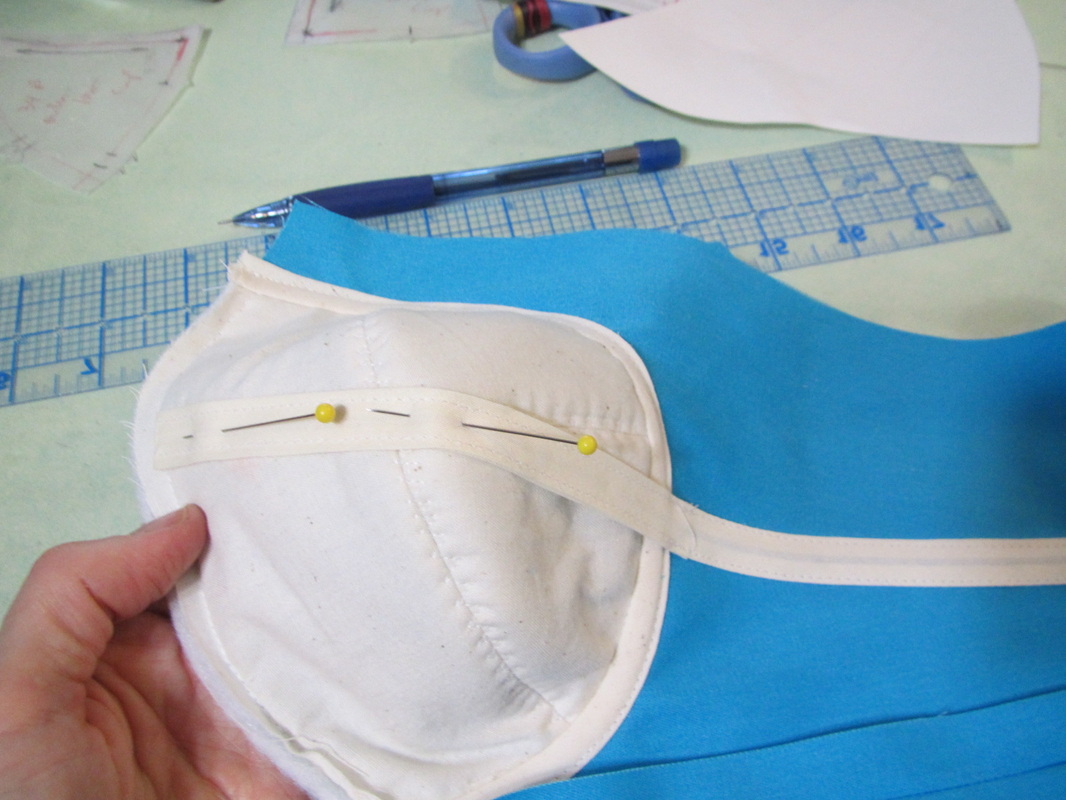
As I said before, the problem I was having was finding the right kind of underwire in the size range I needed, but after talking to Linda Sparks of Farthingales, I had eliminated the underwrite and made a Misses size sample without one. Now I needed to size it up to the 44D.
Picture
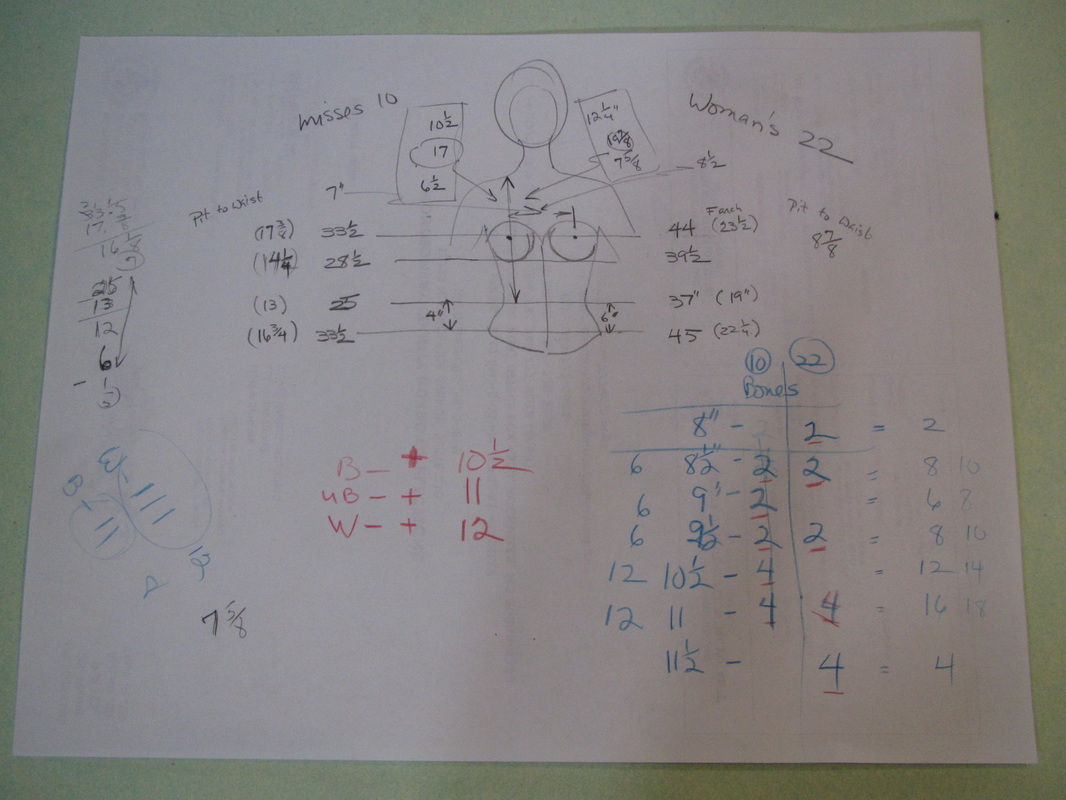
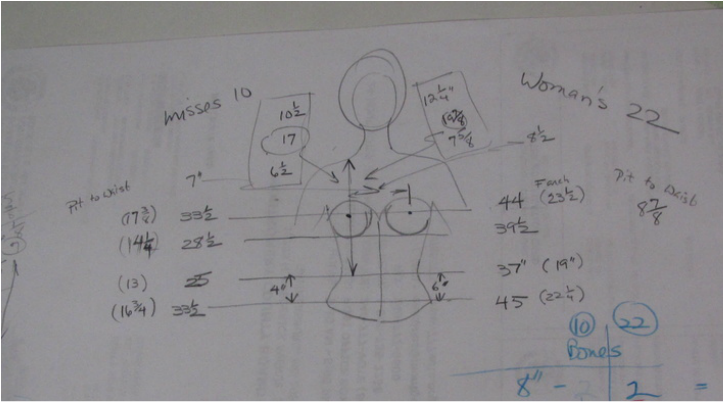
I had my comparison measurement chart for both sizes complete with bust point placement.
Picture
And I had my Simplicity size 22 foam "Uniquely Your's" dress form and I went to work. 

There are no photos of all this, but I will do my best to tell you the story. It just so happens that Nicole Tapanes, who is the assistant head of pattern production (I'm guess at the exact title, but that is what she does), is very close to the sample size needed for Simpliciy's Plus size and I needed to get this thing on a human body. 

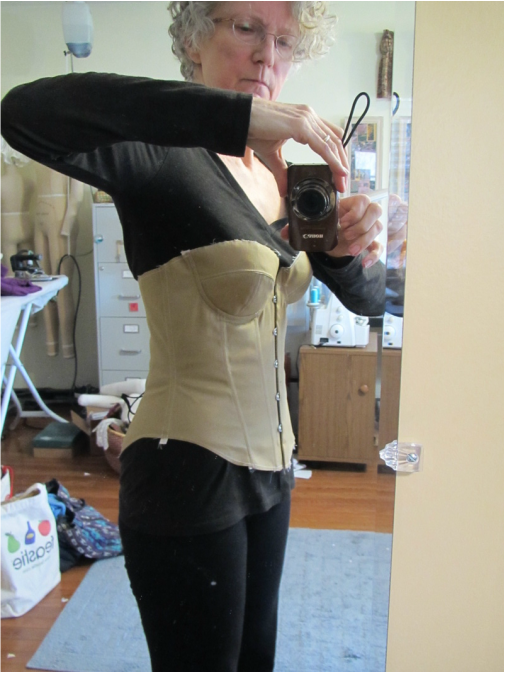
She kindly agreed to be my fitting model and sent me all the necessary measurements. I made up a really good mock up, complete with steel boning. With bones going over the bust like I described in my last blog and lacing in the back. I took a trip up to Simplicity to fit Nicole along with the help of Deborah Kreiling the head of production.

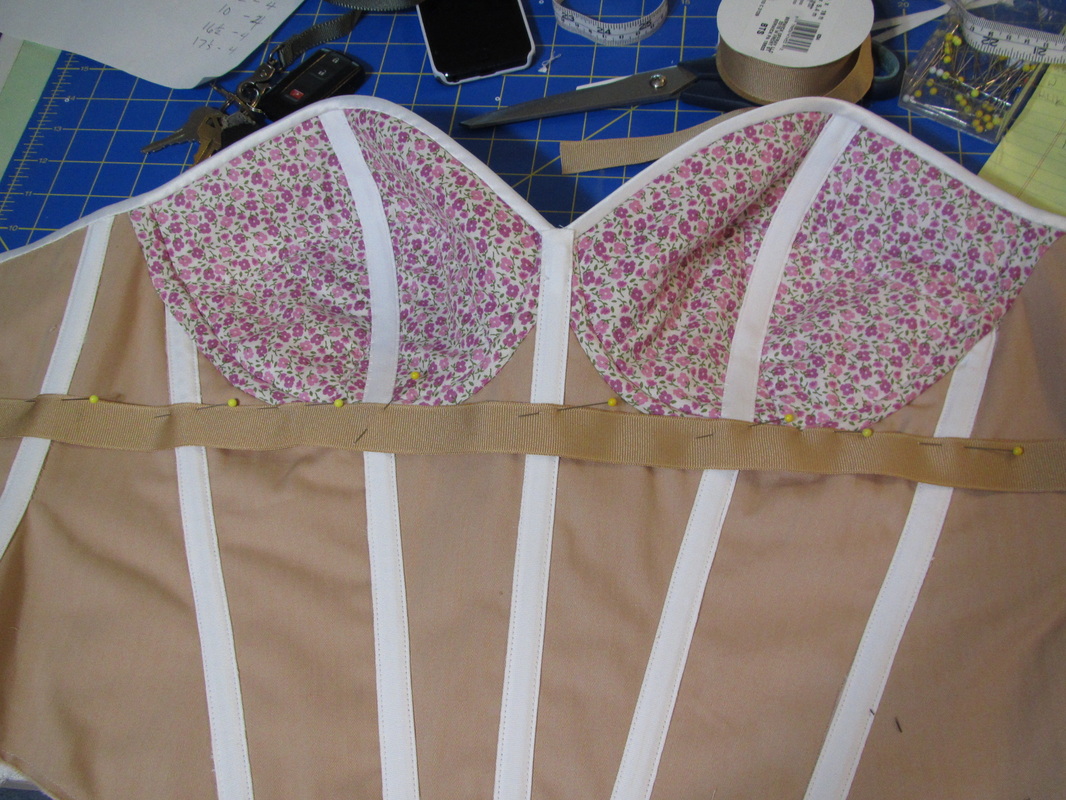
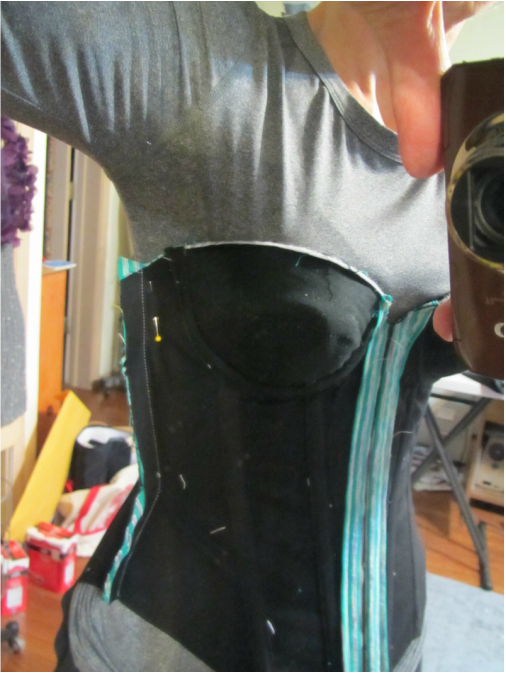
The body of the corset fit great, but the bust cup on her was falling forward like the one had done on me!!! grrr ... I thought the bone going over the bust would solve that problem. So, I started tucking and pinning and pinning and tucking, and then realized I was turning the bust cup into the shape of the bust cup that would have used the "demi" underwire that I couldn't use before because "demi" underwires are not commercially available for the home sewer in all the sizes we needed, but then ... I can't believe it took me so long to figure this out ... I realized we weren't using underwires anymore ... I COULD use the demi style bust cup which hugs the body much better.


TAH DAH!!! problem solved!
Picture
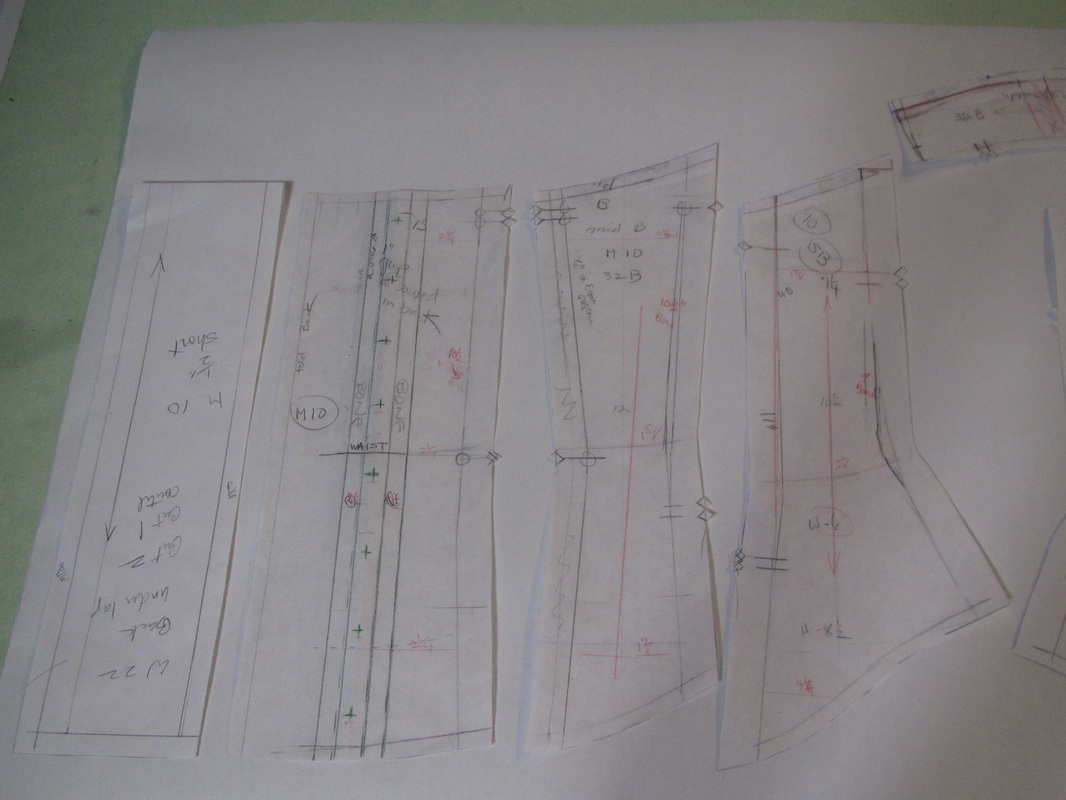
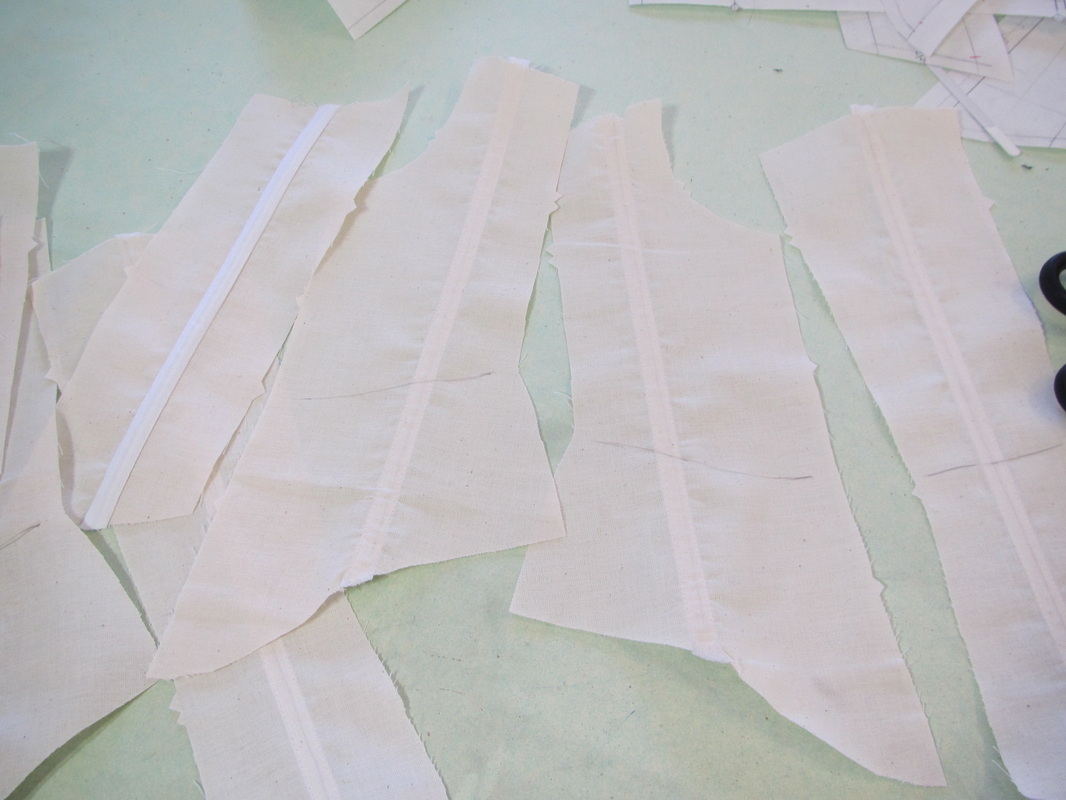
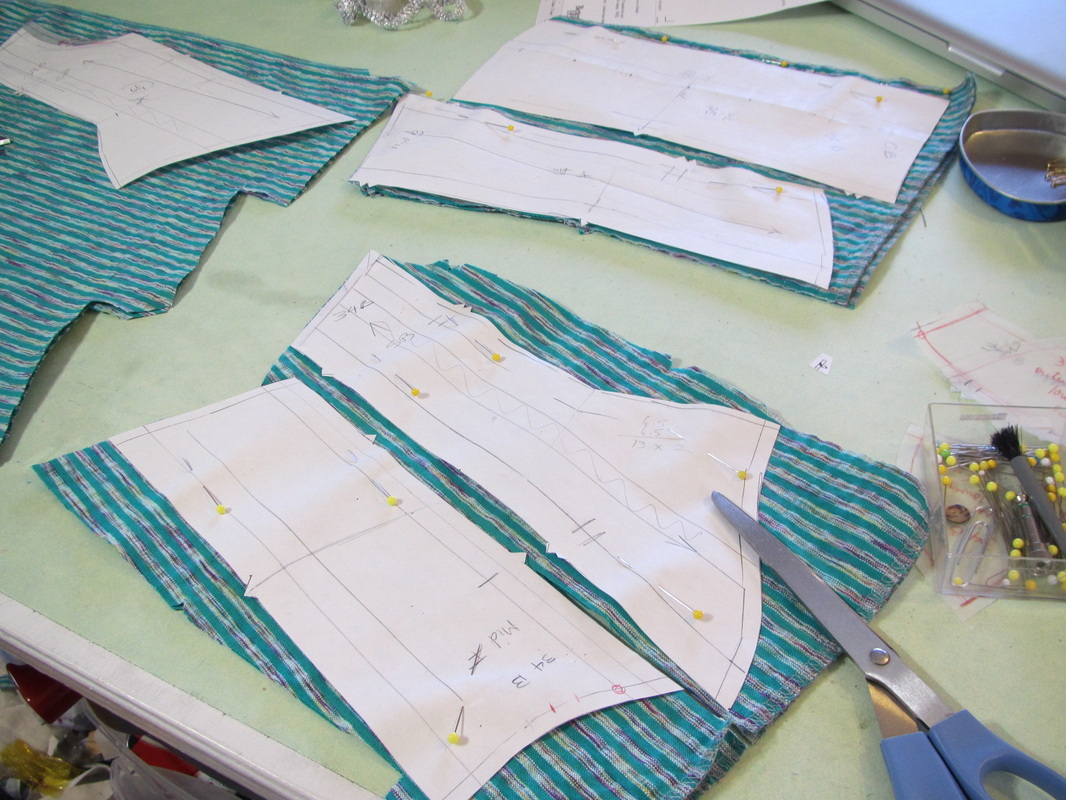
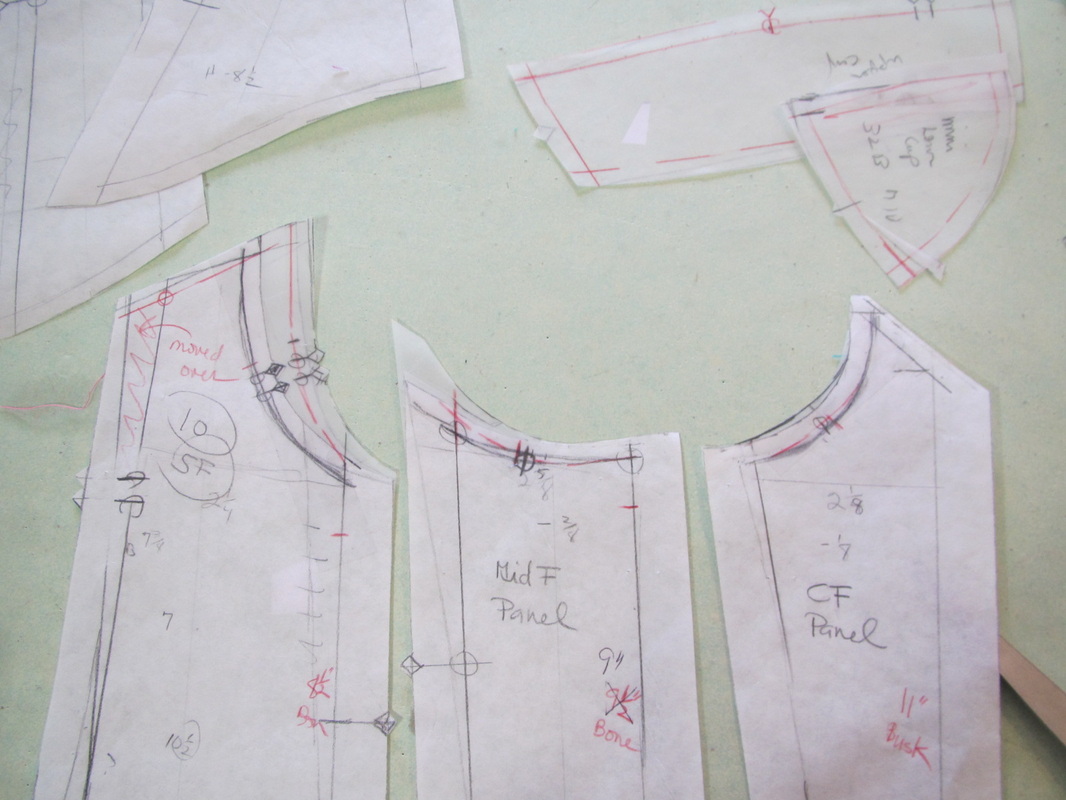
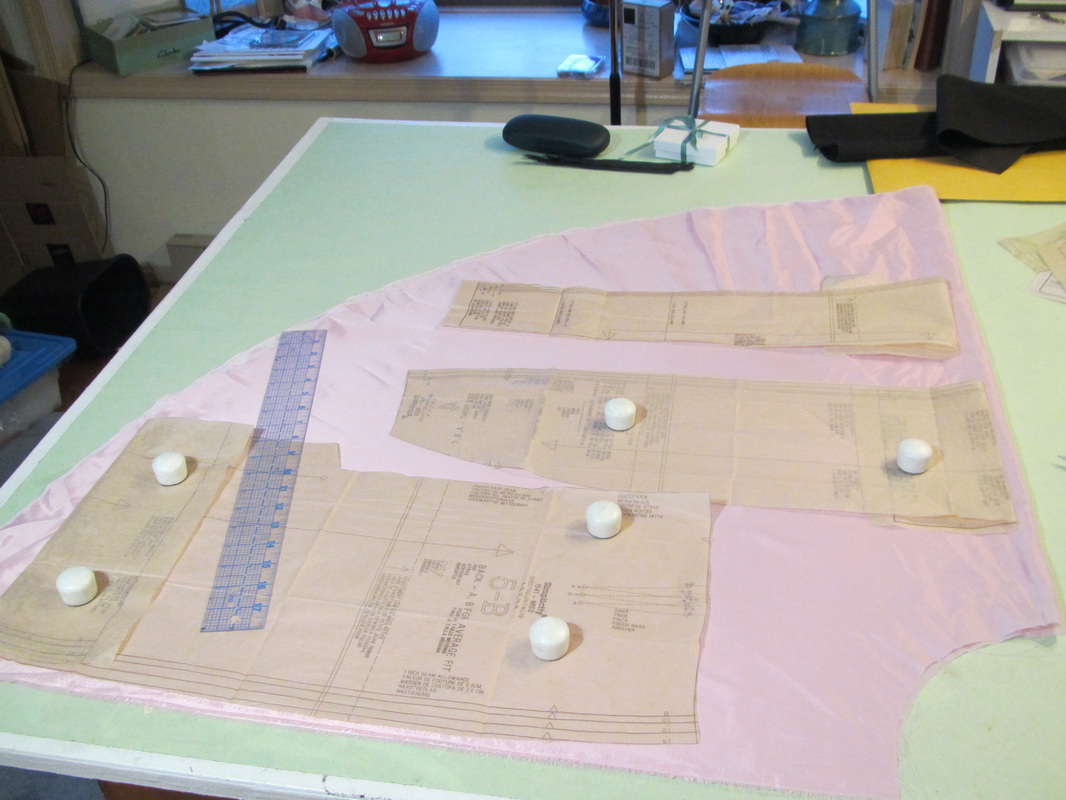
So this is how the pattern changed. Here are the three front bodice pieces taped together so that the bust cup is complete and the correct shape. See the green line? That is the new line for the wider, shallower bust cup that would have used the "demi" underwire.  The tighter "U" is the bust cup arch I had been using that wasn't working. SEE, you can earn while you learn!

Now had I ever taken a bra making class this would have been much easier, but I like figuring things out. I really understand the two cup styles and the advantages of both.
Picture
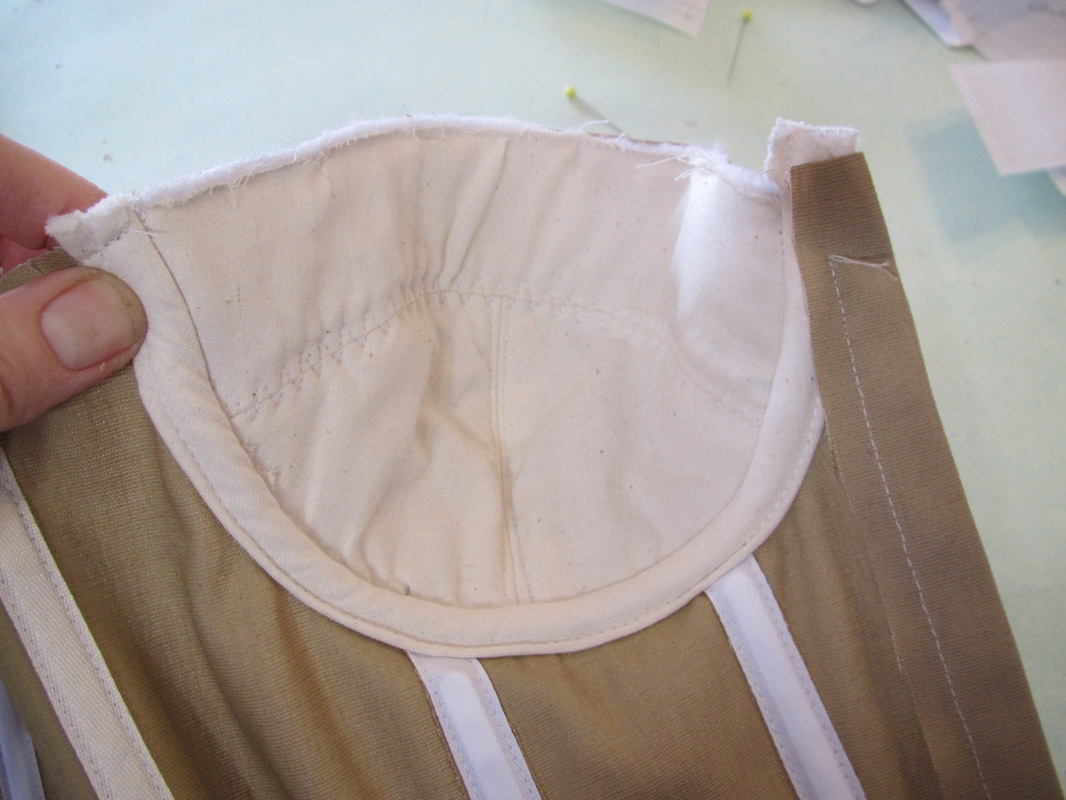
Here are the working pattern pieces for the front of the corset, including the front facing for when a busk closure is used and ...
Picture
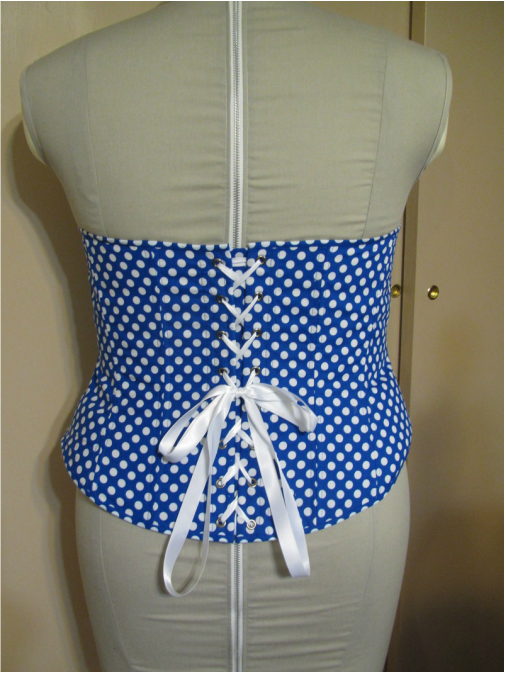
These are the back pieces, which include the modesty flap that is tacked behind the lacings.


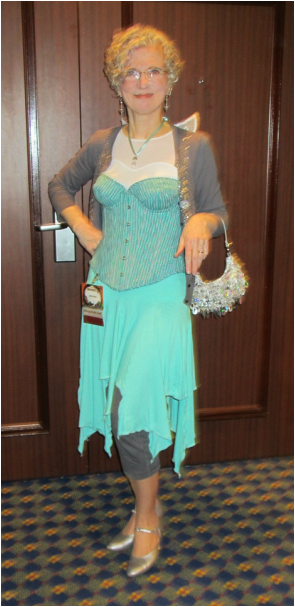
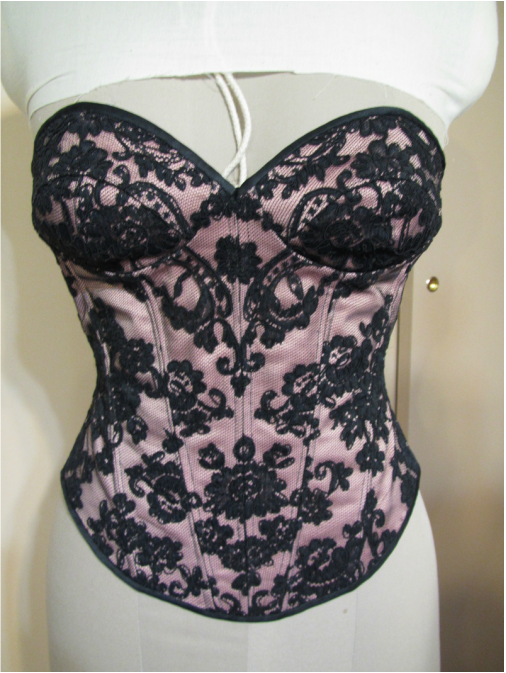
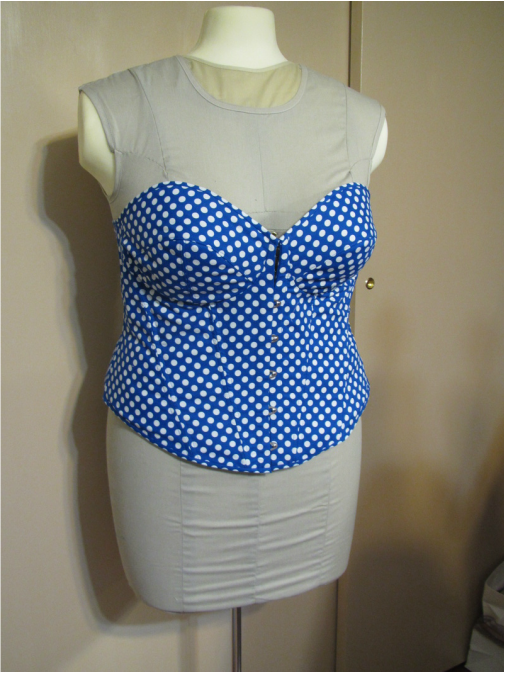
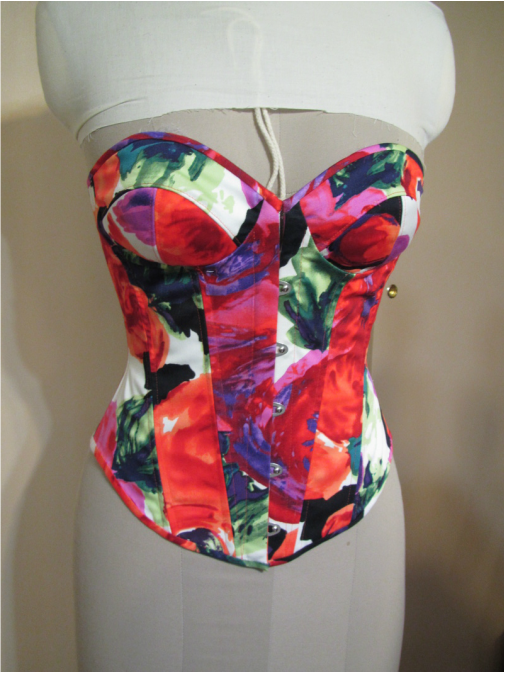
Now I can start thinking about fabrics and sewing up all 4 photo samples!  


Stay tuned.
5 Comments

Rethinking the Cup for the Amazing Fit Corset - #1183

2/25/2015

5 Comments

 
Picture
Picture
So I left you on Monday with me, in Toronto, at Costume Con, being a fairy while test driving what was to become this Amazing fit corset pattern ... albeit with the ill fitting bust cup, at this point.
Picture
Here is a photo of how the bust cup for the corset I'm wearing was constructed. It had boning that stopped just below the bust cup and an underwire in that padded casing around the cup.

The problem, as I explained on Monday, was ... I was forced into using a regular underwire because all the "demi" wires I could find, which are best for strapless bras, were not available in all the sizes this corset was going to be made in.  I was having problems but didn't really understand why, yet. I now know that a bust cup that works with a regular wire which is designed for a bra with straps does not hold close to the body (the straps do that job). So, I had to resort to stuffing the bust of my corset to fill up the cups.  grrr. A regular wire is shaped in a narrower "U", which forces the breast outward for attractive curves, while a "demi" wire makes a wider and shallower "U" holding the breast closer to the body, which is what is needed for a strapless bra.

SO sometimes I am very lucky. While wearing this corset at Costume Con, I just happened to be in the exhibition hall and just happened to walk past the Farthingale's booth with the one and only Linda Sparks standing behind. If you don't know her, Linda just might be North America's best expert on corset fit and construction. Visit her site and seriously consider buying her book.

Anyway, we got talking about the corset I was wearing. I explained my goals and problems, one being the fact that I was going to have to size this up to a 44 inch bust that would then be graded up to 50 inches and she immediately set me straight saying ... first, you cannot make a pattern that uses an underwire unless you can be 100% sure the person using the pattern will use that specific underwire AND it is really best to have a bone go up and over the bust, especially for the larger sizes.  SO, this is what I did.  Thank you Linda!
Picture
When I got back to my studio, I re-patterned the panels of the corset front so a long bone would be positioned to go over the bust. Then made up a new sample without an underwire and with a long piece of bone tape ...
Picture
That would just be hand sewn to the lining of the bust cup so it doesn't show on the outside. After slip stitching the tape in place I then slipped the long steel bone in. 
Picture
To make this cup construction work, Linda also explained that the corset would need an under bust stay to hold the bottom of the cup close to the body, and the long bone that goes over the bust would have to be purposely bent exactly at the seam line at the bottom of the bust cup for the same reason. The under bust stay is hooked separately which takes pressure off the lacings in the back.

I'm jumping ahead a bit with this photo of a finished corset. Backing up ... I have just finished yet another mock up in a size 10 (32 1/2" bust) and now needed to turn my attention to the size 22 (44" bust). 
Picture
First I took all the measurement charts Simplicity has ever given me and every bra measurement chart I could find and made myself this working diagram/chart.

You can see I have the "bust points" marked in! I needed to take into consideration the bust point to waist measurement, which is tricky because as a bra cup size increases the area or arch of the cup increases which makes the distance from the bottom of the cup to the waist get smaller.

So basically, the measurement from the waist to the bottom of the bust cup for a size 10 is quite a bit longer than that same measurement for a size 22.  This project was becoming more complicated now having one of the measurements LARGER for the smaller size. The point of the Simplicity brand and the Amazing Fit line of patterns is to keep it simple and clear (as much as possible).
Picture
I now needed one more thing to work on the larger size ... a larger dress form. And not just any dress form, I needed a squishy foam "Uniquely Your's" form just like my size 10 that I use for corsets and boned bodices in that size.


If you remember back almost a year I wrote two blogs about buying and fitting the cover for this new form.  Click on the links if you are interested in reading them.


Next time, I fit the Plus Size corset mock up on a real person and FINALLY figure out the bust cup!
5 Comments

Amazing Fit Corset #1183 - the assignment

2/23/2015

8 Comments

 
Picture
I, as a someone who sews her own clothing, really like Simplicity's Amazing Fit line of patterns. The designs are flattering and well thought out to make fitting easy.  SO, I mentioned a couple years ago that perhaps Simplicity should publish an Amazing Fit corset that would have options for different bust cup sizes and hip to waist ratios, etc. Good idea, right? Fitting corsets can be hard!

I imagined a basic corset with probably 6 shaped panels, 3 in front and 3 in back. I wasn't holding my breath, though. I frequently suggest things that never happen.  BUT, about a year ago, the word came through that everyone was liking my idea for an Amazing Fit corset BUT! ... they wanted a corset with separate bust cups AND!!!! they wanted it in plus sizes.

So, I was excited and challenged. I felt the responsibility of something labeled "Amazing Fit" keenly and wanted to get it right. This is how I got started. 
Picture
First, I had to plan out the basic design. It seems by this point, I had also figured out what bra size a Misses 10 and Women's 22 would be. These are the sizes Simplicity wants all the samples made.  Two samples were needed because the corset was going to be published in 2 size categories.
Picture
I, also, had to come up with some styling ideas for photography which, over time, became much simpler. I tend to over design. Probably because I'm used to costumes, not fashion.
Picture
Next, I had to figure out the bust cup!! I've made bras before. I can do this.

I found and printed out charts and diagrams for every underwire that the average consumer could buy and started experimenting with patterns.
Picture
I first made mock ups in muslin with plastic boning sewing in the center of the panels because it is easier to adjust the seams if there is no boning sewn to each seam. The finished corset will have boning on each seam.
Picture
I struggled with the bust cup, changing it multiple times. You can see I am using a foam "Uniquely You" dress form. I find these better when working on corsets because they have give in them similar to a human body.
Picture
Next, I made up a wearable sample in duck cloth with an underwire, slightly padded cup. and steel boning. 
Picture
I made it in my size. (I am one size larger than Simplicity's sample size, so grading it up a tad isn't hard) I wanted to test drive this baby.
Picture
Not bad ... I wasn't completely happy with the cup though. Here was my main problem.

I was working with the underwires that were available. I had to use the same kind of wire for all the sizes that this pattern was going to be published in and the "demi" wire that's best for strapless bras didn't come in the 2 or 3 largest sizes I needed, so I was working with a regular underwire that is best for bras with straps. The bust cup for this wire is narrower and projects outward which, even with the support from the padding, was pulling away from my body.

Well, I couldn't figure it out better at this point and I wanted a corset to wear with my fairy wardrobe for Costume Con in Toronto. 
Picture
I hoped that in the process of making this corset all would be made and I could solve the sagging bust cup problem. HA!
Picture
In going through all the photos I took while making this corset, I realized this was the during the 2 or 3 weeks I owned my BIG fancy new Bernina, that kept objecting to sewing corset materials. Clearly not a good machine for me. Read the blogs I wrote about that. 
 Blog 1, Blog 2, Blog 3, Blog 4
Picture
Still tinkering with the bust cup fit.  Tightening the chest helped the bust support, but didn't really solve it. Never give up!
Picture
THIS is what my pattern looked like!
Picture
But, I finished and wore my corset in Toronto ... even though I had to stuff some socks in the bust cups to help the fit ... really!


More on Wednesday ... I DO figure this out ... with a little help.
8 Comments

AMAZING FIT CORSET!!

2/20/2015

4 Comments

 
Picture
What do they say? ... "the wife is the last to know"

Well, in this case it is the designer that is the last to know. I found out this morning by reading PatternReview.com that Simplicity just released the Spring patterns which includes my Amazing Fit Corset #1183 ... the second pattern of mine to make it into the fashion section of the catalog.
Picture
So far, I only have that tiny image of the pattern, but here are the photos I took before sending them to Simplicity.
Picture
I spent a long time on this pattern and have a lot to say about it.
Picture
BUT, I'm still not finished with the project that's due on Monday.
Picture
Which will probably end up being Tuesday, partially because of heavy snow predicted.  I don't like sending things off in bad weather.
Picture
You might notice that there is no white/pink corset on the envelope. Looks like they ended up color mapping this one red.  But, I think it would make part of a lovely bride dress in this color.


So, I will start the saga of these corsets next week.
4 Comments

Whining ...

2/18/2015

3 Comments

 
Picture
Winter is getting me down ...
My project is not going well ...
It is due Monday ...
AND it isn't even one of my designs ... so ...
I can't change anything, if it's not working ...
I have to make it look just like the artwork ...
grrrrrrrrr!

OK, I feel better

Back to work!
3 Comments

Tackling my notions drawers!

2/16/2015

0 Comments

 
Picture
My husband and other non-sewers are puzzled by the word "notion." What is a notion anyway?  It's a word I've just always kind of known, but find hard to define.  So ... Wikipedia to the rescue!  

  1. Notions can include items that are sewn or otherwise attached to a finished article, such as buttons, snaps, and collar stays, but the term also includes small tools used in sewing, such as thread, pins, marking pens, and seam rippers. The noun is almost always used in the plural.

If you want to read more at Wikipedia click on this link.
Picture
In any case my notions are a chaotic mess.  I have LOTS of stuff I don't use and I'm sure I have duplicates of many things, because I go out and buy stuff when I can't find something.  So today is the day to TIDY! my notions.
Picture
So, I dump out the drawers and clean them.
Picture
The book I've been reading "The Life Changing Magic of Tidying Up" suggests using small boxes you have around the house.  She thinks the companies that make organizing equipment are encouraging hoarding ... well ... we all need those boxes and bins, but maybe not as many as most of of have.
Picture
I buy seam rippers by the dozen. They get dull and while I'm working it's easier to pull out another one than search through the pile on my table. So I own a lot! 
Picture
But, I will bag up most of the unused ones.  Throw out old ones and just keep a reasonable number in my main drawer.
Picture
I will, also, only keep 3 of these tracing wheels in my main drawer. My favorite is the one second from the right. It was my mother's. It's half way between the really pointy ones and the newer dull ones. WHY don't they make things the way they used to???
Picture
I throw out a bunch of broken and useless things like a couple feet for a very old sewing machine.
Picture
I use pointy tweezers often to help guide small things at the sewing machine. But, three of those tweezers don't close well at the point. No reason to keep them.  Those two "Purple Thangs" I will give away. Some people love them, I don't. The two bodkins I will keep for elastic and drawstrings. 
Picture
I only like two of these marking pencils, the ones that are blue and white on the outside. The others just don't mark well. Either the line is too fat and inaccurate or too faint. So, I will only keep those two.
Picture
Well, this is a no brainer ... when and where did I get those silly "hubby" labels? Out they go.
Picture
Again, I will throw out the couple bad rulers and put away the excess ones, keeping 4 in my main drawer.
Picture
Picture
Keeping all this stuff! I can't live without point turners and I find this device that "de-pills" sweaters very useful.
Picture
I need tools like this from time to time, but not this many. I will ask my husband if he can use the extra tiny screw drivers and will give away any other duplicates I have.
Picture
I must keep my tracing paper and tools for turning tubes and tiny things. I've had those for 20 years now and they are still great.
Picture
I will only keep these two finger protectors.  I have many others but I don't need them often and these are the only ones I can tolerate. 
Picture
Well! I didn't realize I had so many replacement blades!  I will put them all in a ziplock bag so they won't migrate under and behind things in the draw and will be easy to find next time I need one.
Picture
I will carefully store these things, too.
Picture
This is what these drawers look like now!


On the left is will be the bottom drawer with tools I don't use often and extras of my seam rippers, tracing wheels and seam gauges.


In the middle, is the middle drawer with tracing paper, turning tools and rotary cutters.


The one on the right is my main drawer with the things I reach for most often.
Picture
OO-OO-OO that looks so nice.  I hope I've done a good enough job that I can keep it this way.  At least get it back to this state between projects!


I might clear out the drawer that's below the third drawer. It has knitting things that I could store elsewhere. Actually going through my knitting things should be a future project.


And, you may say ... what about pins!  I think I will do a separate blog on pins. I have many opinions about pins.
0 Comments

Finishing Simplicity skirt #1541

2/11/2015

3 Comments

 
Picture
Picture
Last time, I showed you how I cut and fit this skirt. Today I'm finishing it! And, see how good the fake leather looks with my REAL leather boots!


I've already sewn up all the seams and put in the zipper, but I want to now put in a lining.

The pattern doesn't call for a lining. But, I found this pleather rather sticky to wear and thought it needed one. This skirt is so easy to add a lining to, because it has a yoke and the lower section.  The yoke is already cut twice, because it is used as a the facing for the waist, so all I had to do is cut the lower section out of lining fabric!

Picture
Because I am REALLY trying to use up stuff I have in my studio and I don't want to go out in this cold weather, I rummaged around in some bags of fabrics I was getting ready to give away and found this discarded lining from my test samples for my tulle skirt pattern.
Picture
Picture
See the test sample that was pink underneath?
Picture
Then I sewed up the lining pieces with the second yoke that is meant to be the waist facing following the fit from the outside fabric.
Picture
Sewed the lining to the outside along the waist seam then graded, clipped and under stitched that seam. Pinned back and slip stitched the lining around the zipper.
Picture
Picture
Hmmmm, hemming pleather?  How should I do it?  I don't want to machine stitch it and hand sewing would look bad, too, I think.  So, I did a test with glue and a test with a roll of Heat'n'Bond I happened to have around. Again, I'm using what I have on hand. I don't even know if Heat'n'Bond comes in rolls any more.
Picture
This was left over from the very first pattern I designed for Simplicity 25 years ago. But, it still worked great.  As a matter of fact so great I decided to hem the whole skirt with it.  The glue worked well, too. But it required 24 hours of drying time.
Picture
I first pressed the hem I wanted.
Picture
Pressed on the Heat'n'Bond ... let it cool.
Picture
Peeled away the paper backing.
Picture
Then pressed the hem in place. This needed to be done in sections, because it needs to cool before moving it to make sure the bond is secure.
Picture
The lining needs to be a tad shorter than the skirt itself, so I marked where the lining hung below the skirt and cut it off at that point.
Picture
Then just machine stitched a double fold hem, which will make the lining about 3/4" shorter than the skirt ... just right.
Picture
Now I have to deal with the %#*)$^@! kick pleat.
Picture
The inside half of the pleat is easy. Just seam the edges with a 1/4" seam press, under stitch and press.
Picture
To finish the lining of the outside half of the pleat requires a big chunk of lining to be cut away so it looks like this. I can't think of how to explain it in a few words. I hope a picture is worth 1000 words.
Picture
Then I topstitch through all layers at the top of the kick pleat to hold everything in place, just like the guide sheet shows.
Picture
I LIKE this pink lining. And had I gone out to buy something, I probably would have use black. How boring is that?

So, I actually didn't buy a thing for this skirt except the pattern. The pleather was left over from the boot toppers from my most resent Amy Brown Fairy pattern, the lining from a tulle skirt mock up, the hemming tape from an ancient No-Sew pattern and I had a black zipper on hand ... YAY!

SEE ... sewing CAN be economical.
3 Comments

Cool 1920's apron

2/9/2015

5 Comments

 
Picture
LOOK! at the very cool apron I just got in the mail! My sister Theresa LaQuey made it for me as a late Christmas gift. Actually late gifts are kind of fun, because they are totally unexpected.

I love making gifts for people and receiving them is even more fun. It's great when you come from a family of sewers.  Remember the pajamas I made for Theresa last year?
Picture
I've told you all before that Theresa has an amazing and huge collection of vintage sewing patterns.  She sent me images of the front and back envelope for this 1920's pattern she used to make this apron.  Simplicity was founded in 1927 and this pattern is #29. I'm guessing it's the 29th pattern they published.  From what I can gather by reading the envelope, the pattern pieces were all on one large sheet kind of like what our patterns are like today.  They weren't printed, but there were holes punched everywhere to show where notches and darts went, also each piece would have an alphabet letter punched in with little holes to label it.
Picture
Unprinted pattern pieces were usually all cut out like this. But this apron pattern Theresa used seems to have been all on one sheet with lines of punched holes to show where to cut. Simplicity was trying to be simple, I guess. You could just spread out your fabric and lay this one sheet on top, providing you were using 36" wide fabric or material as people called fabric until about 30 or 40 years ago. I called it material as a kid.  When DID that change?
Picture
BUT, this is the main reason I wanted to write about this apron. We all love to complain about the instructions that come with sewing patterns these days ... well ... look at what people were dealing with 90 years ago. There was no guide sheet. All the instructions, what there were of them, were printed on the back! That's it. That's all they got.

I asked Theresa if I could blog about it. She said "blog away" and then added these comments.

The thing was very poorly patterned.  I mean, I walked the seams to see how true they were and the upper to lower apron seam, the zig zagged one was off by 5/8"!!!!!  No pocket placement lines!  And then the whole trouble of getting the binding to be pointy.
Picture
And then she sent me a follow up email with this final comment.

Oh, and I forgot.  What about those useless pockets.  I mean, what do you do?  Keep a dime in them to pay the iceman? A hankie for the time you find out your husband was cheating with his secretary?  I dunno.

She's got a point. Those pockets are really small, but cute!

I love my apron!

5 Comments
<<Previous

    From Andrea 

    I am a commercial pattern maker who is now "sewing over 50"!
    I love to sew and hope to encourage others to come back to sewing.
    The water is fine!!

    Archives

    August 2019
    July 2019
    June 2019
    May 2019
    April 2019
    March 2019
    August 2017
    July 2017
    June 2017
    May 2017
    April 2017
    March 2017
    February 2017
    July 2016
    June 2016
    May 2016
    April 2016
    March 2016
    February 2016
    January 2016
    December 2015
    November 2015
    October 2015
    September 2015
    August 2015
    July 2015
    June 2015
    May 2015
    April 2015
    March 2015
    February 2015
    January 2015
    December 2014
    November 2014
    October 2014
    September 2014
    August 2014
    July 2014
    June 2014
    May 2014
    April 2014
    March 2014
    February 2014
    January 2014
    December 2013
    November 2013
    October 2013
    September 2013
    August 2013
    July 2013
    June 2013
    May 2013

    Archives by Subject

    To search for blog posts in specific categories, use the drop down menu above by hovering over the word "Blog"

    Enter your email address:

    Delivered by FeedBurner

    RSS Feed

    Andrea Schewe participates in Amazon's associates program.