Andrea Schewe Design
  • Home
  • Costumes
    • Reader's Gallery
    • Fantasy Costumes
    • Theatrical
    • Historic >
      • Easier to make
    • International
    • Costumes for Kid's and Babies
  • Crafts
    • Home Decor >
      • Pillows
    • Fashion Accessories
    • Doll Clothes
    • For Kids and Babies
  • Blog
    • Past Blogs by subject >
      • My patterns by number
      • Sewing basics
      • Personal sewing Projects
      • Fashion History
      • Fun and funny stuff
      • Guest Bloggers
      • Crafts and Home Dec
  • Links
  • Contact

Introducing Theresa LaQuey

8/30/2013

2 Comments

 
Picture
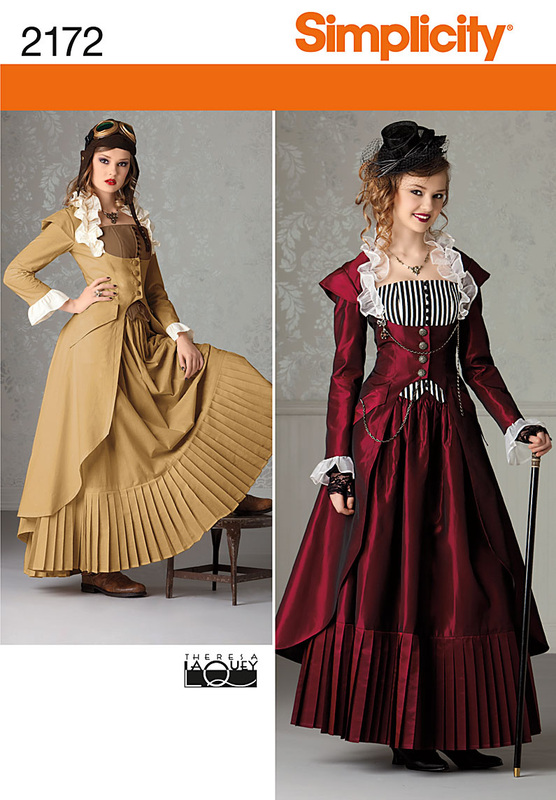
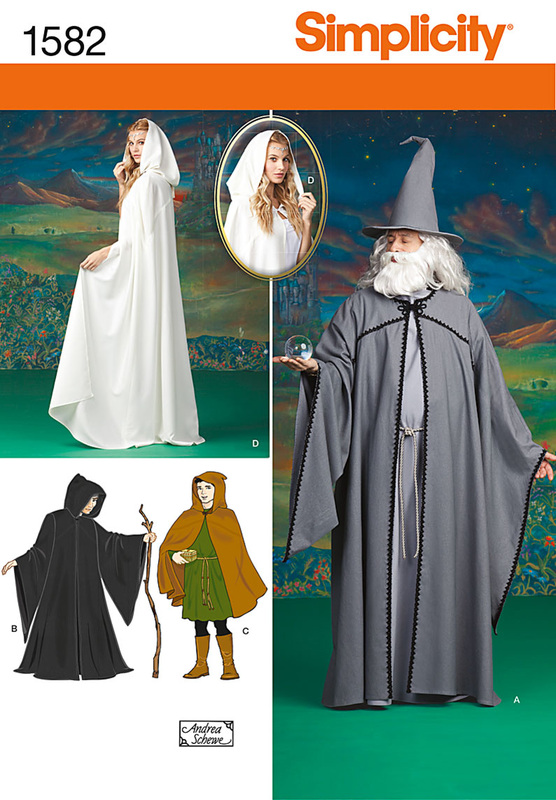
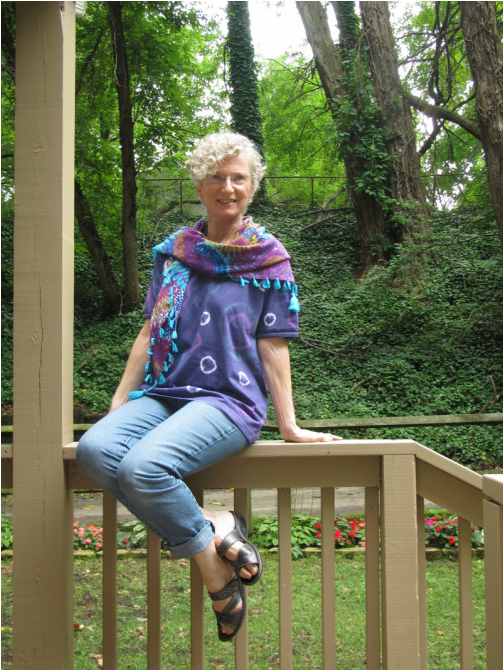
This very popular pattern is designed by Theresa LaQuey, who is going to do some guest blogging here.  I have a special "in" with Theresa. You have seen Theresa on my blog before, but didn't know it.

Remember the photo I posted with one of my flower pattern tutorials to talk about the flowers my grandmother taught me to make that we have sitting on our heads?
Picture
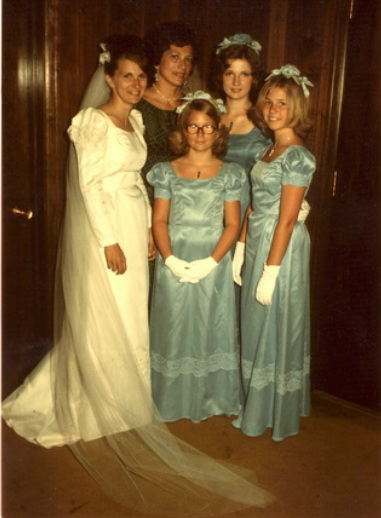
See the adorable little girl in the front?

Well, that's Theresa, my baby sister.  (I'm in the back on the right)

We come from a family of sewers, designers and musicians.  We all have a different mix of those talents.

Our mother, as a young woman, had an amazing spinto operatic voice.  And then after getting married and having all of us, taught costume design and designed the costumes for all the plays at our local college. 
Picture
This is how I remember her.
My sister Christine, the bride, for years played clarinet professionally in New York and Janet, on the far right, is a very talented artist.

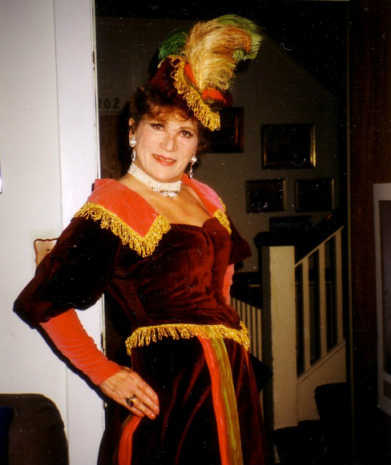
Theresa and I are kind of mirror images of each other.  I studied serious classical singing, while she sings up a storm doing popular music from ragtime through WWII in her beautifully hand made period clothing.   She has a degree from an excellent apparel design program while I learned all my skills from observing my mother and working various jobs, mostly costume shops.  So, we both sing and sew, but differently.


So, she knows a lot about sewing and designing and can tell you how she designs and makes patterns.

If you want to see some of Theresa's work, visit her Facebook page.

Next time, Theresa will talk for herself!
2 Comments

Color mapping for pattern photography

8/29/2013

8 Comments

 
Picture
Here is one of my lesser known patterns.
Usually I get to chose the fabrics my designs are sewn in, or at least I get to search for swatches and then have Simplicity choose one and then get to sew the samples in the pretty fabric.  But sometimes this is what I'm actually sewing ....
Picture
It was looking very much like pea soup in my studio for a couple weeks! And I have to admit I pawned off most of this sewing to one of my assistants who was a good sport and made lots of jokes.  I think she even made her husband try on the men's size one.

Simplicity uses green screen for several reasons.  Sometimes because they want to publish a pattern in the most current prints available which might not be ready when the samples are being made.  Sometimes because they want to be able to take a bunch of extra photos during the photo shoot and use some of those photos later in what they call an editorial shot in the catalog sometime in the future. They can then use a print that might not have been available at the time of the photo shoot.

When this technology was first available, Simplicity was using it much more than they do now. It doesn't save as much time as they thought it would in most cases.  It's very tedious manipulating a print into all the nooks and crannies of a garment or home dec item so that it looks natural. But, it is a great technology in certain places.

Here are a couple other designs of mine that have been color mapped.

Picture
Picture
Picture
Just the cape was color mapped. I couldn't find a color everyone liked, so I made it up in a neutral shade and later they could make it any color they like.
8 Comments

Hat's with wire - Patterns #1582, 1583, 1550

8/28/2013

0 Comments

 
Picture
From my adult cape pattern # 1582
Picture
From the Amy Brown Fairy pattern #1550
Picture
From my child's cape pattern #1583
These three hats are all in patterns just released this month and they are all sewn with basically the same instructions. But, they can be frustrating if you don't do things in the right order.  So, I am going to tell you what I do when sewing these hats. I don't want anyone sewing one of my patterns to be frustrated.

I have one simple tip that should make it easier to handle the hat while sewing.

Each hat has wire around the edge of the brim and a piece of wire running up the seam in the back of the cone shaped crown. Follow the excellent instructions provided in the pattern ... BUT!

WAIT AS LONG AS POSSIBLE BEFORE INSERTING ANY WIRE.

Sew the hat as directed ignoring any instructions to insert wire. Then the brim wire should be done first. Prepare and sew in the wire at the edge of the brim into the bias tape as shown. The very last thing you should do is insert the wire up the back seam of the crown.  I just find it easier to do all the other work on the hat, if the long pointy hat doesn't have a piece of wire that is constantly getting in the way, when trying to sew on the brim or hand sew the wire on to the brim.

That's it!  But it will help ... promise.
0 Comments

Martha McCain - Guest Blogger                    The Road to Extreme Research #3

8/27/2013

4 Comments

 
Museums and Some Things I Have Learned Therein
Picture
Picture
Picture
Hi.  Martha McCain again.  As I mentioned the last time I visited Andrea’s blog, seeing clothing artfully mounted in a museum setting is wonderful.  What’s not to love? Probably only Extreme Researchers want to turn that beautiful garment inside out to find out how it was made.
Picture
Picture
When I designed a Civil War ball dress for Simplicity, I had a lot of questions about how these fluffy confections were really put together. Luckily, the Costume Institute and The Museum of the City of New York let me peep inside theirs.

For example, I wanted to know all about the collar piece called a “bertha.”
Picture
Picture
Picture
Picture
I looked at lots and lots of berthas and, of course, there was variation.  The typical bertha was made by hand. It was mounted on a stiff net base with a center front and/or shoulder seam. All the edges were finished. It was sewn to the outside of the neckline of the bodice with a rather long running stitch. It opened in the center back and this was closed with hooks and loops. The tucker was totally separate and sewn to the inside of the bodice neck.
Picture
Picture
I designed a sheer day dress for Simplicity.  My main question about this style was - What are we seeing underneath  Is that a corset cover showing through the bodice or is it lined somehow?  Again, the Costume Institute came to my rescue.
Picture
Looking inside this lovely dress, I discovered there was a built-in underbodice with little cap sleeves and delicate lace trim.
Picture
Picture
I could go on forever about the details I’ve discovered by looking at original garments. However, next time I visit Andrea’s blog, I’ll talk about Extreme Research at the library.

4 Comments

New cape patterns #1582 and #1583

8/26/2013

18 Comments

 
Picture
Picture
One of the challenges of designing a commercial sewing pattern is making pattern pieces that will fit into the envelope!  The most an envelope can hold is either 4 large sheets of tissue paper and 3 guide sheets OR 3 sheets of tissue paper and 4 guide sheets.  So, you see the problem.  

There have been times when my costumes have been changed after I've finished and turned them in, because the pattern pieces were too large or the sewing too complicated to explain in the limited space ... Martha McCain can tell you even more on this topic!

I wanted this pattern to be a cape and also a cloak with large sleeves, so I had to be very creative how I went about doing this. The secret is in the curious angled yoke seam.


So this is my chance to explain that seam and tell you how to eliminate it, if you want.
Picture
I had to make two front yokes and two back yokes, one set for sleeves and one set without sleeves so only one large main piece would be needed that gets cut 4 times.  The yoke seam is slanted so much because it needs to reach low enough so that a large and complete armhole can be incorporated in that piece.  Separate front and back yokes are needed because a correctly cut neckline should be higher in the back than the front.
Picture
But, you can overlap and pin the yoke pieces to the large main piece to get rid of that seam, if you want.
Picture
18 Comments

Tie Dye experiments #2

8/23/2013

0 Comments

 
Picture
Here are 4 of the 5 garments I've dyed. I think they work with that scarf in the middle, which was one of my goals.
Yesterday I showed you how I tie dyed the dress and skirt on the far right in the above photo.
Today I will show you how I dyed 3 different tops.
Picture
This is a cotton/rayon knit top.
Picture
I drew lines to help me sew straight lines of a running stitch to pull up.
Picture
Ready to dye with all the pleated up places wrapped tightly with thread.
Picture
Out of the dye, thoroughly rinse I'm carefully clipping the thread ties.
Picture
This is my plan, simple parallel stripes which will only get dyed once.
Picture
When they are pulled up the gathers will look like this.
Picture
Into the aquamarine dye bath along with the skirt in yesterday's blog.
Picture
And outside to dry! This is all a want to do with this top.

Picture
This is a women's 100% cotton V-neck t-shirt.
Picture
First I marked where I wanted the circles to be. It's good to plan so the large and small circles are artfully distributed.
Picture
This is what it looked like before dying.
Picture
I then put in some new rubber banded circle areas to preserve this pretty purple color when it get dyed a second time.
Picture
My plan for this top is lots of circles, similar to the green skirt from yesterday, except they will be larger, of differing sizes and I'm only going to use rubber bands. I learned my lesson after the hours and hours I spent with needle and thread tying off all those tiny circles on the skirt.
Picture
For each circle I pulled up a section of the shirt where marked, tried to make lots of small pleats instead of a couple big folds. Then I wrapped this with a big rubber band many times tightly.
Picture
The first dying is the purple/fuchsia dye bath along with the first dying of the purple dress.
I rinsed and dried it outside (no dyer) before removing some of the rubber bands, to allow the second dye color to go straight into the white fabric.
Picture
Into the slate grey dye along with the linen top that I will explain next.
Picture
A good top for jeans and it goes with my scarf!
Picture
Last top, a heavy 100% linen with battenburg lace.
Picture
Again, I draw lines according to my plan before putting the running stitch.
Picture
Here are those three things just out of the royal blue dye. I love how they all came out different colors.
Picture
I tied it up a second time to go into the slate grey dye BUT!!!!! I forgot to put rubber bands around all the pulled up sections ... grrrrrr ... RATS!
And didn't realize it until I had already thrown it into the dye.  So, instead of the usual 20 or so minutes in the dye, I pulled it out after about 3 minutes and rinsed it fast!!
Picture
I thought it would be fun to try a kind of plaid effect.
For the first dying I pulled up each line tight with a single running stitch and then wrapped over that with a fat rubber band doubled several times.
Picture
This goes into the royal blue dye along with the purple dress's and green skirt's second dying.
Picture
This is what it looks like after the first dying.
Picture
Picture
And ... could be worse. Actually not bad ... maybe it's better with the blurred, softer dye job.
You know ... I think this would look great on my older sister.  I have to ask her if she wants it.
0 Comments

Tie Dye experiments #1

8/22/2013

3 Comments

 
Picture
My latest tie dyed creation.
When I posted that first blog about tie dying, I had no idea it would be so fun and that people would be so interested in this .... remember?


You can find the other tie dye blogs by hovering over the word "blog" above.  A drop down menu will appear with "blog archive list". Click on that and you will find links to the other tie dye blog posts.
Picture
Picture
So, for the fun of it, I headed off to the thrift store to see what I could buy for some tie dye experiments.  I bought 5 garments, used 4 different color dye baths and had varying degrees of success.  But, I will wear some of the results.  They aren't half bad.

Today I will show you how I dyed two new garments and tomorrow I will show you the other three.
Picture
I decided to use whatever dye I had on hand.
Picture
The first garment, a 100% cotton light lavender dress.
The upper stripes will be sewn with a single row of thread, pulled tight with rubber bands over.  The lower section will be partitioned off with a running stitch pulled up in a clean diagonal line, then the fabric below will be crumpled up into a ball with rubber bands.
Picture
And I would try to make the finished pieces look good with this new scarf I got for my birthday.
Picture
Here is my rough plan. That was a lesson I learned in my first tie dye blog. Some kind of plan is needed before diving in.
I weighed each piece, to know how much I could put in each dye bath.  It's important to follow the instructions on whatever dye you are using.

Picture
After drawing lines on the garment for the different sections, I run a single running stitch to section off the bottom.
Picture
And secure it with 5 large rubber bands.
Picture
This goes into the purple/fuchsia dye bath for 25 minutes.
The dress gets tied up again, along the second set of lines according to the sketch. This time with 3 stripes up top.
Picture
Now it goes into the royal blue dye bath.
Picture
I used some blue fabric paint to make sketchy lines that follow the tie dye edges.
Picture
I open up the skirt below the stitching and ball up the fabric.
Picture
The lines for the upper part of the garment are made with a running stitch, pulled up and then made tighter with a rubber band.
Picture
Here is the result after the first dying.
Picture
But, after looking at it, I think it needs some paint to define the edges of the color breaks.  See the results above.

Picture
Garment #2, a light lime green skirt made from cotton lawn with lots of stitched down pleats around the hips.
Picture
Here I'm making some of the little thread wrapped pinches of fabric.
Picture
It goes into the aquamarine dye bath.
Picture
I released and opened about a third of the tied thread places.
Picture
The plan for this skirt is to make lots of tiny circles by pulling up little pinches of fabric and wrapping with thread ... more circles at the bottom, thinning out towards the top. It will be dyed twice and half the tied places will be let out after the first dye bath,
Picture
The skirt is ready for its first dye bath. That's the lining hanging below, untied.
Picture
I air dry it completely before removing any of the thread ties.
Picture
Then tied up some new places that will preserve the nice teal color, because it will become a completely different color after the next dying.
I have to confess that this skirt drove me to distraction.  It took HOURS!!  I think it took 3 - 4 hours to put in the first set of ties.  Then it took about 1 1/2 hours to remove about a third of them after the first dying. Putting in new ties for the second dying took another hour or so ...  Anyway ...
Picture
It went into the royal blue dye bath along with the dress above.
Picture
I actually dyed three different things in that royal blue dye and they all came out differently ... fun isn't it?
Picture
Then after a good hour taking out all the tied up thread, I can finally press out all those little crinkles flat and can see the results. I think this, also, is a garment I will be happy to wear.  I love these colors.
Picture
A good light weight skirt that can pack small! I guess you've figured I'm getting ready for a trip.
Tomorrow I will show you how I dyed three tops.

3 Comments

Sleeve Caps - an overview

8/20/2013

8 Comments

 
or ... Why we can't lift our arms.

Yesterday, I showed you how I took the sleeves off my daughter-in-law's dress, so she would be able to lift her arms to dance at the wedding she was going to soon.

This got me to thinking about how the sleeves in modern clothing have very high caps, which make the underarm curve very deep.  This make the sleeve look really nice and smooth when your arms are down, but when you lift your arms this lifts the rest of the garment, or if the garment fits tightly, sleeves like this prevent you from being able to lift your arms at all.

Sleeves weren't always like this.  Until about the 1920's sleeves had lots of extra fabric under the arms that allowed people to lift their arms easily. Dresses during this time fit very tightly and ladies wore tight corsets. I think sleeves changed around the 20s, because all of a sudden dresses were loose so sleeves didn't need to have that extra armpit fabric for mobility. And the look of the sleeves when the dress was simply being modeled was more important than the look when arms are lifted.

So, today I'm going to give a quick overview on the evolution of sleeve caps in European clothing for the last 400 years.  

All my example are from Janet Arnold's books.

Picture
A women't jacket from 1615 - 18
Picture
These 1615 sleeves have a 1 1/2" different between the cap and the underarm.

Picture
A woman's jacket from 1730 - 50
Picture
This sleeve has a 3 1/2" different between cap and underarm.

Picture
A riding habit from 1795 - 1810
Picture
This one piece sleeve has a 3 inch difference between cap and underarm.

Picture
A day dress from 1866 - 7
Picture
These two piece sleeves have 3" between cap and underarm.

Picture
A day dress from 1908
Picture
This sleeve, even though it is fuller still only has 4 inches from cap to underarm.

Picture
A dress and jacket from 1920
Picture
This is when the big change came. The sleeve for the dress has a 6 inch difference from cap to underarm. The difference for jacket sleeve is also 6".
Picture
And here is a good basic modern set in sleeve and the rise of the sleeve cap is 6" for the size 10, which is probably the size of that 1920's jacket above.
I just want to mention that the sleeves in a modern man's shirt have very shallow caps to allow for movement, BUT a modern man's suit has the high cap like modern women's clothing.  Again for that smooth look when standing with one's arms down.

I always make a period pattern with the correct kind of sleeve and often raise the underarm for other costumes just to make wearing more comfortable.  I do the same for my personal clothing sometimes, too.


How can we start a new trend??????
8 Comments
<<Previous

    From Andrea 

    I am a commercial pattern maker who is now "sewing over 50"!
    I love to sew and hope to encourage others to come back to sewing.
    The water is fine!!

    Archives

    May 2019
    April 2019
    March 2019
    August 2017
    July 2017
    June 2017
    May 2017
    April 2017
    March 2017
    February 2017
    July 2016
    June 2016
    May 2016
    April 2016
    March 2016
    February 2016
    January 2016
    December 2015
    November 2015
    October 2015
    September 2015
    August 2015
    July 2015
    June 2015
    May 2015
    April 2015
    March 2015
    February 2015
    January 2015
    December 2014
    November 2014
    October 2014
    September 2014
    August 2014
    July 2014
    June 2014
    May 2014
    April 2014
    March 2014
    February 2014
    January 2014
    December 2013
    November 2013
    October 2013
    September 2013
    August 2013
    July 2013
    June 2013
    May 2013

    Archives by Subject

    To search for blog posts in specific categories, use the drop down menu above by hovering over the word "Blog"

    Enter your email address:

    Delivered by FeedBurner

    RSS Feed

    Andrea Schewe participates in Amazon's associates program.