Andrea Schewe Design
  • Home
  • Costumes
    • Reader's Gallery
    • Fantasy Costumes
    • Theatrical
    • Historic >
      • Easier to make
    • International
    • Costumes for Kid's and Babies
  • Crafts
    • Home Decor >
      • Pillows
    • Fashion Accessories
    • Doll Clothes
    • For Kids and Babies
  • Blog
    • Past Blogs by subject >
      • My patterns by number
      • Sewing basics
      • Personal sewing Projects
      • Fashion History
      • Fun and funny stuff
      • Guest Bloggers
      • Crafts and Home Dec
  • Links
  • Contact

Books for people who love to sew

11/28/2014

0 Comments

 
Picture
I love to read. Even when I am very busy I try to set aside time to read before going to bed. I go from high brow to more popular novels. Jane Austin and Dickens are some of my favorites. I love all of Ian McEwan's book. I sometimes like non-fiction like Outliers by Malcom Gladwell. That's the book where he talks about the theory of 10,000 hours to become really good at anything. He gives examples of great athletes, artists and inventors, a very interesting read. Another non-fiction book that has influenced me a lot is The Omnivore's Dilemma by Michael Pollan. This has changed my eating habits and how I think about food in general.

When I'm overloaded with work, like right now, I like to escape into a plot driven book series with a group of friendly characters. Alexander McCall Smith has several series that I read from time to time. The No. 1 Ladies' Detective Agency Series being my favorite.

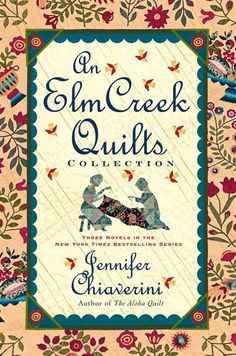
I am currently sucked into a series that is new to me all about a bunch of quilters, thanks to Linda Sparks of Farthingales (the corset supply website).

It is the Elm Creek Quilts series by Jennifer Chiaverini. Here is a link to her website.

The stories center around an old mansion and a bunch of quilters who are friends. But the plots vary widely, sometimes going back into historic times.  I'm currently in the middle of book five. I like to read books in a series in order, if at all possible.
Picture
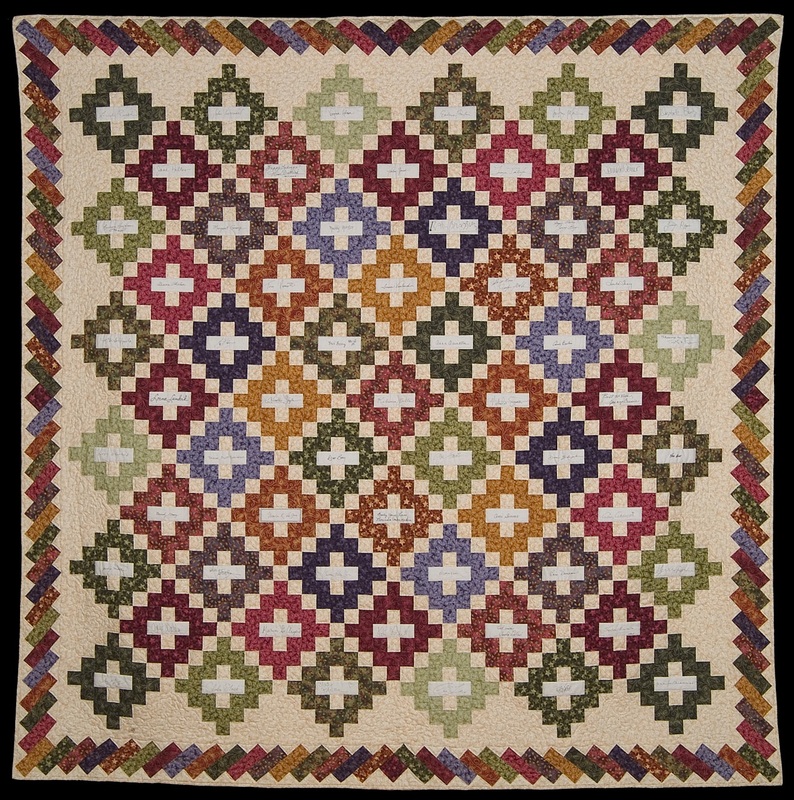
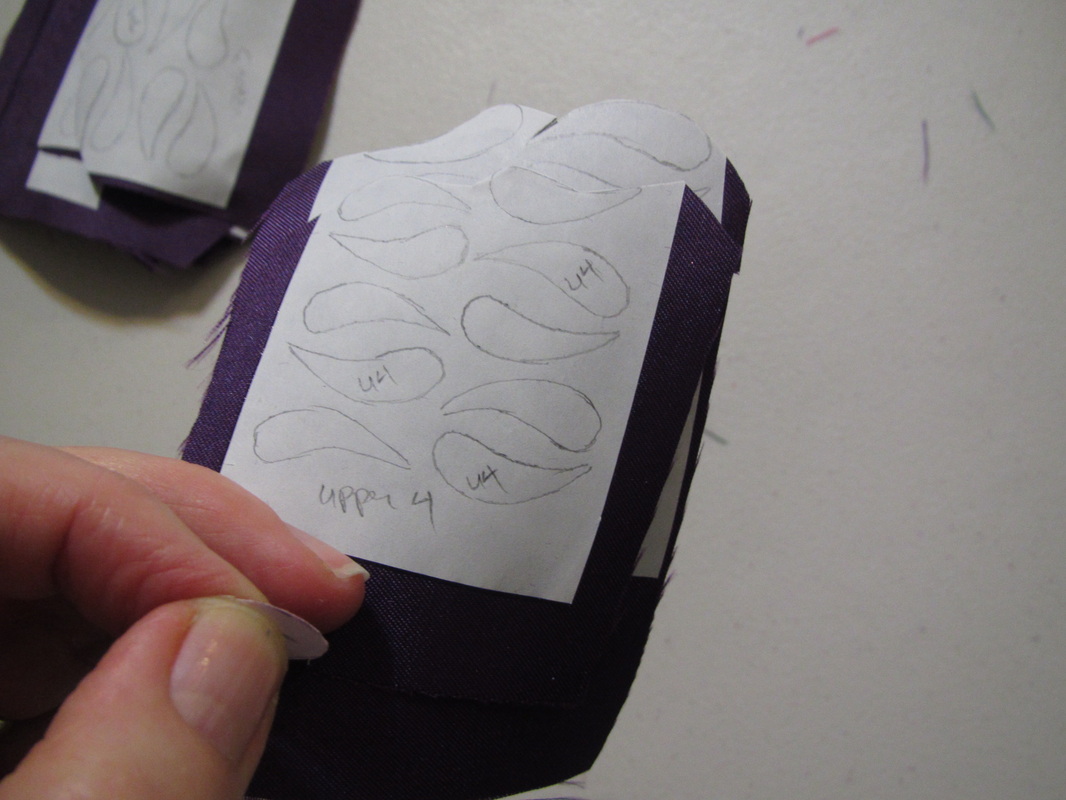
Now I am aching to make a quilt.  I will figure out how to work one into my schedule in 2015. Maybe that will be my New Year's resolution!

I want to share one more book thing with you all.  I found my all time favorite short story on line where you can read it for free. 

The name is Career Move by Martin Amis. This link will take you to the story.

In it he creates an alternate world, where the idea of who succeeds and and who struggles is turned on it's head.  Every time I read it I laugh out loud.

Let me know if you like it, too.


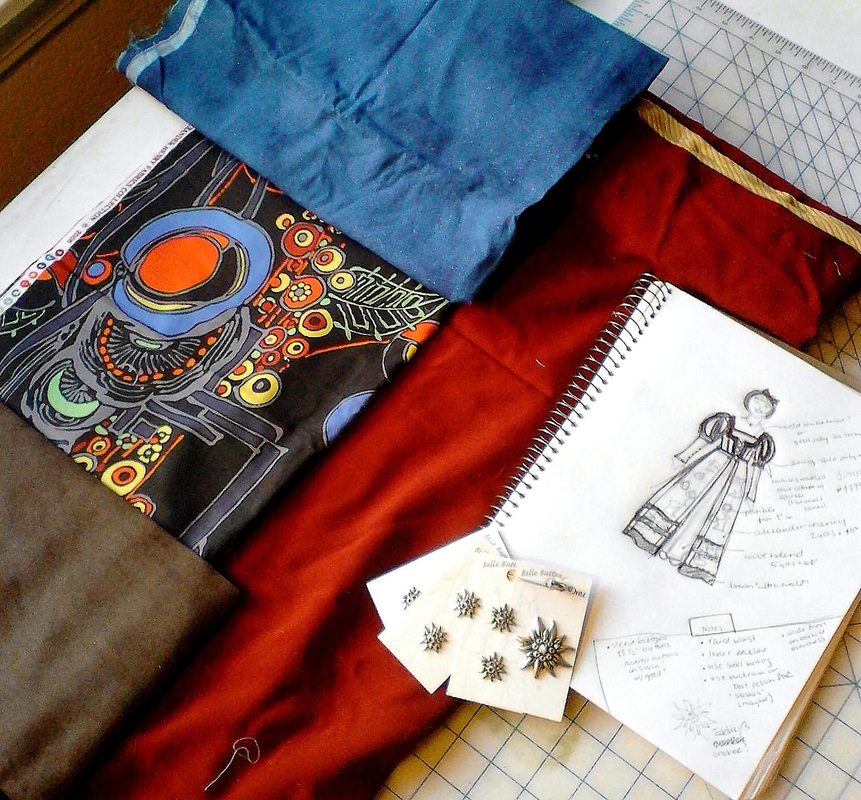
AND, I'm happy to announce that next week is Theresa LaQuey week. She will be sharing her sketches and work on several Steampunk designs for Simplicity.
0 Comments

Marietta Greene - Guest Blogger ... a costume from her stash - part 2

11/26/2014

0 Comments

 
Picture
Last we met I was just at the beginning of making my (stashbusting) Snow White  Halloween costume using Simplicity 1773.

As usual – plans changed and the timeline to make said costume became incredibly shorter than originally planned. I somehow thought that I could knock out a full costume in under a week…in the evenings only…after a full day of work…where I sew for 8 hours. Yeah…..right….

The cutting out the pieces took longer than planned – I really didn’t read the whole pattern as I usually do and I wasn’t aware of how involved and detailed the pattern was. (I should have known better)


From Andrea ... here we go into Marietta's mind. She comes up with clever ways to make the materials she has on hand work. AND what to do about problems that arise while working on a project.  These are the skills acquired while making lots of theater costumes under tight deadlines!  Brava, Marietta.


Below was her original plan.
Picture
Lots of little pieces. The overdress sleeve specifically. But Brilliant!!! I love that it truly is a sleeve that has been slashed and not just strips of cloth. Clever construction! 
Picture
Instead of gathering – I pleated the center 3 strips. Being low on time (and supplies), I whipstitched the sleeves to the bodice instead of snaps. Part of me wishes I had used a heavier interfacing or even buckram for the strips – but the other part of me likes the softness of the strips…..jury is still out. I am also considering tying the sleeves on for a future over dress.

My other “low on supplies” issue was not having enough of one fabric for the skirt. And even those two weren’t enough, so I had to add godets to fill the void.

Picture
On to the bodice – this is where I became forgetful. I forgot to add the boning and I took a few shot cuts. Should have flatlined or underlined the bodice – but lack of time was making me forgetful. I also constructed the bodice like I do corsets and period bodices. Click here for a good description of this method.
Picture
So I made up some bias, stitched it to the lining, and made what little boning I had work.

I also changed the center front a bit too – This is where I spent a bit of money (less than $5) and went to the jewelry findings dept. at JoAnn’s for some beads that I could use for “grommets” instead of using the ribbon loops. Could have used boning at center front, but not 100% necessary.  


From Andrea ... Hmmm, I think boning at the front matters if you are using lacing. 

I did not add the studs called for in the pattern – Had I gone with a plainer fabric, I think it would have been needed.
Picture
The underdress was almost perfect – I forgot to make a simple adjustment to the pattern to accommodate my very pear-shaped body. Typically I cut a pattern from shoulders down like so:

size 14/16 at shoulders

size 16/18 at bust (with a 16 sleeve)

size 18/20 at waist

size 22 and beyond at hip.

I forgot the 14/16 at shoulders and ended up with some serious gap-age at the neckline.

I also did not want to add a zipper so I could use the underdress for other costuming events where that might matter…… And this is where the “almost” comes into play.

Time caught up with me and I was not able to resolve the neckline or closure issue in time for the big event. It didn’t help that it was POURING RAIN!!!!! Soooooo she did not make her debut – but I live in Portland now, so I am sure there will event where I can wear her.


Please get a photo when you do wear it. I and I bet many others will want to see you in it.

And thanks, Marietta, for writing this!

Andrea


0 Comments

Marietta Greene - Guest Blogger ... a costume from her stash - part 1

11/24/2014

0 Comments

 
Marietta is back! Remember she has a very interesting sewing background which included a lot of theatrical costume. Read about her background here.


She did a really great and creative fabrication of one of my patterns. I know you are going to want to see this so .... take it away Marietta!
Picture
For this Halloween, my son said the sweetest thing to me:

"Mom, I am going to wear what I wire last year since we are at a new school and a new neighborhood. BUT FOR NEXT YEAR, I have lots of ideas!"

 Why is this the sweetest thing, you might ask? It meant I got to make a costume for me! My son went out as a Cyborg and I (almost) went out as Snow White. 

My goal was to create a costume that was relatively age and body type appropriate, something that I could possibly wear again AND something which had the potential of stash-busting and be a pattern already in existence.  So I went with Simplicity 1773 – Andrea’s version of Snow White and the Huntsman.  

This pattern was a lovely way for me to get my Dirndl fix (sort of), cater to my love of Grimm Fairy Tales (preferably in the original German) and something with a few historical costuming details  - not necessarily dead accurate to a particular period – all the while stash busting. (Although the Grimm’s published in the early 1800’s, many historians believe the story of Snow White was based on a noble woman living in the 1500’s)

Picture
This was my original plan. The print intended for the skirt is an Alexander Henry print that I purchased 8 or more years ago. (It is called JUGENDSTIL - the name of and based on my favorite moment in Art History – which is also specific to Germany and the Austro-Hungarian Empire.  Notice a theme in my life?)  There wasn’t enough of the fabric so I thought that I would get creative with it and piece it with the brown “suede” leftover from a cut up skirt ruffle.  The husband vetoed this plan. I don’t normally listen to the husband, but he felt it just want quite right for this project…and he was right.
Picture
So I headed to my local JoAnn’s and picked up a lovely home deco fabric for the bodice, a bit of gold crepe back satin from the remnant pile, for the overdress sleeve lining, and a couple of necessary notions.

There are many challenges to stash busting  - such as not having the exact amount of fabric required for a garment, not having matching threads, and not having all of the important notions.

Next time I will go through what I changed, what I forgot and how I put it all together.


Andrea again ... come back Wednesday to see this costume take shape.
0 Comments

Simplicity #1215 - Anna's Coronation dress and the PLEATED skirt!

11/21/2014

29 Comments

 
Picture
As promised, today I will show my work on Anna's pleated skirt.
Picture
This was my inspiration. Most versions of this costume don't have actual working box pleats and for a good reason. It is LOTS of work to sew and even more work to figure out the pattern.

My hat goes off several times in a row for the person who made a fabulous pleated version of this dress for Costume Con in Toronto this year.  If anyone knows, please write in and tell me her name so I can give her proper credit.
Picture
Picture
Because these flaring pleats need support, I designed the pattern to fit over a standard smooth waisted bridal petticoat.
Picture
The skirt is made up of 10 identical pleats. There are 3 main pattern pieces, the outer panel, the narrow central stripe of the outer panel that gets the design pieces put on it and the recessed box pleat piece.  You can see by this photo that I sewed some stiff interfacing behind each of the outer panel pieces.  The darker center piece is sewn on with a zig zap appliqué stitch on either side. Then all the cut out pieces are ironed on.

One of the big reasons I decided to make the skirts and bodices separate in this pattern was to be able to use the same pattern pieces over and over for all ten pleats. If the skirt was sewn to the bodice with that point at the center front, I would have had to make completely separate pattern pieces for all three parts the front and side front pleats to correspond to the slope of the bodice front waist seam. This would be so confusing AND require much more pattern tissue.  Then there might not have been enough room for the big, wonderful snowflake cape in the pattern envelope.
Picture
This is the pattern piece for the inner box pleat.  It flares out at the same angle as the outer panel.
Picture
This is how I got the exact design for all those motifs. The pattern is repeated five times, getting progressively larger from waist to hem. So, I traced the best illustration I could find first.
Picture
After I determined the length of the skirt, I could then use my proportional scale to help. I only drew out the design once and used my copy machine to get the five different sizes of motif repeats.
Picture
Using my preferred method, permanent fusible webbing, I traced all the motifs, ten times over, organizing them by color.
Picture
I devised a labeling system to prevent mixing up the pieces. So many of them look so similar.
Picture
To properly space the pieces, I like to use the pattern folded in half as a guide, rather than mark on the fabric.
Picture
The white/iridescent dots are made with a small bottle of squeeze paint.
Picture
It works best to press the pleats in all the box pleat pieces before sewing them. The skirt becomes very heavy and unwieldily as the sections get sewn together.
Picture
I finished all the seams with a wavy rotary cutter, instead of serging, to keep unnecessary bulk out.
Picture
You can see how the white looking squeeze paint dries into nice glowy iridescent dots.
Picture
One last thing.  Inside the hem at the inner corner off all ten box pleat pieces, I sewed a metal washer to help the pleats stay pleated, so 20 weights in all.

Box pleats, or actually any kind of pleat do not really work being flared out like this. But, of course, anything is possible in animation!!!!! Which makes life interesting/difficult for costume makers.

Pleats really should be cut straight and hang straight. Even the pleats on a kilt are stitched down in the upper section that is shaped over the hips. They don't open until they reach the point where they become perfectly straight.

This is why I had to build these pleats over that conically shaped petticoat and put weights in the hem. This skirt looks beautiful in motion, but even with the weights, it will need help from time to time to make the pleats lie flat after they've open up.

So, this is all I have to say about Frozen for a while. Rumors have it there is a sequel in the works ... ahhhhhhh!!!!
29 Comments

Simplicity #1215 - Elsa's Snowflake dress - the cape

11/19/2014

8 Comments

 
Picture
So, why were these two dresses put in the same pattern package? First, if you discount the sheer yoke and sleeve on Elsa's snowflake dress, the two bodices are really the same shape.  I decided to make a separate, boned, lined bustier that zips in the back with a separating zipper. Then the two very different skirts could just be separate skirts. And the sheer yoke and sleeves for Elsa's dress become a very close fitting sheer spandex top. That's how it's drawn in the movie anyway. And then the cape can be removable by having it attach with hooks along the upper back edge of the bustier.

Often I have to be very careful about pattern pieces getting too large, but these two skirts didn't cause a problem. Elsa's skirt is very slim and Anna's pleated skirt has three skinny pieces that are each cut ten times each. That allowed me to make a nice BIG cape.
Picture
Here is Elsa's spandex top when I was trying to get the fit just right ... close fitting but not too, too tight.
Picture
When work is done for an official licensed character, the company that holds the license sends out an official character book with pages and pages of images and other information such as specific Pantone colors that should be used. This is easy for people making printed things like bed sheets and lunch boxes. They mix paint until they get the right color.

But, we just have to do our best to find fabrics that are as close as possible. The licensor, in this case Disney, has to approve everything. I've worked on projects where the actual costume was sent in and came back with all sorts of notes pinned all over for the corrections they wanted.

Now usually photos are sent of the finished costumes for approval and I'm lucky that there haven't been too many changes as of late.
Picture
The Frozen character book has several pages of "official" snowflakes. I chose 5 different ones that I thought could be modified into a shape that wasn't too hard cut out multiple times without losing your mind.
Picture
I then ran the ones I chose through my copy machine several times until they were the sizes I wanted.
Picture
Here they are all ready. Fabric is pressed to the fusible webbing ready to go on the cape. I will explain how I got to this point.
Picture
This photo shows the design of the cape pretty well. 
Picture
The upper section is aqua and the lower section is white. The divide between these two colors is a lot of jagged lines. After a lot of experimentation I determined the best way to do this would be to lap the aqua over the white, zig zag along the edge and then ...
Picture
CAREFULLY cut away the excess in the back. I made the pattern with about a 1" overlap allowance to make is easy to line up, but this extra does need to be trimmed away.
Picture
I'm tracing the snowflake designs onto the paper side of the fusible webbing here. A small ruler really helps to keep all those lines straight.
Picture
Using iron on fusible webbing with a sheer fabric works fine BUT you have to use baking parchment paper on both sides. Otherwise the gluey stuff gets on the iron, the ironing board and everywhere else you don't want it.

Now, in this photo I'm pressing the paper backed webbing to the fabric, so in this case I only needed the baking parchment on the back side of the fabric.
Picture
Once the shapes are cut out, the paper is peeled away and the snowflakes can be pressed onto the lower part of the cape.  This is where it is crucial to have that parchment above and below the fabrics while pressing.
Picture
Allow the snowflake to cool down, but not completely. I found it was easier to peel the parchment away if everything was just a tad warm.
Picture
After each snow flake I put the cape back over my pattern piece to make sure all the snowflakes were going in the correct place and both sides were even.
Picture
The bottom and sides of the cape are hemmed by machine with a tiny rolled hem. The top edge is finished with a narrow binding. This is substantial enough to sew a bunch of small hooks and snaps to. I left the bottom edge of the trim loose, so the corresponding eyes and snaps could be sewn UNDER the trim. That makes the cape look as if it it is part of the dress. I like this method, too, because it gives a very smooth look in the back. There is no zipper going up the back of the sheer top and there is no break or opening in the cape.


Friday, Anna's pleated skirt.
8 Comments

Frozen for Ladies #1210 & 1215- The Crowns and Capes

11/17/2014

2 Comments

 
Picture
These are the three crowns I made for the models to wear with the adult Frozen costumes that just came out, but low and behold ... Simplicity used my crown for their second set little girl Frozen costumes, too. Those were done in their New York offices.

See ...
Picture
They are made with quart sized yogurt containers, spray paint and glitter. I did a complete tutorial that is at the Simplicity website. Use this link to go to it.

My crown tutorial for all three crowns at the Simplicity website.

I thought I would show you a couple things about the capes today, too.
Picture
This is a side view of the cape for Anna's winter dress. See how it slopes from the front to the back.
Picture
This is a photo I sent to Simplicity when I was experimenting with different trims. There are specific designs that are supposed to be on this cape similar to all the dresses, but I was happy to find this trim (that Simplicity makes) that works pretty well. I was getting tired of cutting and fusing all the motifs. Also, I was worried it would be difficult to put a design on polar fleece and I really thought this cape should be made of polar fleece. 
Picture
The ball fringe is inserted in the seam that joins the outside polar fleece to the cotton broadcloth lining. This seam has to be clipped and trimmed to lie flat.
Picture
Then I simply stitched on the trim with two rows of narrow zig zag.
Picture
I gave Elsa's coronation cape a nice long train. My dress form is a little off the floor so the train is actually a little longer than this. But, of course, this will change according to the height of whoever wears the costume and it can be made as long as anyone wants! Just buy a little extra fabric.
Picture
Sewing the purple flat trim around the curved edge of this upper cape is a little tricky.
Picture
I used purchased packaged single fold WIDE bias tape. And no matter how hard I tried I couldn't steam press it into a tight enough curve without it buckling and folding. So, I ran a machine stitch along the part that I was having trouble with and pulled up the thread to force it to ease in.
Picture
Then I was able to pin it all flat and edge stitch the inner side of the bias tape.


The main part of each of the capes is unlined, but if I were making this for a special person or occasion I think I might line it. The reason I didn't do it for these samples is that I hate to require people to buy, lots and lots of fabric if it isn't necessary.


Wednesday ... Elsa's snowflake dress and especially the cape.
2 Comments

Simplicity #1210 - Anna's Winter dress and Elsa's Coronation dress - motifs

11/14/2014

9 Comments

 
Picture
Where  to begin?

I was working so hard on these costumes in July that I only took photos haphazardly, but I think I have enough to be able to show you all the interesting parts of making these dresses.


First, let me explain why the four dresses are grouped the way they are. These two dresses have a very similar shape. They both have close fitting band collars, long sleeves, slightly dropped waists with points in front and a flared skirt with no gathering at the waist. Also, they both have capes. So, even though these two costumes are worn by different people and are never seen together in the movie, it made sense to put them together pattern-wise.
Picture
Picture
I thought you might like to see the dresses without the capes.  It’s hard to see the details on the bodices on the envelope photo.
Picture
Picture
See the neck decoration on Elsa’s gown and the very exaggerated curved shape of Anna’s faux bodice/vest neckline.
Picture
My preferred method for all the decorative motifs is fusible webbing (Heat’n’Bond “RED” or Stitch Witchery) and solid color fabrics. I think it is fastest, but other’s may want to paint or embroider.

It is best if all the motifs are done while all the fabric is flat BEFORE any sewing, no matter what method is being used. Because the bodice motif is so large, it has to go over the bust darts.  So, I fused on the center part first, THEN sewed the darts and finished pressing on the rest of the appliqué. See the basting stitches? These show me exactly where the dart stitching line is.
Picture
I hope you like the peasant styled stitching I put on Anna’s collar and cuffs! Thanks to my fancy new sewing machine.
Picture
The scalloped border at the bottom of Anna's skirt I did NOT use fusible webbing. It is too large. Fusible webbing is expensive and stiff. So I first straight stitched it in place and then did a satin stitch zig zag over.  This can look really nice. 

I would have loved to have done all the motifs this way, but then I would have probably spent the next five years making these dresses!  REALLY!

Disney can go crazy with the clothing in their animated films now computers are involved. You would never see such unrelenting detail if the cells were are being hand painted!! grrrrr!
Picture
So, I hand traced the motifs on the paper backed fusible webbing ...
Picture
Grouping them by color.
Picture
And used a print out of the design, folded in half to help with placement.  The very small pieces kept sticking to my fingers and I found using a small tweezers so much easier.
Picture
I sewed the gold bias tape around the faux bodice neckline with a small zig zag, carefully mitering the points.
Picture
Now all the hard parts of Anna's dress are done ... phew! ... and I can finish the sewing.
Picture
I am left with a pile of rubble! 

Actually, this is the pile from Elsa's coronation dress, but there was a very similar mess from Anna's dress.

There is so much to say about the four Frozen dresses. And this is a good thing. I'm going to stretch it out over a number of blogs, which will give me something to write about while I am furiously working on next year's costumes.

Probably topics are ... "The crowns and Capes", "Elsa's snowflake cape", "Anna's pleated skirt ... AHHHH!"  and ???
9 Comments

Official DISNEY FROZEN for grown-ups - Simplicity #1210 and #1215

11/12/2014

16 Comments

 
Picture
You may wonder WHY did Simplicity publish these patterns AFTER Halloween??

And you would be justified in wondering this. All I can say, is that's as fast as they (or should I say "I" or actually "we") could get them finished!  
Picture
But, also, no one in almost any industry that makes Disney stuff had a clue how popular this film was going to be. And so Simplicity rushed out the little girl sized pattern and the Barbie pattern (I made). These were done in spring and hit the stores mid-summer.

The dilemma was how to approach the adult size. Our competitor (not to be named!) was on the ball and did an EZ version of two of the dresses early on. And after some investigation Simplicity found out Disney wasn't going to do anything about these unauthorized versions. So we needed to do something better. After Betsy and I attended Costume Con in Toronto and saw several fabulous renditions of Elsa's and Anna's costumes it was decided I would make "Cosplay worthy" versions of these dresses.

So, Anna's coronation dress has 10 box pleats with weights at the bottom to help them re-pleat after opening up. Elsa's snowflake dress has a complete snowflake and zig zag design for the cape, not just random purchased snowflake appliqués or printed fabric. Also, the skirt for this costume is a slim skirt with a front walking slit and train (like in the movie).  AND the bodices for this costume and Elsa's coronations dress are separate boned bustiers that have separating zippers in the back.

Needless to say ... these 4 dresses took the entire month of July for me to make and pattern.
They might have taken longer, except I had booked my vacation to Scandinavia and I HAD to get them done. And, actually, Simplicity HAD to get them into their offices, because I only begin the journey of a pattern. After I finish my job, they have to digitize my pattern, check it, grade all the sizes, write the instruction, translate the instructions, draw the sewing illustrations, set up the guide sheet, arrange the pattern pieces to fit on the tissue paper, find models, take photographs, edit the photographs, put them on the envelopes and in the catalog ... THEN print everything ... THEN get the patterns on the website and into the stores so you can buy them.

That is why these patterns came out now.


I will be following up with blogs showing my work on all 4 of these dresses in the coming week or two.
16 Comments
<<Previous

    From Andrea 

    I am a commercial pattern maker who is now "sewing over 50"!
    I love to sew and hope to encourage others to come back to sewing.
    The water is fine!!

    Archives

    May 2019
    April 2019
    March 2019
    August 2017
    July 2017
    June 2017
    May 2017
    April 2017
    March 2017
    February 2017
    July 2016
    June 2016
    May 2016
    April 2016
    March 2016
    February 2016
    January 2016
    December 2015
    November 2015
    October 2015
    September 2015
    August 2015
    July 2015
    June 2015
    May 2015
    April 2015
    March 2015
    February 2015
    January 2015
    December 2014
    November 2014
    October 2014
    September 2014
    August 2014
    July 2014
    June 2014
    May 2014
    April 2014
    March 2014
    February 2014
    January 2014
    December 2013
    November 2013
    October 2013
    September 2013
    August 2013
    July 2013
    June 2013
    May 2013

    Archives by Subject

    To search for blog posts in specific categories, use the drop down menu above by hovering over the word "Blog"

    Enter your email address:

    Delivered by FeedBurner

    RSS Feed

    Andrea Schewe participates in Amazon's associates program.