Andrea Schewe Design
  • Home
  • Costumes
    • Reader's Gallery
    • Fantasy Costumes
    • Theatrical
    • Historic >
      • Easier to make
    • International
    • Costumes for Kid's and Babies
  • Crafts
    • Home Decor >
      • Pillows
    • Fashion Accessories
    • Doll Clothes
    • For Kids and Babies
  • Blog
    • Past Blogs by subject >
      • My patterns by number
      • Sewing basics
      • Personal sewing Projects
      • Fashion History
      • Fun and funny stuff
      • Guest Bloggers
      • Crafts and Home Dec
  • Links
  • Contact

Sew'n for my man

3/29/2017

4 Comments

 
Picture
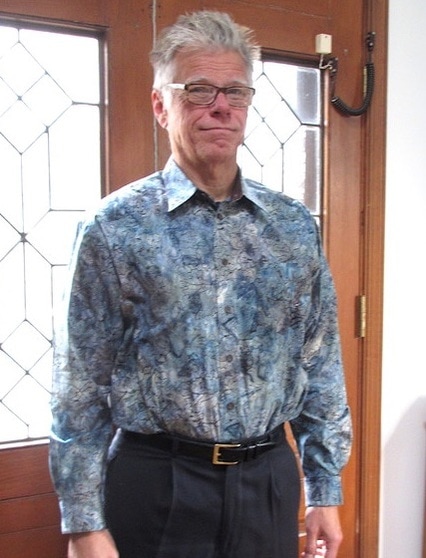
This is my darling husband wearing a custom made shirt! We have been married a very, very long time and when I don't know what to get him for his birthday or Christmas, I make him a shirt! I think of it as wrapping him in love.
Picture
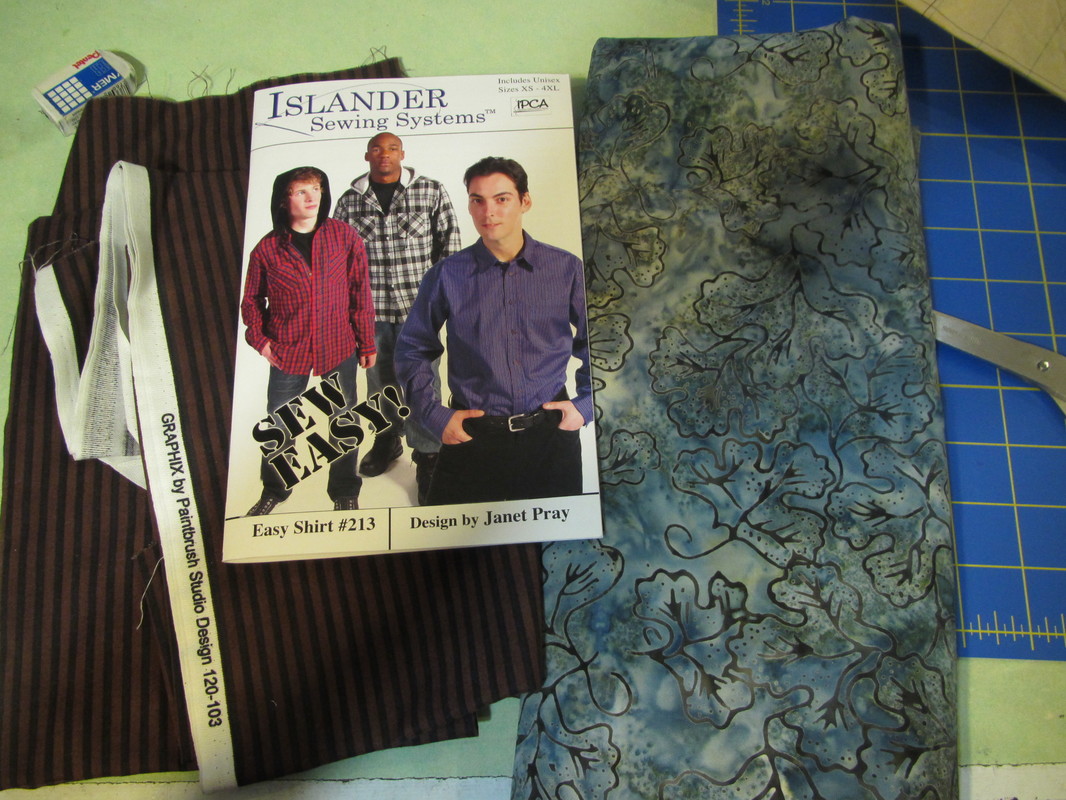
This time I used a pattern made by my friend Janet Pray. She owns and designs for the Islander Sewing System, which makes patterns and teaches sewing using industrial techniques, meaning small seam allowances and sewing without pins. I have to confess, I did a lot of the sewing my own way and didn't follow all the instructions to the "T". I need to pin for things like collars and cuffs. These details need to be super crisp for a man's shirt to look good.

​That said, this is a good pattern no matter how you do the sewing.
Picture
I did follow the pattern layout to the "T" though and it worked really well.
Picture
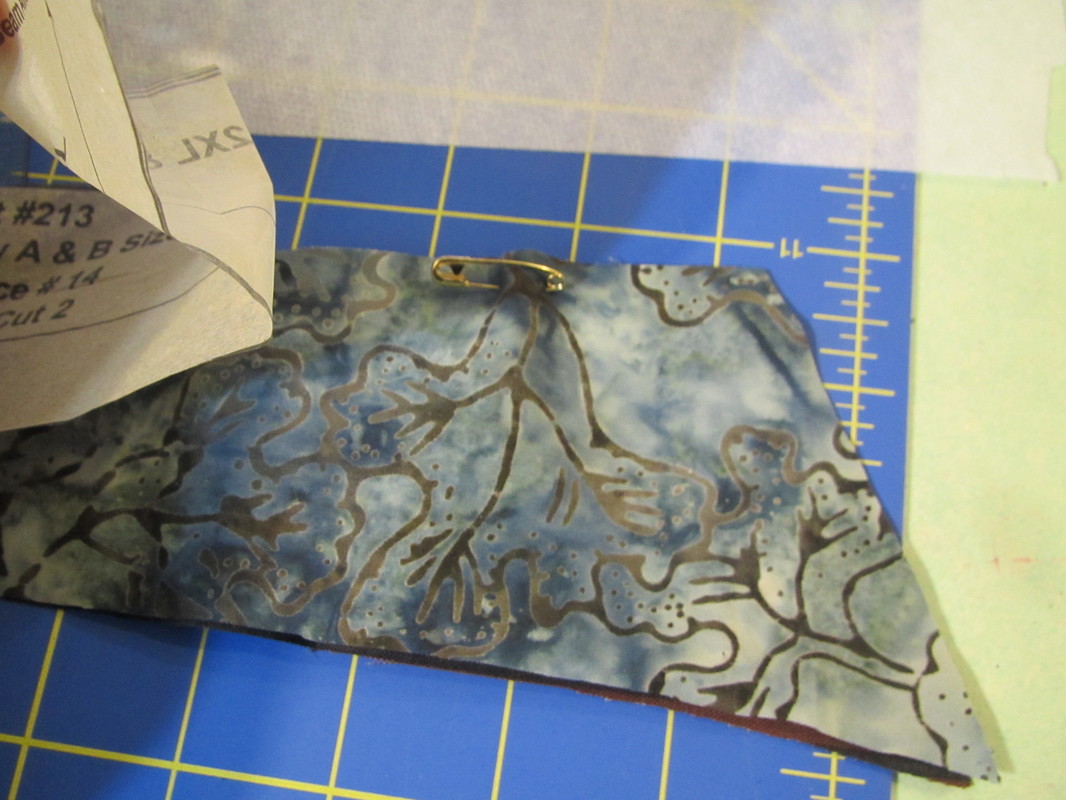
My husband like artsy stuff so I chose this batik print. But it was really hard to tell the right from the wrong side, so I put small safety pins on the right side of all my cut pieces, because the color was a bit different on each side and it would bother me to death if I had to look at him wearing a shirt with the right and wrong sides of the fabric all mixed up.
Picture
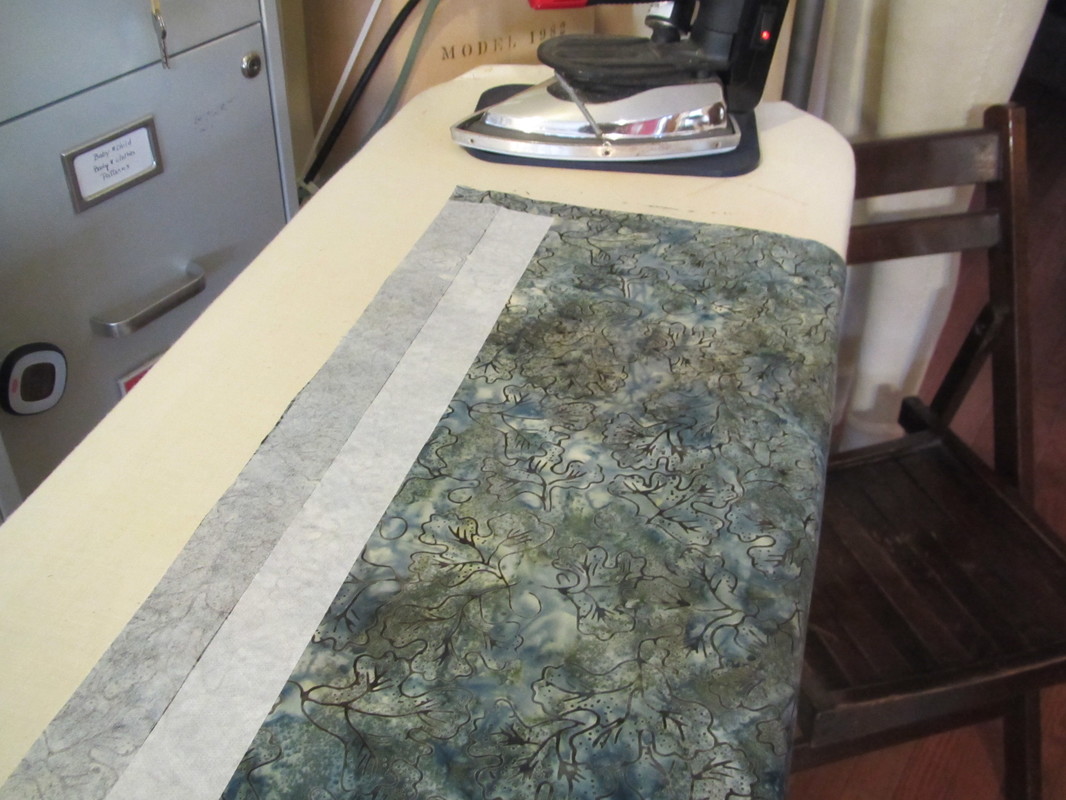
This pattern, interestingly, has you use two different weights of interfacing for different parts. (SEE ... even the front placket alone uses both kinds) I like the finished product because of this. It's really stiff where it should be and less so where it's shouldn't be. And, if you are going to go to the trouble to sew a shirt like this, buy good quality interfacing. I am so grateful I heeded my own advice every time I wash this shirt. The collar, cuffs and front placket lay flat and iron well with no bubbling.

And don't forget the all important cool down after fusing anything. Don't move whatever has been fused until it is cool. That assures fusing success!
Picture
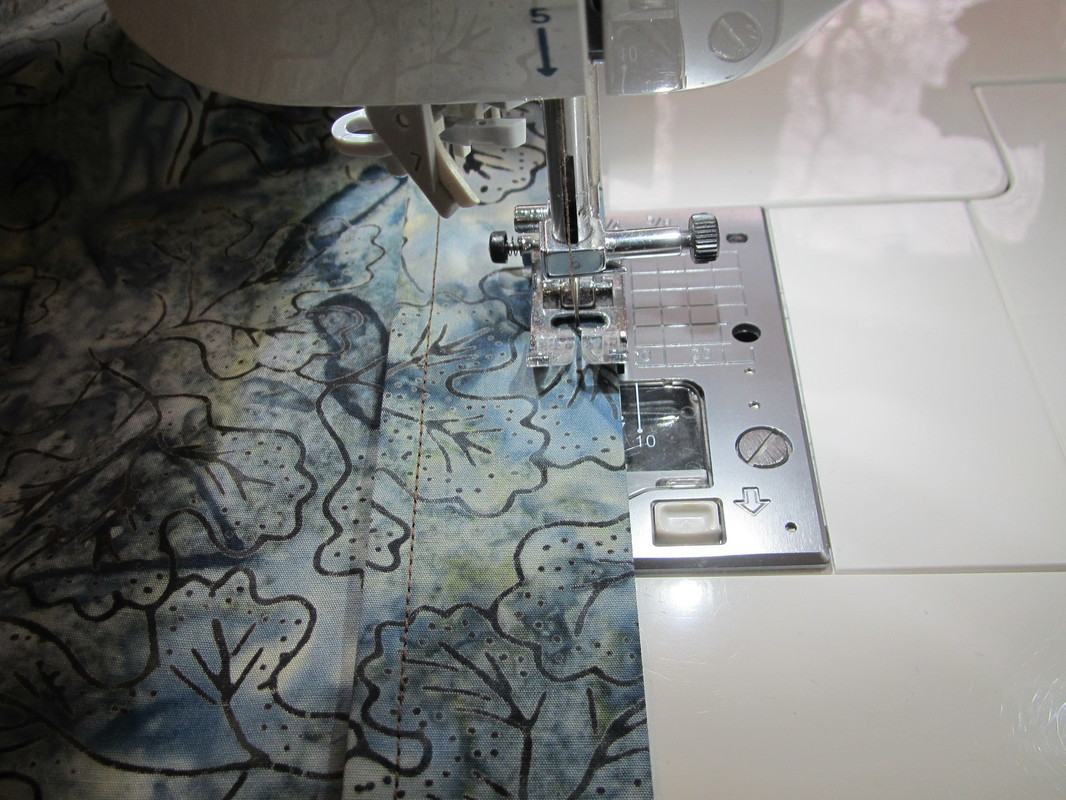
I think I did a pretty good job with all the top stitching, but if you use a busy print like this, small mistakes won't show ... ha ha.
Picture
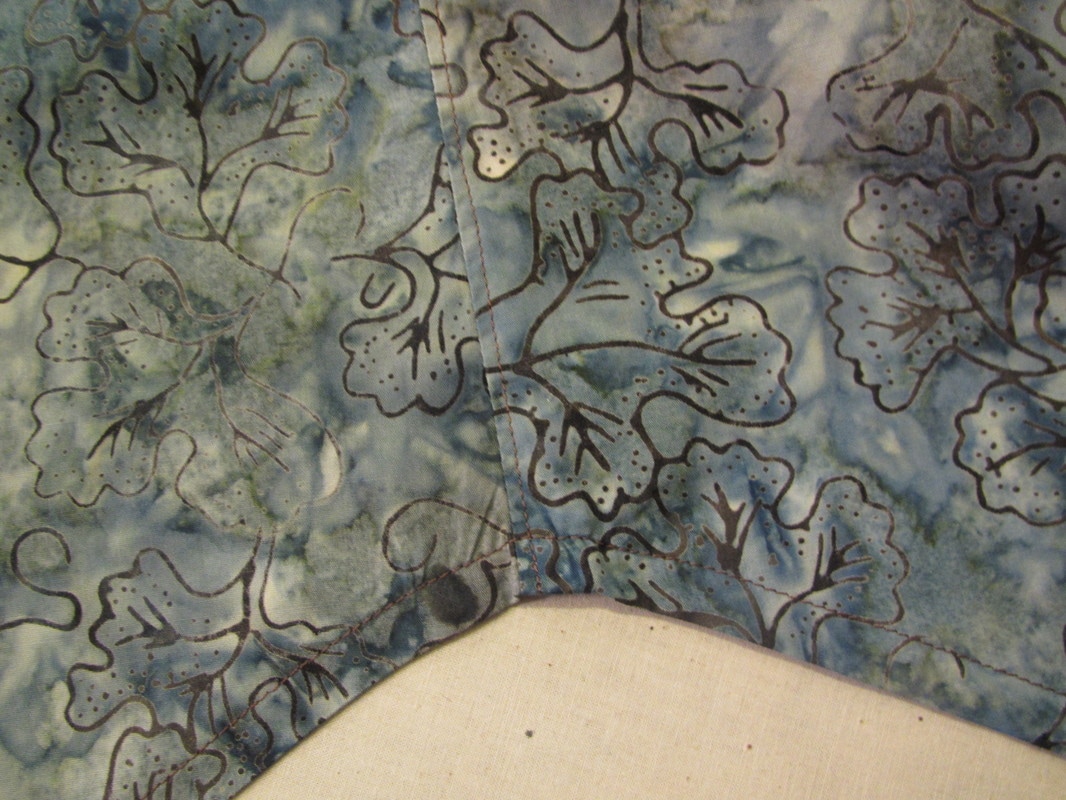
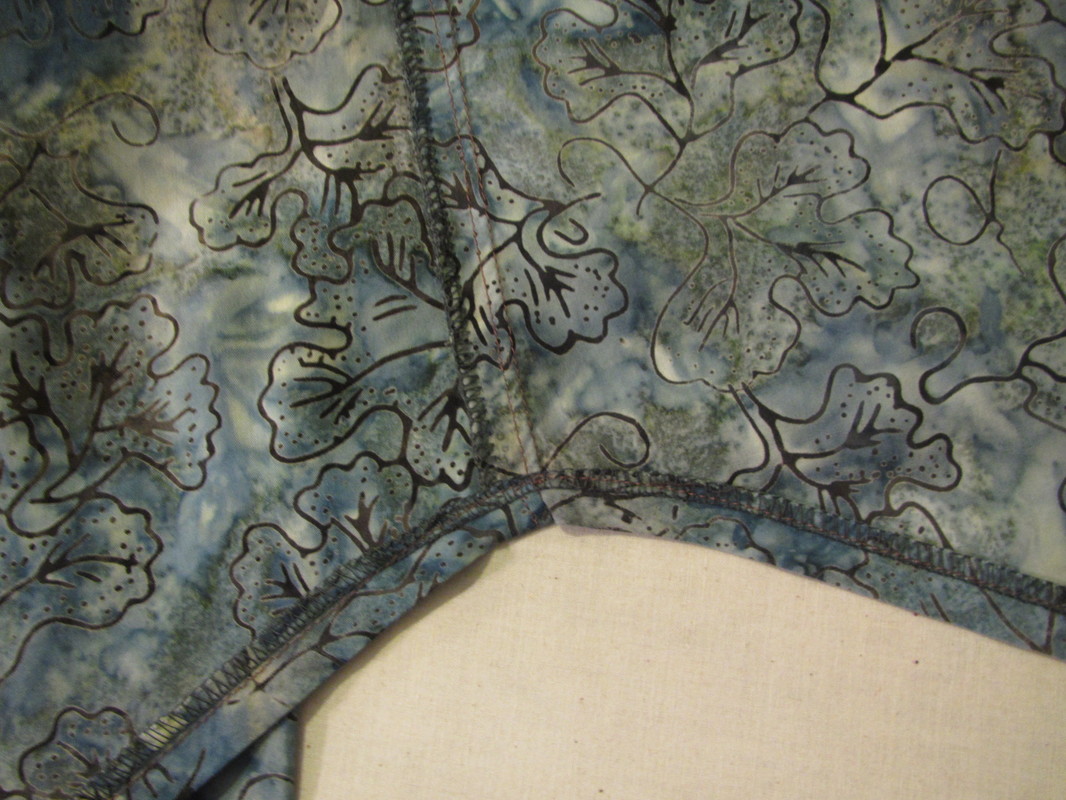
This pattern has you edge stitch the outer side of the collar-stand to the shirt after seaming the inner side of it to the neck of the shirt the regular way. First you press back the seam allowance and stitch 1/4" from the fold THEN edge stitch it down. As you can tell, this is one of those places I needed to pin.
Picture
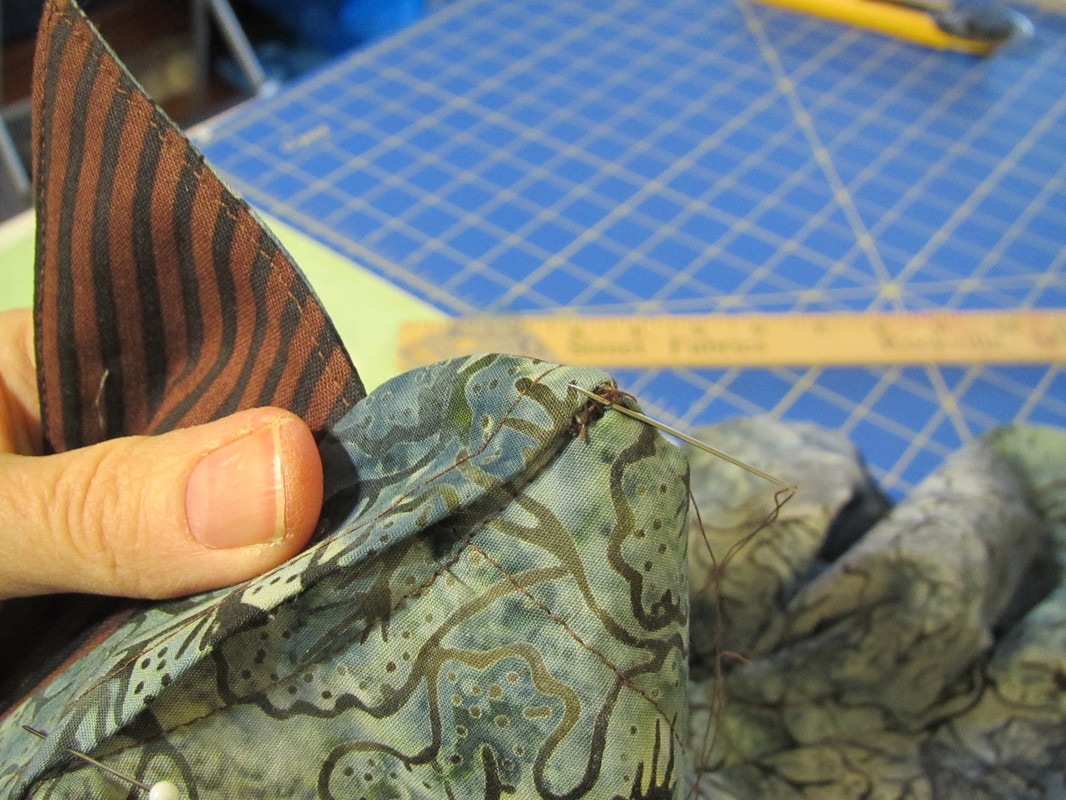
Another way I "cheated" is, I hand sewed each of the ends of the collar-stand in the front. I was just too afraid I would slip up with the sewing machine.

If you have any collar anxieties like I do ... this video should amuse.
We can learn factory sewing technics, but we NEED those machines!
Picture
Picture
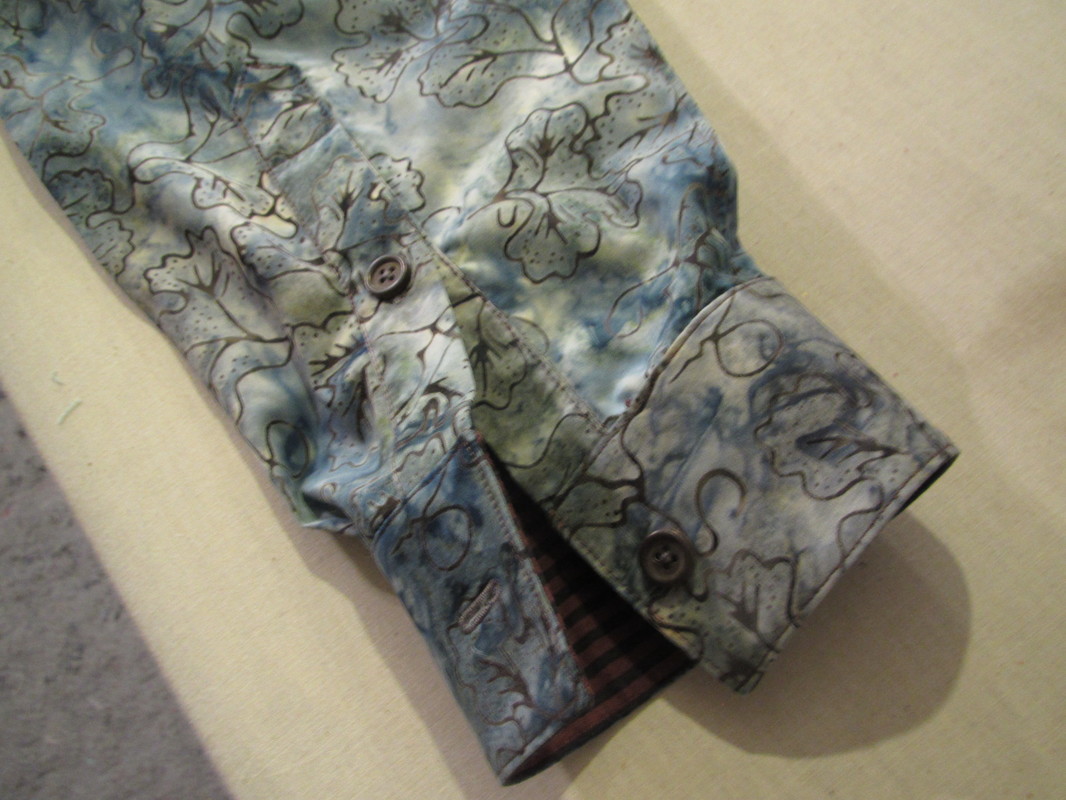
But, back to my shirt. Here is the cuff, which I am very proud of. The design and instructions for the cuff in the pattern work very well.

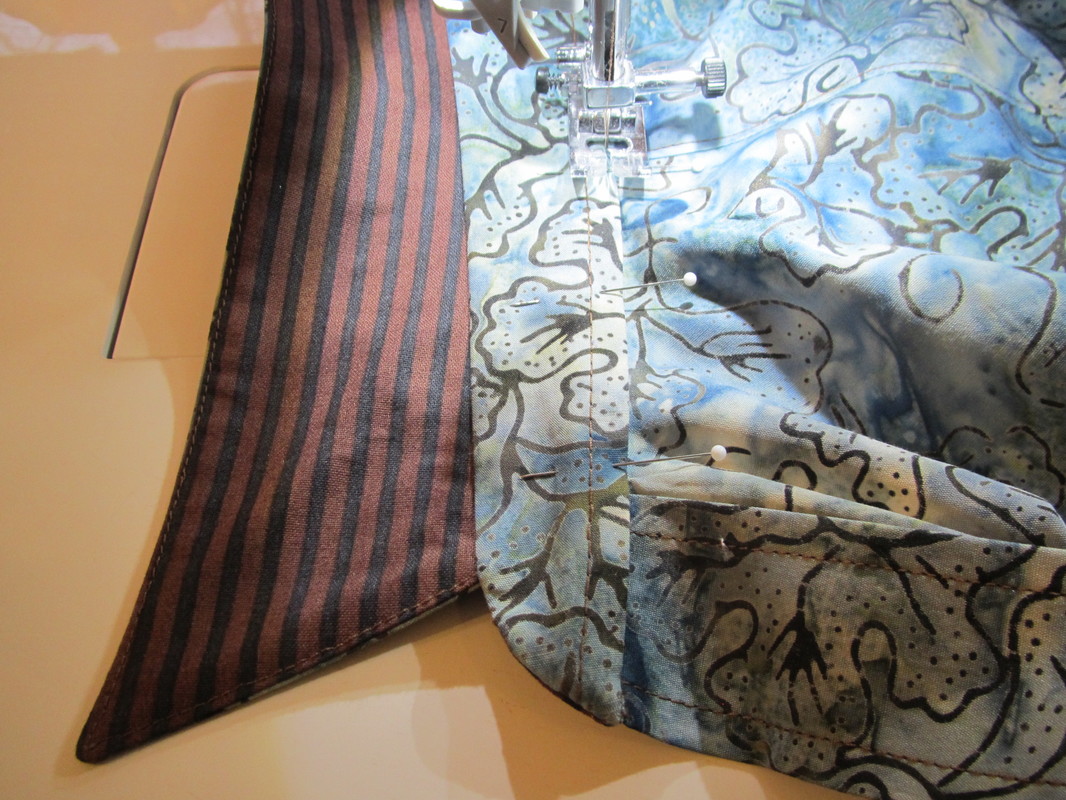
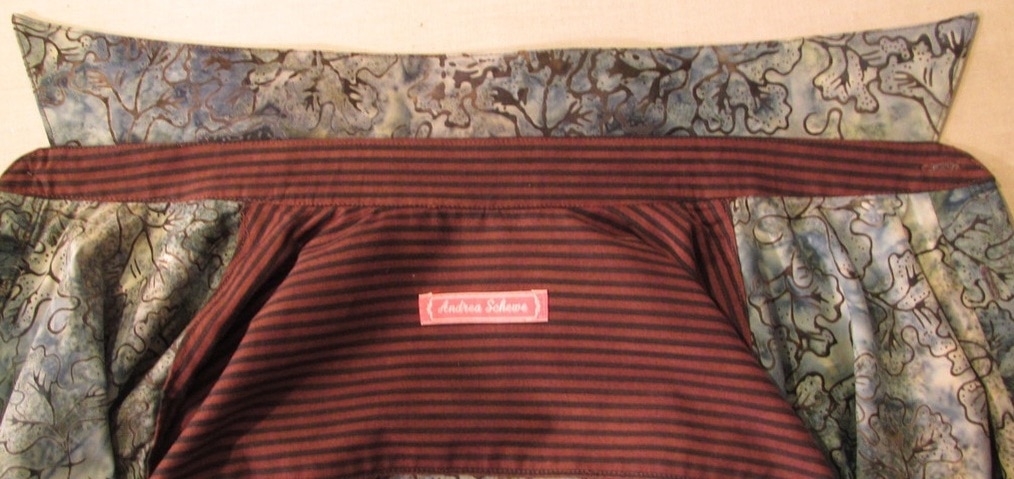
You may have noticed I used a brown and black stripe for the back of the  collar and cuffs. I try to put interesting inside features when I sew ... a great use for leftover fabric and makes for a unique garment!

This stripe is what was left over from that skirt on the lower left of this pattern.

Here is another peek into a shirt factory. It is pretty long (12 minutes), but check out the machine that sews on the pockets at around minute 5!!!

Now ... if I could have twenty specialized sewing machines in my workroom ...
Picture
No one in the world will have a shirt like this one I made for my man! 

I also love to bake my own bread and make my own jams, very satisfying.
Picture
One more "cheat" I want to share, how I do the side seams and hem. I think they look pretty good from the outside. Again, the busy prints helps.
Picture
BUT you can see on the inside I just serged the seam together and topstitched it to one side on the outside. Also for the hem, I serged and made a single fold hem. Doing a decent flatfeld seam is tedious, actually nearly impossible, with a home machine. And a rolled hem that curves up and down, like a man's tailored shirt, tends to twist, so these are my easier methods. 
No one used to know I did these things, but now you all do. 

Don't tell!!

4 Comments

Sparkly Little Cheerleaders - Simplicity 8240

3/22/2017

2 Comments

 
Picture
Here's a pattern I should have written about a few months ago ... but ... better late than never.
Sparkly cheerleader dresses for little girls. I thought little girls would do better in a one piece dress rather than a top and skirt that would be sliding all over the place.
Picture
I was given this assignment last year while I was living in Santa Barbara. Here is the sketch I sent in to get started.
Picture
Picture
And since my husband and I just came back from another visit to Santa Barbara, only two weeks this time, the stark contrast in the two places is very evident to me.  
First picture - my front yard last week.
Second picture - the beach in Santa Barbara a 15 minute walk from our cottage.

Picture
Santa Barbara can't be beat, but the work space I had last year was challenging ... a very small unheated, uninsulated finished shed. BUT, it was all mine and I cranked out a lot of work in that little space, wearing long underwear and my down vest every morning when it was 45 degrees inside and out. It did warm up later in the day.
Picture
Picture
So, let me show you a few parts of sewing these dresses. 
First all the color breaks are done in a nice and easy way. The contrast part is simply laid over the full part of the garment piece and top stitched in place.
Picture
Then the extra, unneeded under layer is trimmed away. Piecing this way is easier and leaves flatter and smoother color joins.
Picture
The ribbon trim is lined up on both sides of the color break, pinned and stitched down.
Picture
All three dresses are trimmed with two colors of grosgrain ribbon with a single string of sequins in the middle. You can machine stitch right through plastic sequins, but I think glueing looks better is less risky.

Gluing works especially well for the skirt with all the little panels because so many short piece of sequins have to be applied and it is easier to deal with the cut ends using glue.

First cut the sequin strands longer than needed and strip off the sequins until the row of sequins is the desired length, leaving the extra string.
Picture
Apply glue to the string and then along the back of the sequins.
This is my favorite fabric glue, grabs super fast and is perfectly clear.
Picture
Tuck the string ends under each side of the cut piece and press in place.
Picture
The sleeves don't have color breaks to use as a guide for placing the ribbon trim. The fabric needed to be marked, but this silver metallic fabric was impossible to mark on, so I used a fabric marker on the wrong side of the fabric and then hand basted a line of thread that would show through to the right side.
Picture
Then pinned the ribbon along the thread line as my guide ready for machine stitching.

Picture
Another problem is when the ribbon goes around a curve. I used only grosgrain ribbon because it will ease around a curve, satin ribbon just won't.
Picture
The outside edge of the curved ribbon needs to be stitched down first. Then gently steam the fullness out of the inner curve and stitch it down.
Picture
Pretty smooth.
Picture
Cheerleader outfits always have LOTS of color breaks and can be fussy to sew.
Picture
But, can be very satisfying when finished. 
Please note one end of the sequins is not glued yet. When I'm working with a very long piece, I do it in sections. Looks like I was waiting for what I had done so far to dry before proceeding.
Picture
Looking at all these photos brings back memories ... 
2 Comments

Edwardian Choker Tutorial

3/15/2017

2 Comments

 
Picture
Picture
I received a comment on an old blog post this week. It was about this choker above with a link that is supposed to take you to the Simplicity website where the full tutorial used to be. When they switched over to their new website LOADS of content was lost ... sigh. BUT, I found all my notes and photos Simplicity used to for this tutorial, and have reconstructed the whole thing here.

It was created to go along with my Edwardian dresses ... anyone missing Downton Abbey?

Well, now you, too, can have this choker and imagine you are dining with the Crowley family.

​Enjoy!


Picture
These amounts are for a 12" choker. The finished choker should be about 2" smaller than your neck measurement.

  • Materials required:   12” of 2 1/4” pointy Venice lace
  •             12” of 7/8” beaded pearl trim with drop pearls
  •             12” of 3/4” wide horsehair
  •             3 yards 1/8” pearls on string (this allows 6” extra)
  •             6” of 1/4” ribbon    
  •             24” of 1/8” ribbon
Picture
Here is a close up of the beaded trim. 

​I made this almost 4 years ago, so you may not be able to find the same trims I used.
Here are 3 trims I think would look nice. The last one is a rhinestone trim that would make your choker look really fancy. If you click on that link, there are several other similar trims.
Picture
Cut the Venice lace to be 12 “ or as close as possible still keeping complete points. 
​
It is important that the lace have tabs or points so it  can open up as it encircles the neck. 
Here are 3 I think would work, available as of March 2017.
The horsehair is used to stiffen the lace after the pearls are sewn on so ... a wider horsehair might work better with a wider lace. Read the entire tutorial to understand the necessary choices.
Picture
The lace I used had 12 places to sew the 4 pieces of 1/8” pearls on a string so I cut - 12 pcs. 4 5/8” and 12 pcs. 3 7/8”
These are the kind of pearls I used.

If you are using a different lace, you need to determine how many motifs there are and cut 2 short and 2 longer pieces of pearls for each place. If the motifs are larger the pearls may need to be cut in longer lengths. To be safe, you just might want to start by cutting one set on the long side and see what works, then you can cut the rest.
Picture
Take 2 long pieces and 2 short pieces of cut pearls.  Arrange them so the 2 long ones are in the center and the 2 short ones are on either side.  Line the tops up and sew in place on the WRONG side of the lace in the “V” between lace points. Or where ever looks best on your lace.


Picture
Here is a close up that shows how I sewed around the space between the first and second pearl on each strand.
Picture
For the next “V” between lace points, take the 2 pearl pieces on the side of the new attachment points, add 1 more long and 1 more short pieces, bring these 4 ends to the next “V” and sew in place in the same manner.
Picture
Continue doing this until all the lace points have pearls looping around them.
Picture
Sew the horsehair on the WRONG side of the lace to cover the ends of the pearls and to support the lace and give it substance.

​You may need a wider horsehair if your lace is wider, or 2 lengths could be used right next to each other.

Picture
On both ends of the choker take a 12” piece of 1/8” ribbon, make a tiny fold on one end and sew securely in the center of the end.
Picture
Take a 3” piece of 1/4” ribbon, fold over the top of the choker end so it covers front and back of the end.  Sew in place, folding the ends of the ribbon to finish.

Length needed may be different, depending on width of the lace you are using.
Picture
 Sew in place, folding the ends of the ribbon to finish.
Picture
Last thing ... sew the beaded pearl trim along top.
Picture
Picture
I made the choker to go with this dress, which unfortunately got cut from the pattern, BUT I did a blog about how you can create it from the pieces that come in the pattern for the other dresses.
Click HERE!

2 Comments

Party Time with Tulle! - Simplicity 8353

3/8/2017

1 Comment

 
Picture
Picture
Tulle is great for more than just fluffy skirts! As decorator fabric, it makes a big impact for a little money. 

At Amazon you can buy a 40 yard bolt of tulle in 20 different colors for $9,99 with free shipping!!

And I am honor bond to tell you I will get a tiny percent if you use this link to buy this tulle. 

But, truly, this is the very tulle I used!
I learned about this Amazon program from my wonderful Santa Barbara sewing and blogging friend, Ana Sullivan. She and I have made a pact to blog once a week. We both have been finding it challenging to keep a blog going, so we are now blogging buddies keeping an eye on each other.

Here is a link to her blog The Lost Apron. If is full of tips and projects for Moms and kids. She is also currently developing kits with projects to teach sewing. Stay tuned!


But, back to this fun pattern and some sewing help for how to wrangle a lot of tulle and deal with pressing those felt appliqués on a thin layer of tulle.
Picture
Picture
Whenever possible, I leave the tulle on the bolt for as long as possible. The skirt for the table cover and chair cover use the full width of the tulle for each panel. So, instead of cutting around a paper pattern, I roll the tulle out still folded in fourths from the bolt. Then measure and cut the lengths needed through all the layers. A rotary cutter is easier and makes the edges much smoother.
Picture
I, also, keep all sorts of tallies so I don't loose track of how many I've cut or sewn. It is such a pain to try and count giant piles of tulle things.
Picture
Picture
So, these huge tulle pom poms are pretty popular right now. You can find tutorials to make them on line, but these tutorial have you use that tulle on a spool and wind it around a piece of cardboard ... like you would make a yarn pom pom ... tedious.
Picture
Picture
I figured out how to make them with just a few widths of tulle cut to specific lengths and gathered in the center ... faster and cheaper!!
Picture
Picture
The table cover can be a monster to sew, at least at the last stage ... reminiscent of the tulle skirts I have made. READ OLD BLOG
​
​
But, here is how I assembled it. Just go step by step and it isn't too bad. First prepare the top, it is backed with felt for support. Join all the panels for the skirt, run a machine gathering stitch, then gather and sewn to the assembled side piece.
Picture
The tulle skirt is actually sandwiched between the outer fabric and the felt backing of the side piece for a very clean finish. You can see this is starting to get big.
Picture
At this point the side piece with the tulle skirt can be pinned to the top.
Picture
To keep it clean while sewing, I keep the bulk of it in a large box on the floor next to my machine and just rotate the part that I'm sewing back into the box while pulling out the next section.
Tulle can be filled with static and all sorts of stuff (thread, small scraps, dust, etc) gets stuck to it. Spraying it with Static Guard is also a good idea. It will keep the tulle from sticking to you and everything else.
The chair cover skirt is dealt with the in the same manner.
Picture
Picture
One more tip I want to pass along is how to work with the iron on felt appliqués. I recommend using Heat'n Bond. The desired shapes are first traced on the paper backing, second the paper backing is ironed on to the felt then the shapes can be cut out, felt and paper together, after it cools off.
Peel the paper backing off. This exposes the heat activated adhesive.
Picture
Because the shapes are being pressed onto sheer fabric I use a sheet of baking parchment underneath the tulle fabric to keep the appliqués from sticking to everything else. For the large table cover, I covered a small piece of wood with muslin, then wrapped it in baking parchment so I could bring it over to the table where I had arranged all the butterflies onto the tulle. This could be done on the floor as well, if you don't have a table large enough. 

Don't even think about trying to bring the table cover to your ironing board. An ironing board is not large enough to properly arrange all those butterflies and it would be very, very frustrating because those pieces would keep shifting. I simply moved my little portable ironing board from butterfly to butterfly pressing as I went.

Hope you all have festive and happy parties and celebrations ... cheers!
Andrea

1 Comment

    From Andrea 

    I am a commercial pattern maker who is now "sewing over 50"!
    I love to sew and hope to encourage others to come back to sewing.
    The water is fine!!

    Archives

    May 2019
    April 2019
    March 2019
    August 2017
    July 2017
    June 2017
    May 2017
    April 2017
    March 2017
    February 2017
    July 2016
    June 2016
    May 2016
    April 2016
    March 2016
    February 2016
    January 2016
    December 2015
    November 2015
    October 2015
    September 2015
    August 2015
    July 2015
    June 2015
    May 2015
    April 2015
    March 2015
    February 2015
    January 2015
    December 2014
    November 2014
    October 2014
    September 2014
    August 2014
    July 2014
    June 2014
    May 2014
    April 2014
    March 2014
    February 2014
    January 2014
    December 2013
    November 2013
    October 2013
    September 2013
    August 2013
    July 2013
    June 2013
    May 2013

    Archives by Subject

    To search for blog posts in specific categories, use the drop down menu above by hovering over the word "Blog"

    Enter your email address:

    Delivered by FeedBurner

    RSS Feed

    Andrea Schewe participates in Amazon's associates program.