Andrea Schewe Design
  • Home
  • Costumes
    • Reader's Gallery
    • Fantasy Costumes
    • Theatrical
    • Historic >
      • Easier to make
    • International
    • Costumes for Kid's and Babies
  • Crafts
    • Home Decor >
      • Pillows
    • Fashion Accessories
    • Doll Clothes
    • For Kids and Babies
  • Blog
    • Past Blogs by subject >
      • My patterns by number
      • Sewing basics
      • Personal sewing Projects
      • Fashion History
      • Fun and funny stuff
      • Guest Bloggers
      • Crafts and Home Dec
  • Links
  • Contact

Pattern 1137 - the purple dress

4/24/2015

14 Comments

 
Picture
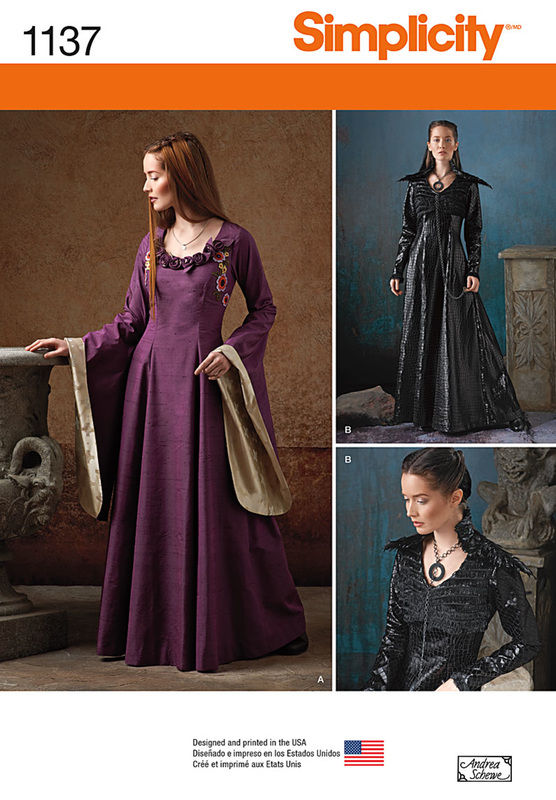
First of all, thank you everyone for such an enthusiastic response to this new pattern. It was really fun to work on. 

Today I'm going to talk about some aspects of the purple dress.
Picture
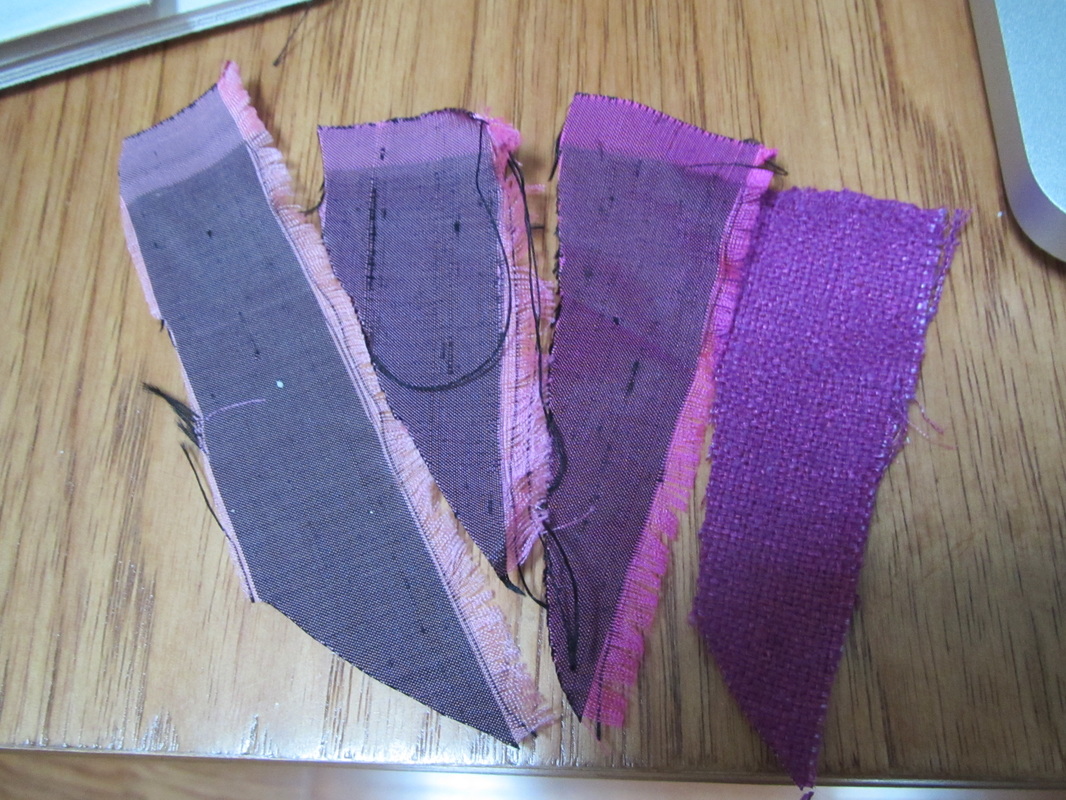
I am lucky to have a terrific independently run fabric store a mile from my house that is so crammed with fabric you can hardly walk through the aisles ... really.  They had several shades of lavender silk dupioni and one of raw silk. They cut swatches for me and this is the photo I sent to Simplicity. They chose the darkest of the dupioni swatches, second from the right.
Picture
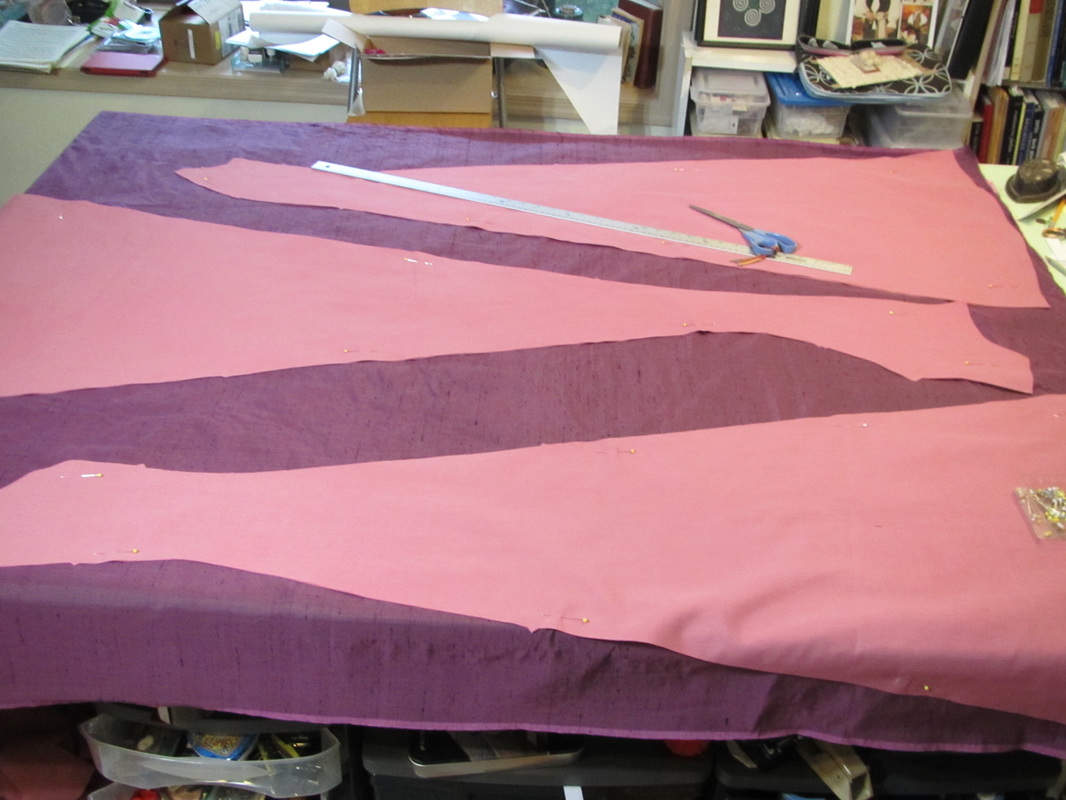
I'm not sure if this is in the pattern, but I flat lined (backed or interlined) the entire dress with broadcloth. I felt the silk was a little too light weight. This is something that can be done to pretty much any garment to add substance to the chosen fabric. And it actually doesn't make sense to put in the instructions because not all fabrics will need a flat lining.

In any case, it is REALLY important to make sure all the fabrics involved are pre-shrunk before cutting or sewing so these layers don't shrink at their own separate rates when washed or dry cleaned after the dress is finished leaving a bubbled and badly hanging garment.
Picture
Flat lining is nice, too, because the hemming can be slipped stitched into the flat lining only. Then no hem stitches at all will show from the outside.

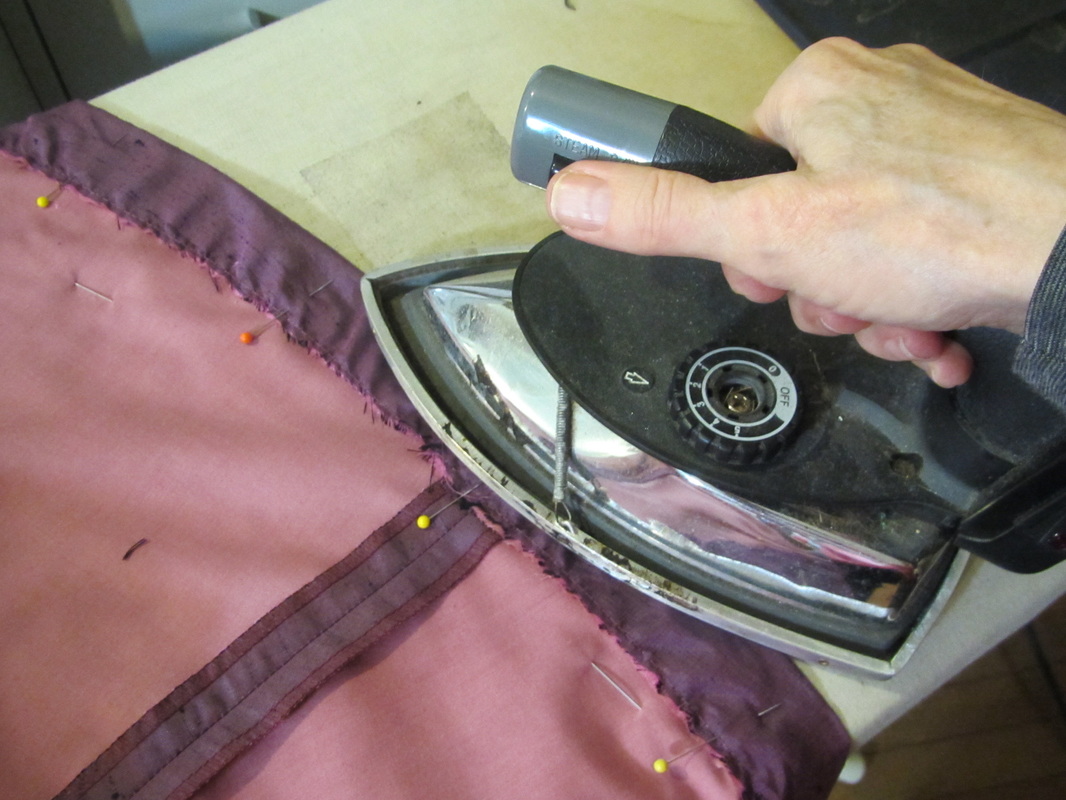
This hem is slightly curve, so the fullness needs to be eased in before hemming. 
Picture
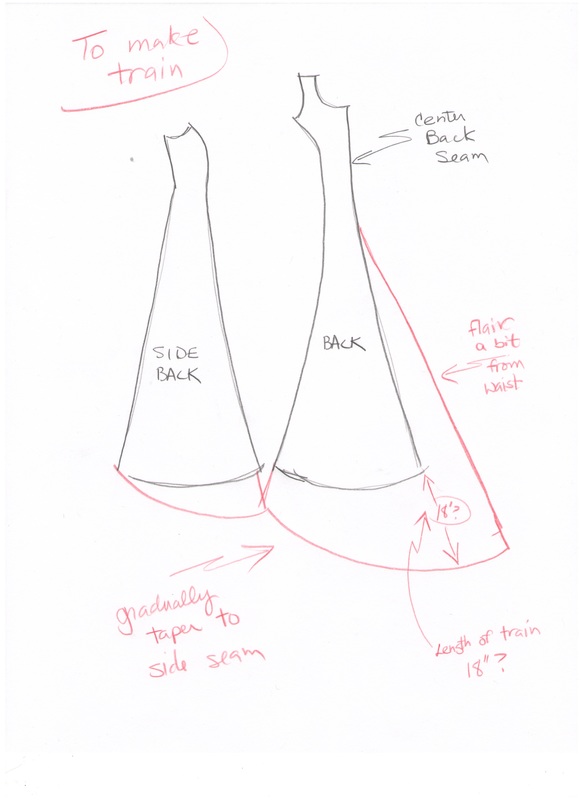
There was a request on my Facebook page to show how to add a train. This diagram shows where fabric should be added.  A train in most cases needs extra fabric added to the width of the back in addition to length.  After the dress is sewn together, the sweep of the train should be smoothed out during one of the fittings before hemming.

And, of course, the train can be made as long as you like.
Picture
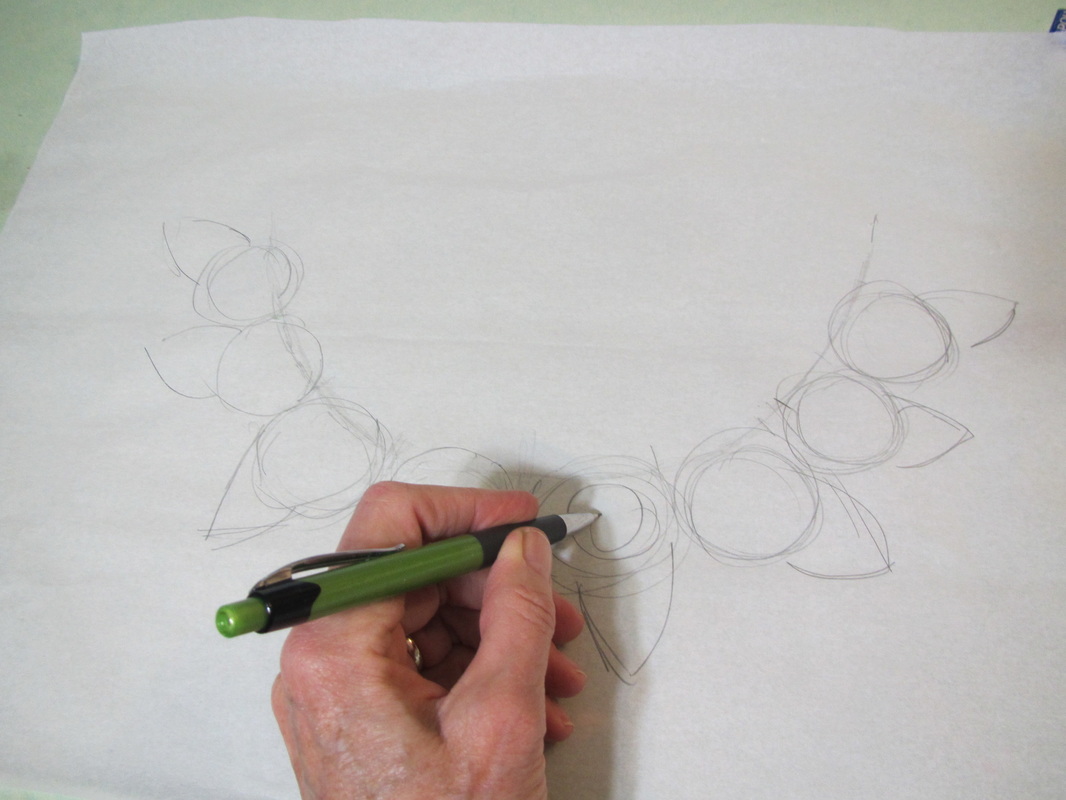
To work on the roses for the neck, I first traced the scoop of the neck and sketched the size I thought the roses should be.
Picture
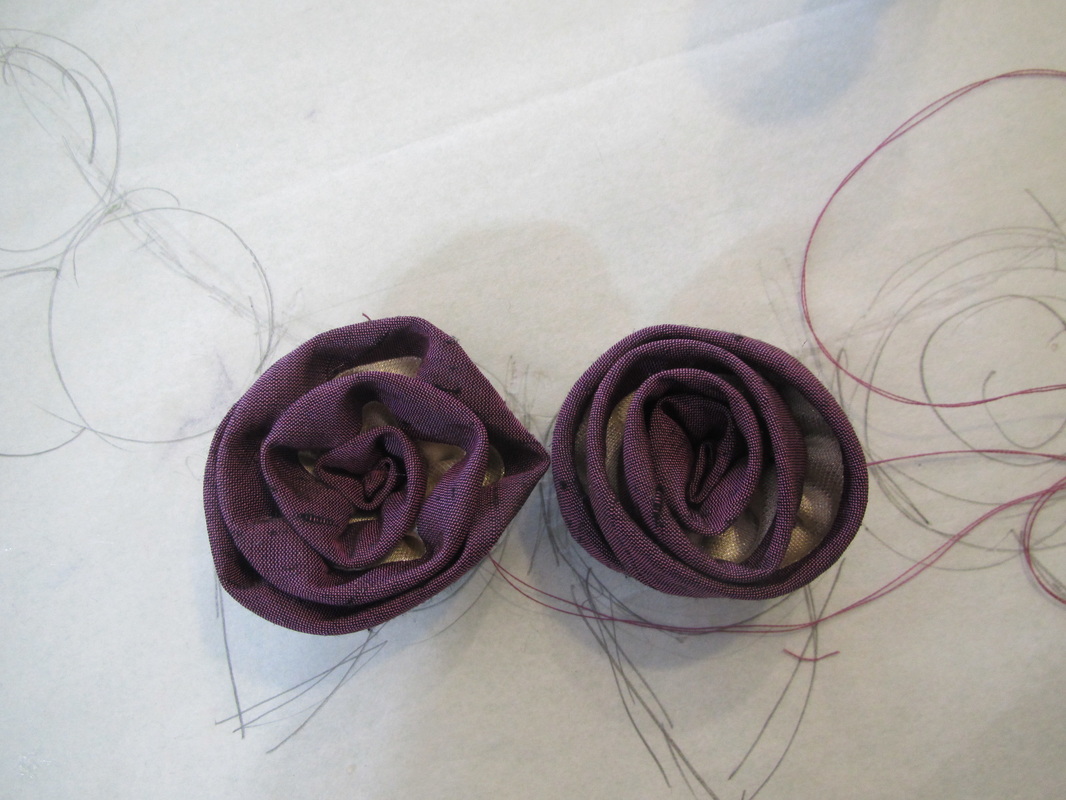
Then made some experimental roses. I wanted the roses to have a contrast interior, but after looking at these samples, realized I didn't want too much contrast and decided to make them all like the one in the center.
Picture
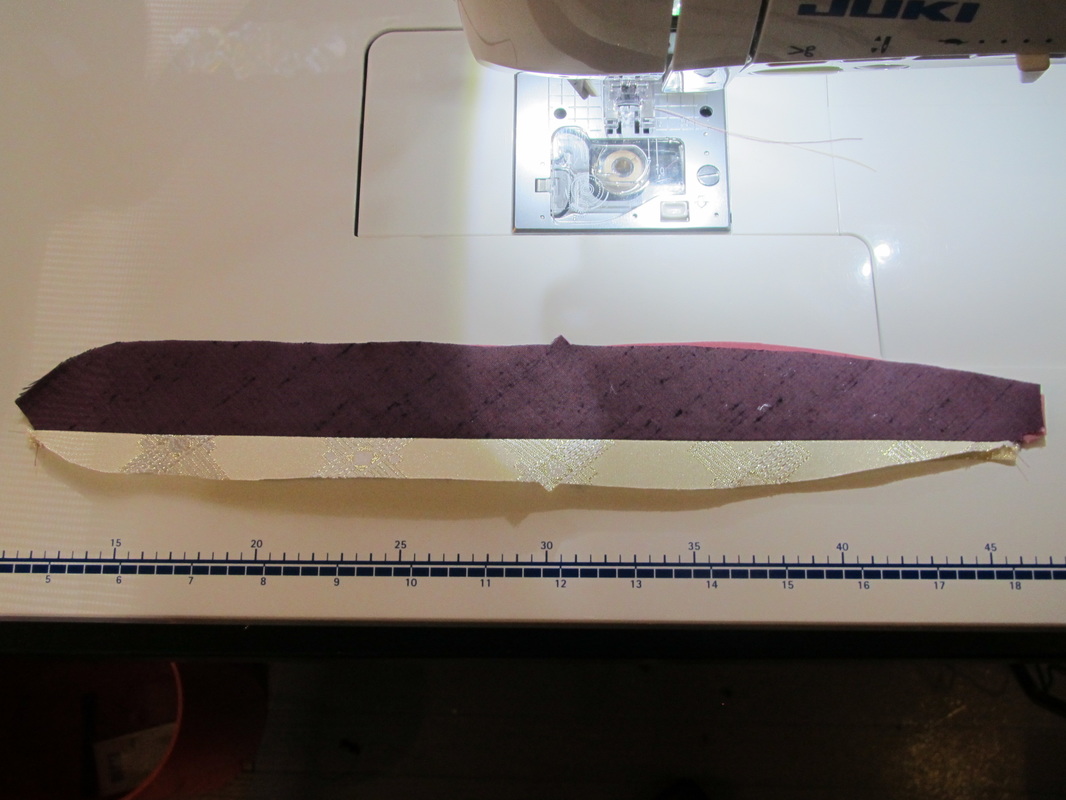
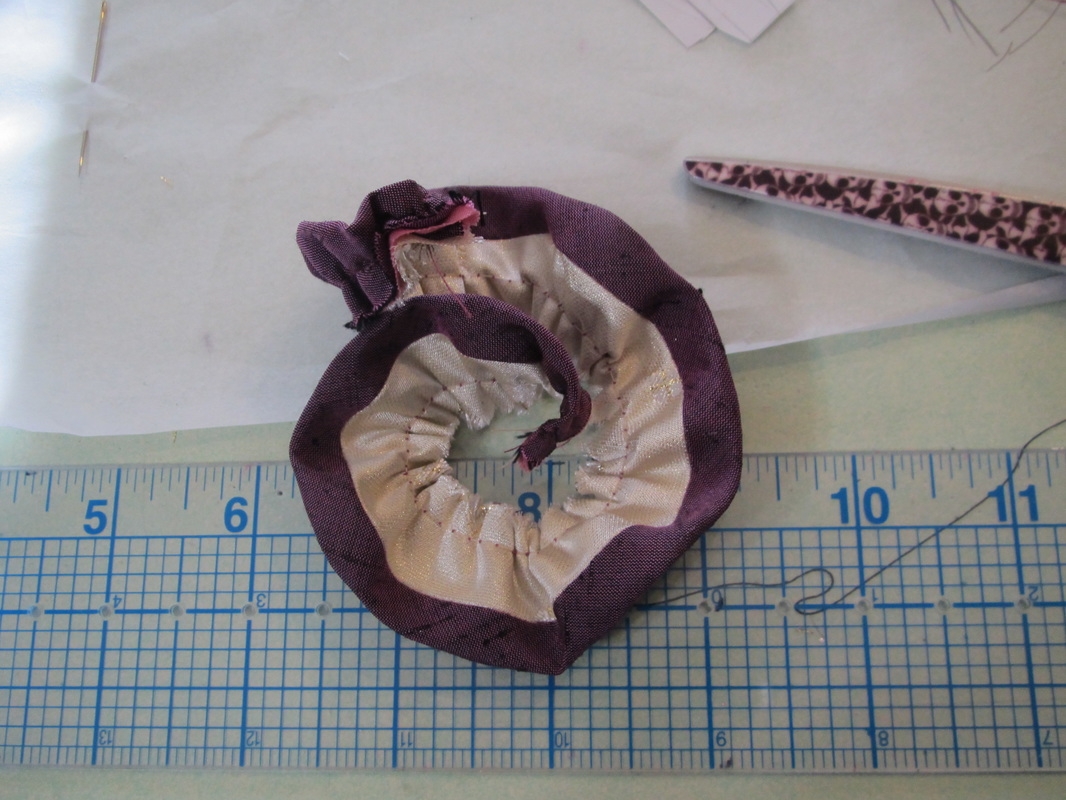
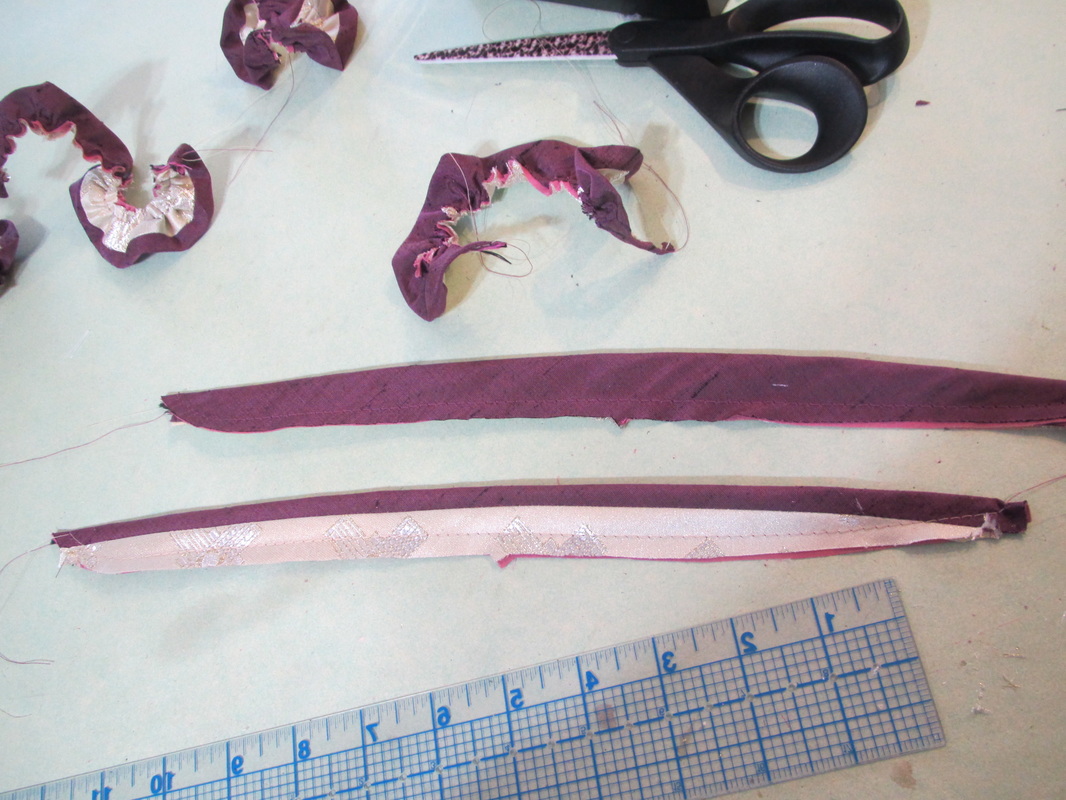
So, the pattern for each rose is like this. It is a standard bias cut spiral rose, but with about a third of it being the contrast fabric.
Picture
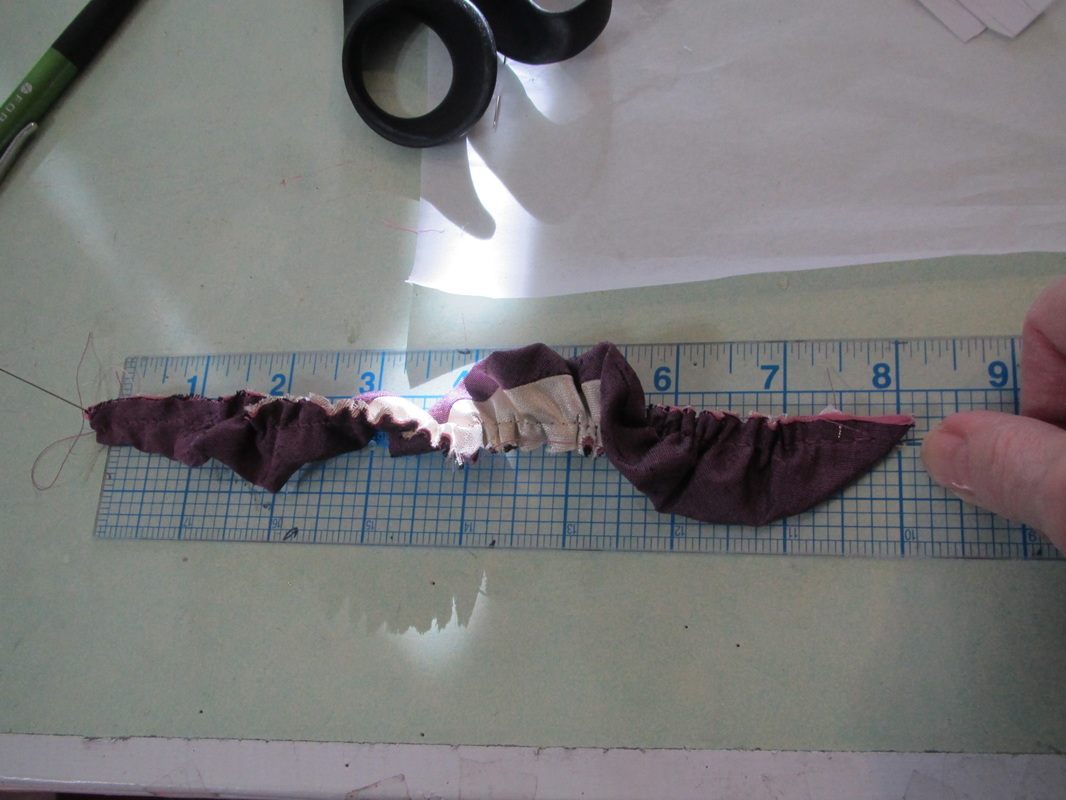
Fold the strip lengthwise and run a LONG machine gathering stitch on the cut edge.
Picture
Pull the stitched up ... not too tight.
Picture
As I worked I kept referring to my sketch and comparing my roses to make sure they were all about the same size.
Picture
I covered the back with a circle of fabric ... (but, if you could probably skip this stip. The roses are getting sewn to the dress anyway). 
Picture
Once the roses were figured out, I just had to make the rest.
Picture
It's important to get a nice tight coil to start.
Picture
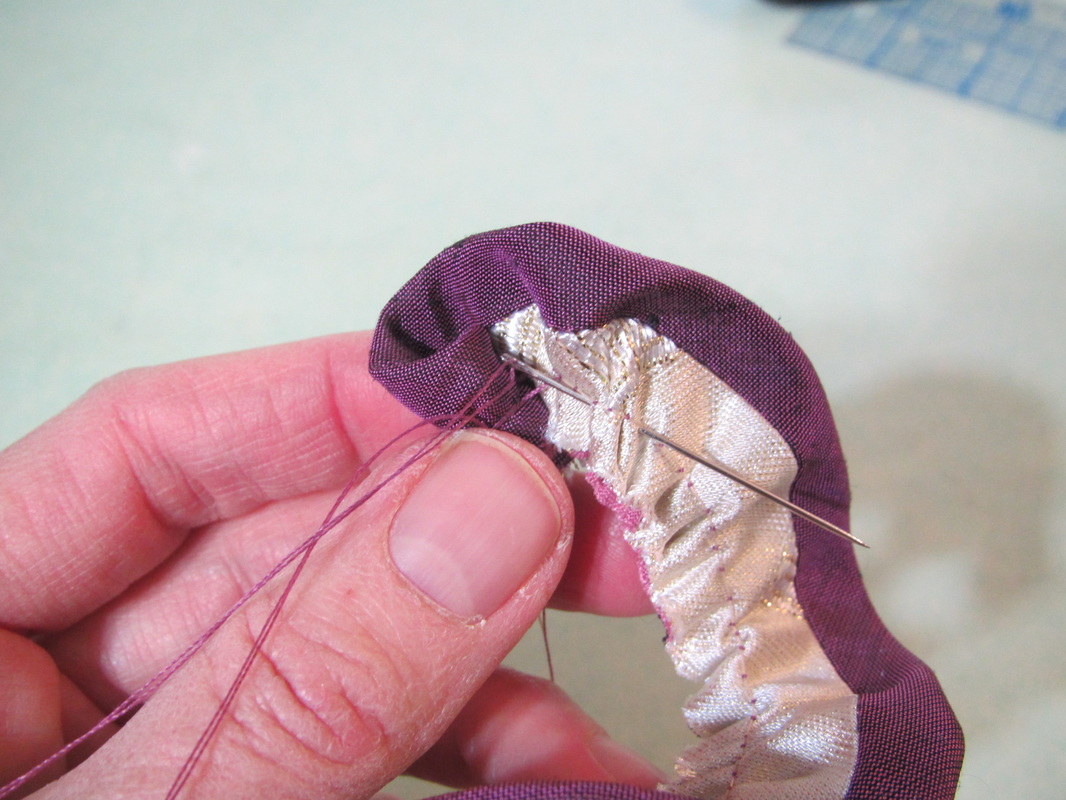
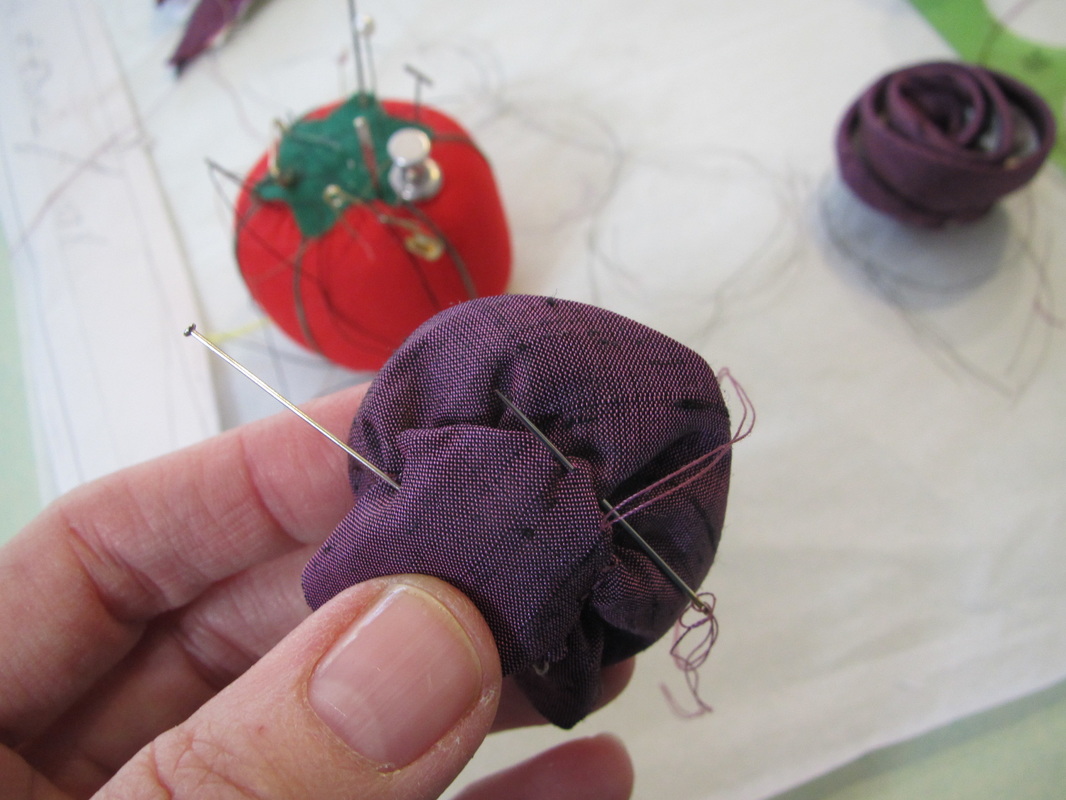
Then I find a simple running stitch along the gathering stitches works best. This keeps all the bottom raw edges pointing downward so they won't accidentally fold up, peak though and be visible from the right side.
Picture
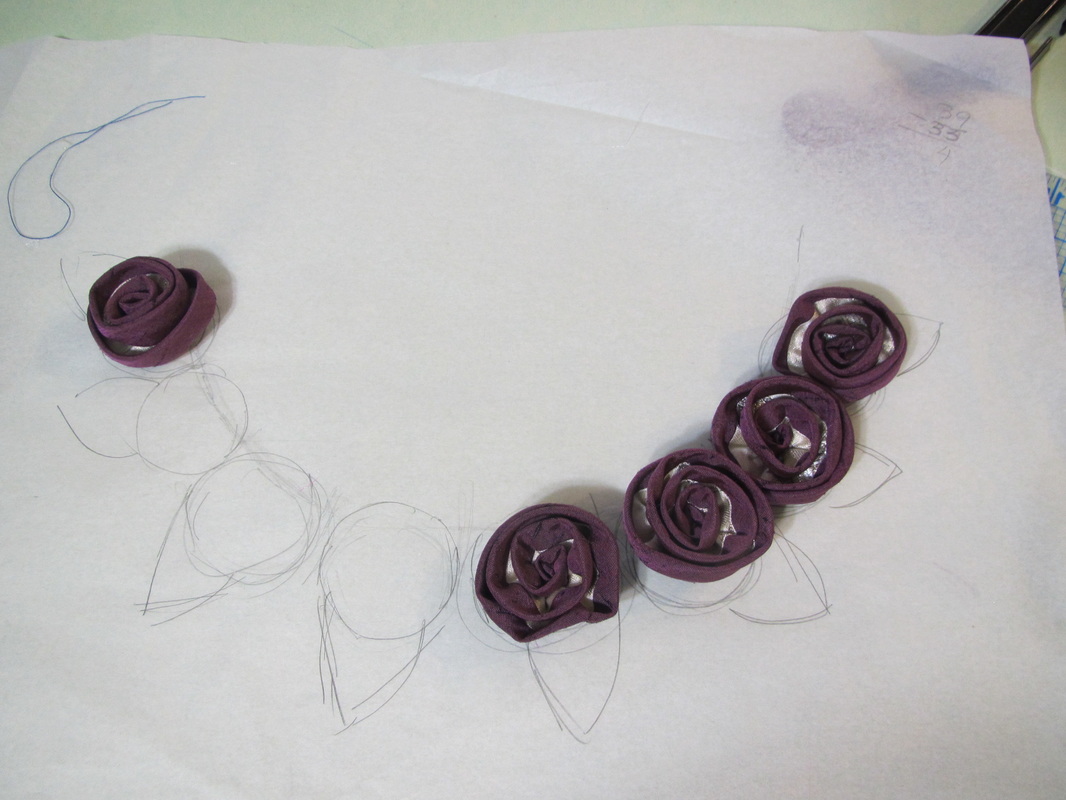
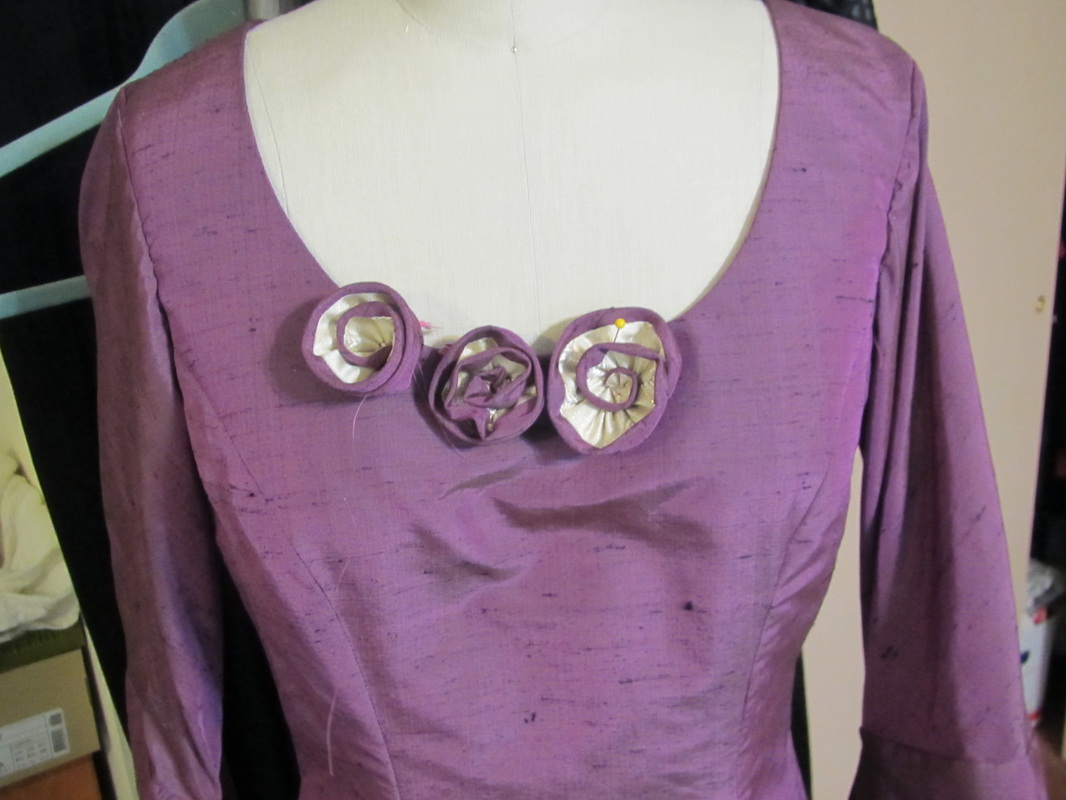
Before sewing to the dress, arrange the roses in the order they look best. No matter how hard you try, each rose will be a little different and the order they are placed will make a difference.
Picture
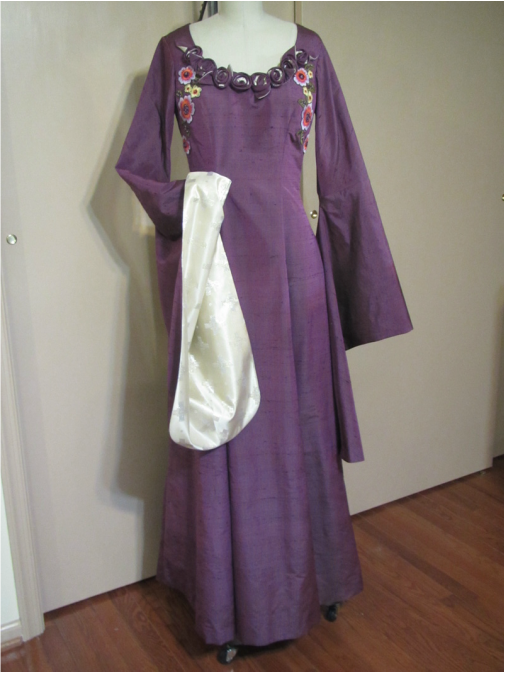
Here is my personal reference photo taken just before packing everything up for the trip to New York.


Feathers next week.
14 Comments
Carina Saraco
4/23/2015 10:47:43 pm

These dresses are gorgeous and I'm certain this pattern will be a huge seller! That collar is a work of art :)

Reply
Claire link
4/24/2015 07:09:08 am

love the dress. I made a wedding dress for a friend of a similar style a few years ago, wish I'd had this pattern back then.

Reply
Lyanna Stark
4/27/2015 01:10:59 am

I'm curious about your decisions regarding the seaming of this dress. The actual dress from the show doesn't have princess seams, however princess seams are quite common in Simplicity patterns. I've drafted a pattern of this dress myself and noticed that it drapes completely differently if you use the seams that are placed more towards the center front of the bust rather than towards the sides. (see http://www.michelecarragherembroidery.com/USERIMAGES/SANSA%20JD%20-%20HBO-MCE%20GOT%20EMBROIDERY%20BY%20MICHELE%20CARRAGHER.jpg)

Reply
Marietta Greene
4/27/2015 10:28:37 am

That's a good point. I am looking at the pictures you shared (which are awesome and inspirational) and it looks like darts not full seams to me. Almost as if a more traditional kirtle/tent shapeless dress was made and then they fitted it to the actress by adding darts to give it a better line....possibly?...I also love the bias cut on the sleeve - a nice touch....

Reply
Andrea
4/27/2015 09:44:30 pm

I tried the link you gave me, but it didn't work.

I tend to use princess seams because they are easy to fit, but I would really like to see the link you have.

Thanks.

Reply
Sansa Stark
4/28/2015 08:04:55 am

Hi Andrea, the link is to the costume embroiderer for the show. I will post a link to her main site and the link that didn't work for you.

http://michelecarragherembroidery.com/

http://michelecarragherembroidery.com/USERIMAGES/SANSA%20JD%20-%20HBO-MCE%20GOT%20EMBROIDERY%20BY%20MICHELE%20CARRAGHER.jpg

http://michelecarragherembroidery.com/USERIMAGES/GAME%20OF%20THRONES%20EMBROIDERY%20BY%20MICHELE%20CARRAGHER%20-23.jpg

Denise Lewis link
4/27/2015 01:36:30 am

Beautiful work. I can't wait until that pattern is available in my area. Thank you for sharing your beautiful work.

Reply
Amanita
4/27/2015 01:23:00 pm

I would love to know what was used for the black fabric of the second dress- I've got a costume coming up which that would be perfect for.

Reply
Andrea
4/27/2015 09:46:27 pm

I bought that black fabric from Joann's. It is a suede cloth with the alligator print made with a vinyl coating.

Reply
Kaeyln link
4/29/2015 02:23:02 am

Beautiful purple dress (my favorite color!) but I actually have a question about the seams. It looks like you serged edges of the cut pieces before stitching the seams, and then used a straight stitch to join the pieces. Is this because you added the lining or would this be a good method to use even without the lining? And what are the benefits of finishing seams this way vs. just serging the entire seam?

Reply
Andrea Schewe
4/29/2015 07:53:25 am

The "correct" way to sew a seam in most cases is to press open the two sides to distribute the thickness of the fabric evenly. Garments look better from the outside when seams are done this way. Now there are other ways to finish the edges of the seam allowance besides serging. There is a lot of info on this on line.

Reply
Erika
3/8/2016 08:20:03 pm

I love this pattern & would like to try to make it for a larger size, but I'm not sure where the best place to increase the bust size would be. Can you make any recommendations? (bust 52 inches, waist 44 inches, hips 55 inches).

Reply
Andrea
3/18/2016 07:06:55 am

You probably do not want to add anything to the shoulder and neck area. But, what I find works best is to add to the center of each piece. Either cut the pattern up the middle and kind of spread it open or cut one side of the piece and slide the pattern over a bit and cut the other side. And if, for example, you are very busty but smaller in the back, you can enlarge the front more than the back. And it is always a safe bet to add some to the sides. That can always be easily taken in. My mother's rule, when in doubt, add a little extra, it can always be taken in.
Good luck!

Reply
Kate
9/13/2016 08:45:29 pm

Andrea, please help me! I'm sewing your pattern in view B and the package tells me to cut size 14 for 28" waist and a 36" bust but there is no way this can fit me. The waist is more like 26" tops... what am I doing wrong? :'(

Reply

Your comment will be posted after it is approved.


Leave a Reply.

    From Andrea 

    I am a commercial pattern maker who is now "sewing over 50"!
    I love to sew and hope to encourage others to come back to sewing.
    The water is fine!!

    Archives

    August 2019
    July 2019
    June 2019
    May 2019
    April 2019
    March 2019
    August 2017
    July 2017
    June 2017
    May 2017
    April 2017
    March 2017
    February 2017
    July 2016
    June 2016
    May 2016
    April 2016
    March 2016
    February 2016
    January 2016
    December 2015
    November 2015
    October 2015
    September 2015
    August 2015
    July 2015
    June 2015
    May 2015
    April 2015
    March 2015
    February 2015
    January 2015
    December 2014
    November 2014
    October 2014
    September 2014
    August 2014
    July 2014
    June 2014
    May 2014
    April 2014
    March 2014
    February 2014
    January 2014
    December 2013
    November 2013
    October 2013
    September 2013
    August 2013
    July 2013
    June 2013
    May 2013

    Archives by Subject

    To search for blog posts in specific categories, use the drop down menu above by hovering over the word "Blog"

    Enter your email address:

    Delivered by FeedBurner

    RSS Feed

    Andrea Schewe participates in Amazon's associates program.