
So, how does a serger work?
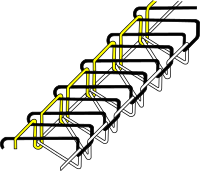
This is a great diagram of a 3 thread serger stitch. And below is a step by step description of what each thread is doing.
Sergers come in 2, 3, 4 and even 5 thread models. Home machines are usually 3/4 model. I use mine most often with just 3 threads for overcasting edges, the 4th thread turns it into a functional garment assembly seam as well as an overcast seam all at the same time.
These are the basic 4 kinds of stitches an overlock/serger can do.
This is a great diagram of a 3 thread serger stitch. And below is a step by step description of what each thread is doing.
- When the needle enters the fabric, a loop is formed in the thread at the back of the needle.
- As the needle continues its downward motion into the fabric, the lower looper begins its movement from left to right. The tip of the lower looper passes behind the needle and through the loop of thread that has formed behind the needle.
- The lower looper continues along its path moving toward the right of the serger. As it moves, the lower thread is carried through the needle thread.
- While the lower looper is moving from left to right, the upper looper advances from right to left. The tip of the upper looper passes behind the lower looper and picks up the lower looper thread and needle thread.
- The lower looper now begins its move back into the far left position. As the upper looper continues to the left, it holds the lower looper thread and needle thread in place.
- The needle again begins its downward path passing behind the upper looper and securing the upper looper thread. This completes the overlock stitch formation and begins the stitch cycle all over again.
Sergers come in 2, 3, 4 and even 5 thread models. Home machines are usually 3/4 model. I use mine most often with just 3 threads for overcasting edges, the 4th thread turns it into a functional garment assembly seam as well as an overcast seam all at the same time.
These are the basic 4 kinds of stitches an overlock/serger can do.
- An overlock stitch encases the seam and locks the edge of the fabric with threads to keep the edge from raveling and give a professional finish.
- A cover stitch is used most commonly to create a hem. The hem fabric is folded and the stitches cover the folded, raw edge. Cover stitches are commonly found on store-bought t-shirts.
- A flatlock stitch, as the name implies, joins two separate pieces of fabric in a seam that opens out flat.
- A rolled hem covers the edge of fabric in a tiny roll of thread. This is most commonly seen on lightweight fabrics and table napkins.
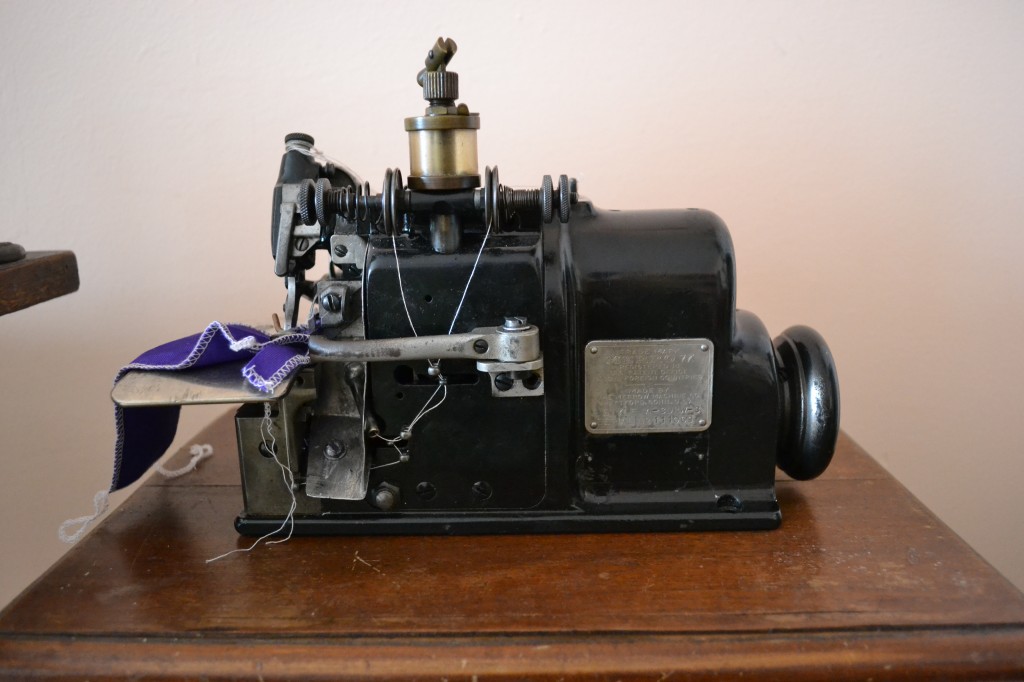
The first serger I sat down to use, looked very much like this, an industrial machine. At this point in my life I had been in New York for about 6 months and had been working in one of the largest costume shops as a finisher, meaning I wasn't allowed to touch any machine. My job was to prepare garments for machine stitching by pinning the pieces together and then grading and clipping seams after the machine stitching was done as well as sew buttons, hooks and other hand sewing. But, I really wanted to try a serger, or as we called them, Merrow machines.
My second costume shop job was in the basement of Juilliard, the famous music and theater school. This was a smaller shop and the job distinctions were not so strict. On my second or third day, I was asked to marrow something!!!
SO ... I cooly walked over to the machine (pretending like I'd done this my whole life), but the thread color was completely wrong, so I grabbed all 3 threads getting ready to pull them out of the machine, like I would have done with a regular sewing machine and the person I was working for (who just happened to be Martha McCain!) said "STOP! ... let me show you how to do this"
Threading any serger is tricky, but an industrial model is even trickier than home machines which have been made user friendly.
In most costume shops I worked in there was usually only one or two people who knew how to thread one from scratch, if all the threads were pulled out, like I almost did.
WATCH ...
So, after a serger is threaded, the best way to change the thread is to cut the old thread, leaving a good amount of extra thread, then tie REALLY good knots, lift the presser foot to release the tension and gently pull the thread until the new color is completely through.
Now, I love doing research because you never know what you will learn. At the Merrow company website I saw a Youtube link for a
Hand-Held Butt Seamer ... doesn't that sound interesting? It puts images in my mind.
BUTT ... it wasn't quite what I thought. Watch this!
Now, I love doing research because you never know what you will learn. At the Merrow company website I saw a Youtube link for a
Hand-Held Butt Seamer ... doesn't that sound interesting? It puts images in my mind.
BUTT ... it wasn't quite what I thought. Watch this!
I think I've just scratched the surface of serger machine info. Let's see what I can dig up for tomorrow.
 RSS Feed