Andrea Schewe Design
  • Home
  • Costumes
    • Reader's Gallery
    • Fantasy Costumes
    • Theatrical
    • Historic >
      • Easier to make
    • International
    • Costumes for Kid's and Babies
  • Crafts
    • Home Decor >
      • Pillows
    • Fashion Accessories
    • Doll Clothes
    • For Kids and Babies
  • Blog
    • Past Blogs by subject >
      • My patterns by number
      • Sewing basics
      • Personal sewing Projects
      • Fashion History
      • Fun and funny stuff
      • Guest Bloggers
      • Crafts and Home Dec
  • Links
  • Contact

Beautiful sewing machine cabinets

4/18/2014

3 Comments

 
Today a photo blog, I did yammer on yesterday! Since I've been doing a LOT of sewing machine research lately I've found many photos of beautiful old machine cabinets ... WOW.
They don't make'm they way they used to.
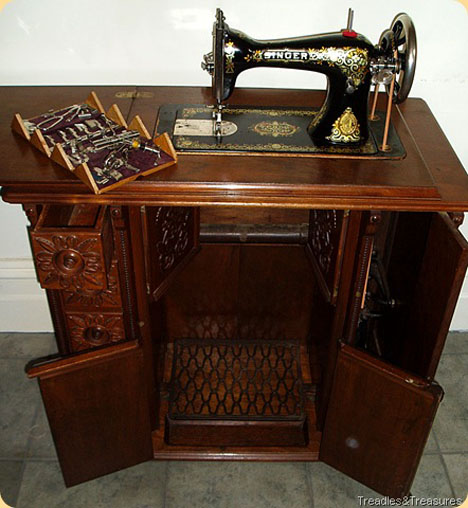
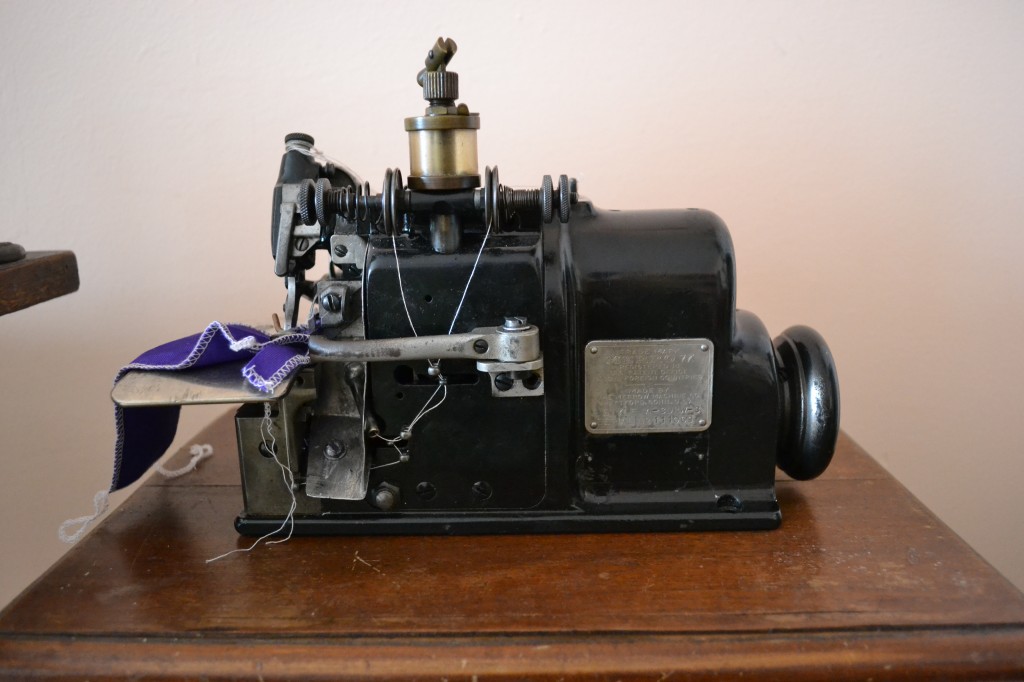
Picture
from around 1915
Picture
Picture
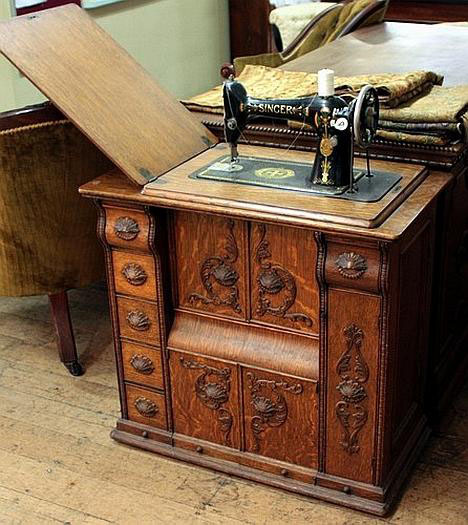
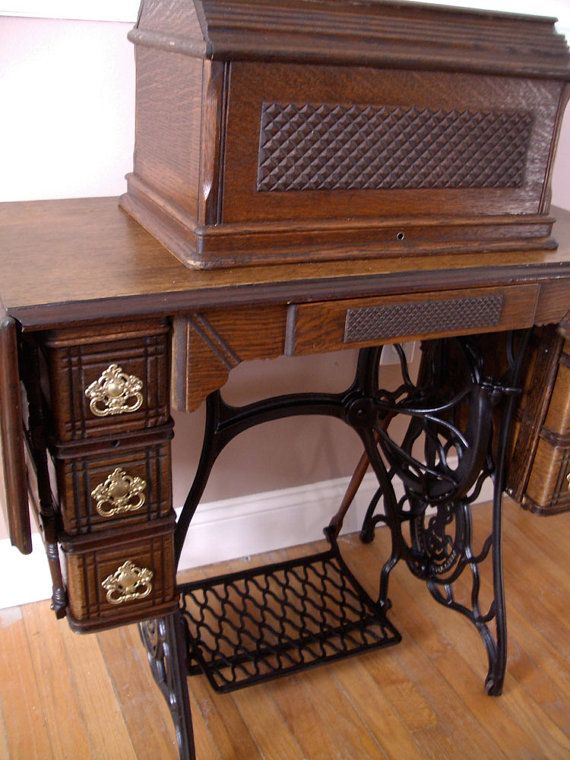
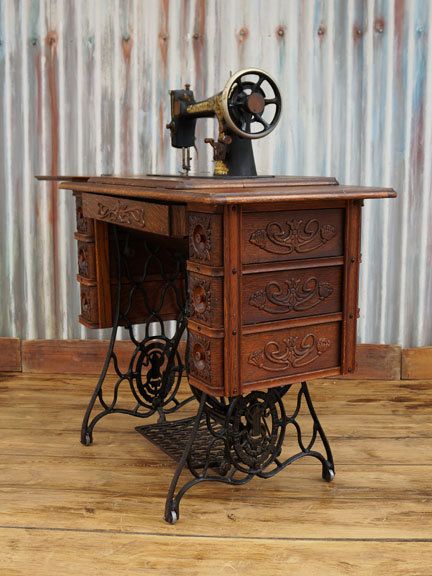
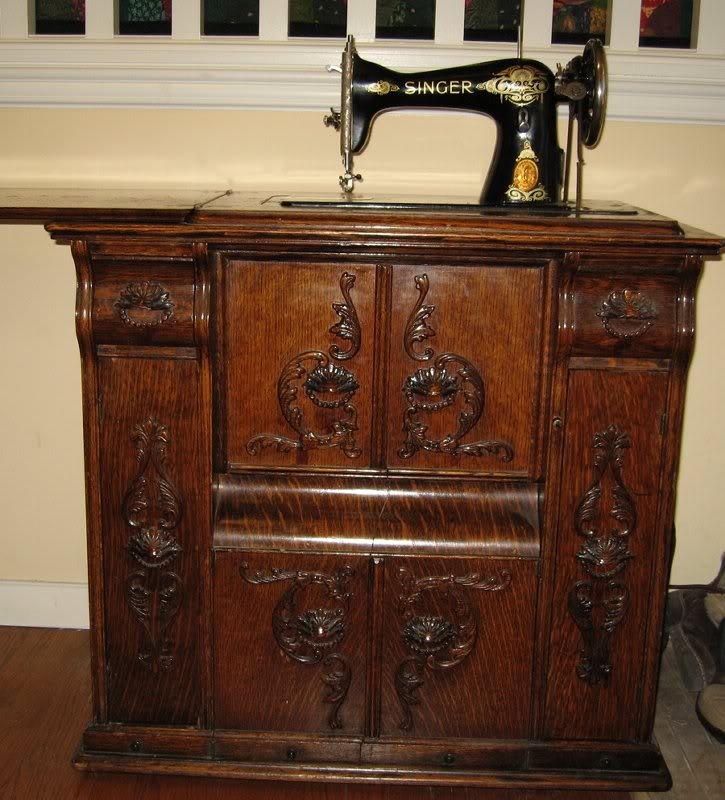
This one and the following model are from the 1890s before they figured out how to have the machine fold down into the table when folded up.
Picture
Picture
Picture
Picture
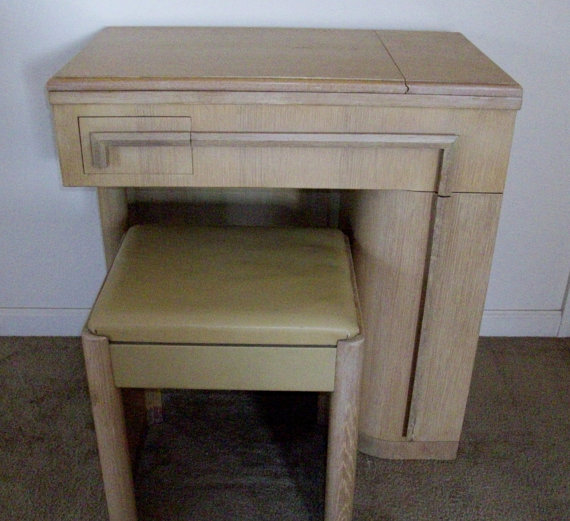
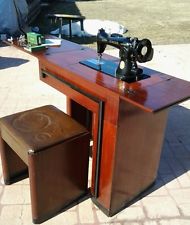
I adore this deco style cabinet, probably from the 30s.
Picture
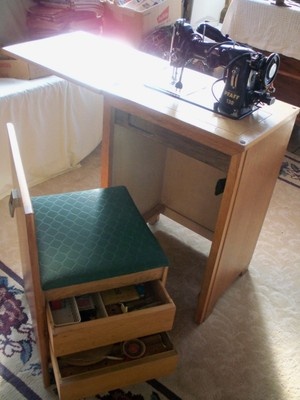
See how much storage there is in it.
Picture
Picture
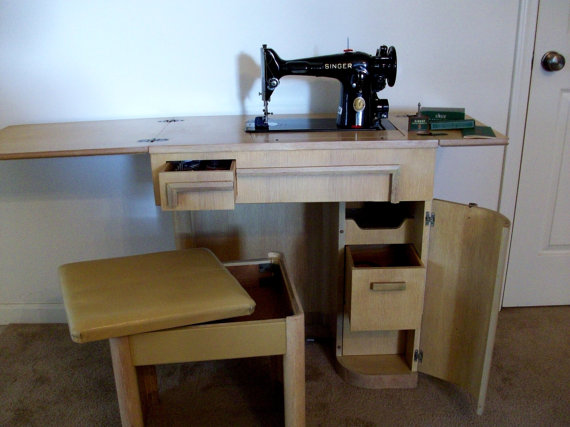
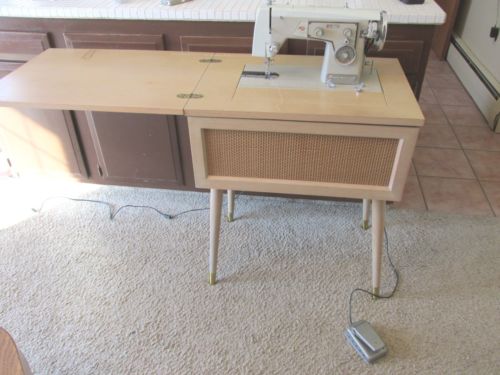
This one is called a space saver cabinet from the 50s.
Picture
Picture
Picture
Picture
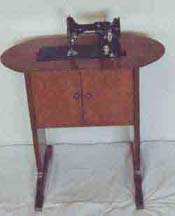
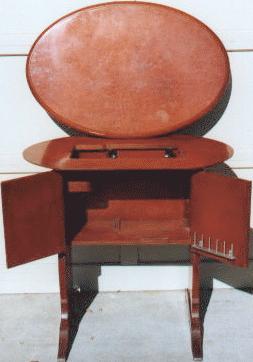
This oval cabinet is one made just for the Singer Featherweight.
Picture
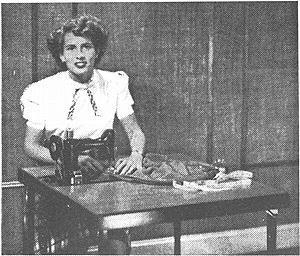
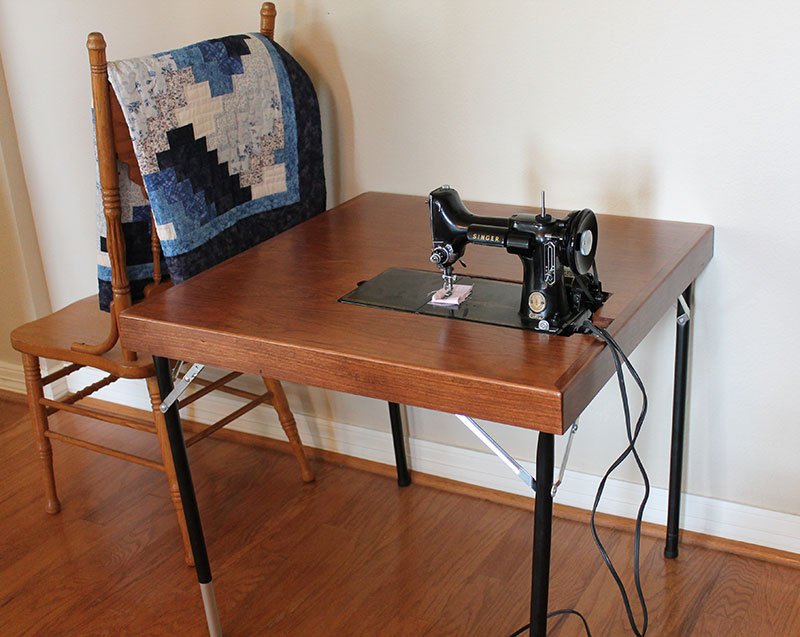
But the one I really like is the card table with the hole just the right size for the featherweight, the perfect portable machine.
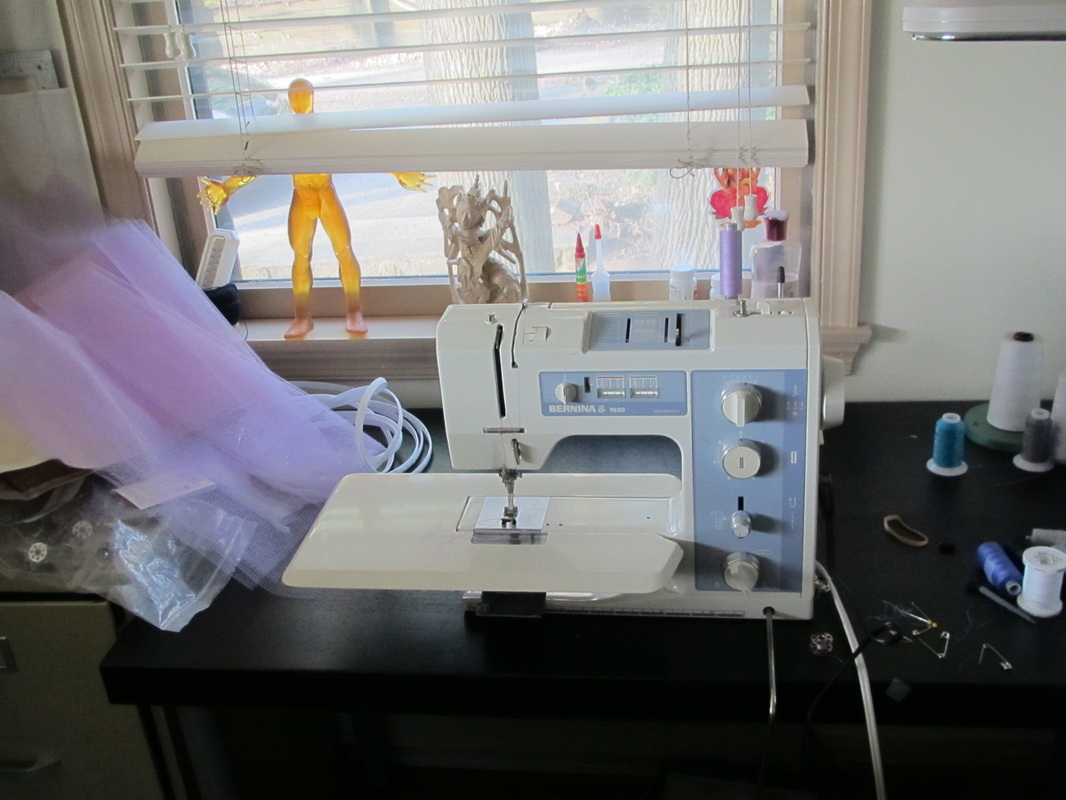
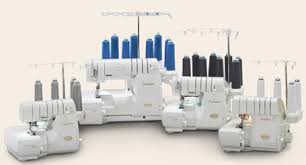
As for me ... well, I've been doing tons of proper machine research during these last two weeks while I was struggling with the Bernina and I've narrowed my choice down between the Juki f600 and the Janome 6600.

I should have done that in the first place.  It's not hard.  So many people have posted opinions and testimonials on many, many machines.

And as for my new table, it might not be fancy-gorgeous like some of these, but I like it so much better than the cabinet I had before. It is a versatile surface with adjustable legs on which I can use a variety of machines. So I am ready when I get my second new machine. 

You can see the before and after in this blog.
3 Comments

Mistakes ... sigh ... :-(

4/17/2014

3 Comments

 
Picture
LOOK WHO'S BACK!

Yesterday was a rough and sad day for me ... I returned that beautiful and HUGE Bernina and got hassled a bit in the process, but they were nice in the end.  There were a lot of things I liked about it, but it was fussy. And I can't have a fussy machine when I'm constantly working on deadline.


Also, it was REALLY expensive and I thought I should get more for that amount of money.  It was my fault, I know.  I should not have been so blindly loyal to Bernina.  But, dang! there are NO machines as good their old mechanical ones.  Anyone who has an 830 or 930 Record would never part with it. And my 1030 is just as good with added stretch stitches. It just sews and sews well, period!

So, I was saying to a friend yesterday on the phone, that I thought when I became a grown-up I shouldn't make such mistakes.  But she, by way of comfort, said we all make mistakes.

Which makes one of the postings on today's Pattern Review's daily email very appropriate!

I invented a term years ago, which many friends and family members have adopted.  It's called a "Melitta Mistake." Melitta coffee makers were very popular in the 70s and 80s.  They have funnel shaped cone with a paper filter and you manually pour the water into it.  The possibilities for mistakes when half awake in the morning are endless ... putting the coffee in without the paper filter, and then sometimes actually pouring the water into it,  pouring the water in when there is no coffee in the filter at all, pouring the water into the filter when it is sitting on the counter instead of on your cup or coffee pot, a very messy mistake, forgetting to grind the coffee beans and putting them whole into the filter, and then sometimes actually pouring the water in, and on and on ... 

Well, over time, this term "Melitta Mistake" has become what any stupid mistake is called.  And this morning on Pattern Review there is the best list.  I will share some of my favorite ones.

1. I picked up my 18mm rotary cutter instead of my tracing wheel the other day and happily started tracing (oops cutting ) away

2. Fused interfacing to the wrong side of the fabric piece (actually did that 5 minutes ago) 

3. Just cutting that last piece of thread off your just finished dress.
Only to end up with a hole in the dress.....  ( from Andrea -I've done THAT ... OY!)

4. I cut an appliqué out of a piece of scrap fabric....or so I thought! It was really part of a knit top I was sewing    (that one, too ... from Andrea)

5. After sewing a collar, I flipped it right side out... and.... Now why is the interfacing on the outside? :(

6. I was making a jacket for my dd and sewed one sleeve to the neck. 

Three times. 

To a fabric of high loft curly fleece. Those stitches were fun to take out!


7. Here's a new one, serging on a sleeve only to get the sleeve cap caught into the serged seamed. On an extra good day, I'll cut a nice hole into the sleeve cap with the serger blade while doing this. :)

8. I made a simple skirt and didn't notice until I was finishing it that the flower pattern ran one way only - and mine were all upside down! The flowers are actually on stalks. Oh well, it's a comfy skirt and I only wear it around the house and the occasional visit to local shops.

9.  At sewing class one of the other ladies put a top together and serged the sides eams, but she kept going and managed to serge the armhole openings together too - Just thinking about it gives me the laughcramps again. It was so funny (not for her)

10.  I am forever snapping off the zigzag foot and snapping on a straight stitch foot, but forgetting to change the stitch width to single width. SNAP! There goes another needle!!!
(from Andrea, another one I've done several times)


So, as one other contributor to this list said, "The hurrieder I go, the behinder I get!"


These all make me feel better.  Number 6 is my favorite. And I didn't even list them all.  Click on this link to go to the page where these come from. I'm not 100% sure it will work for you if you are not a member to Pattern Review, but I think it should.


But, anyone who's sews has stories to tell. I've certainly gotten pretty fast at picking out seams, even serged ones.


Please share if you have a mistake you feel comfortable fessing up to.
3 Comments

100 years of Girl Scout uniforms

4/16/2014

35 Comments

 
Picture
Last weekend as my husband and I made our weekly foray to the farmer's market, I noticed the window of my town's historical society was filled with vintage Girl Scout uniforms!
Picture
Picture


The sign said "Celebrating 100 years of Girl Scouting." Well, technically they are two years late.  The anniversary was in 2012, but it made me nostalgic.  I learned to embroider wearing a Brownie uniform just like this one hanging in that window.  So I thought I could find out about the history of Girl Scout uniforms.

Picture
This link will take you to Juliette Gordon Low's website to learn more about her.
Picture
I came across this beautiful portrait of her in the National Portrait Gallery in Washington DC a couple years ago. It was painted by Patrick A. Tupa in 1887 when she was 17 years old. 

But back to the uniforms!  
Picture
Here is Ms. Low with two Girl Scouts. Looks like mid-1910s to me.  Note that one girl has a skirt and blouse and the other is a dress. Kind of a feminine take off of a WWI uniform.
Picture
Picture
These 2 images show the uniform from 1928. I love the 1920's styling with the hat. 
Picture
This uniform is from the 30s.  See how the color has changed to a less muddy shade of green.
Picture
But, then in 1948 the famous American fashion designer Mainbocher designed all new uniforms.  Of course he was known more for garments like this ...
Picture
But, if he was good enough for the Navy, he was good enough for the Girl Scouts.  He designed this uniform for the Navy Nurses Corps in 1941.

His uniform stayed for a while with little change ... on to the 50th anniversary in 1962.  There's that Brownie uniform I had.
Picture
Picture
Picture
What are those Brownies doing wearing lipstick?!
Picture
But, uniforms are fashion, too.  And this new set was adopted from 1963 through 1975.
Picture
Halston's design - 1978
Picture
Bill Blass - 1984
And to keep the Moms interested a couple more famous designers were brought in to create the adult leader's uniform.
Picture
Picture
Honestly, I don't know if these uniforms would have motivated me to become a scout leader, a little too green. But ... it's amazing what you won't do for your kids, no matter what the uniform is ...
Picture
That's me and my boys ... a while ago.
Picture
Picture
Picture
If you were thrifty, you could always make your own, using an official pattern even.


You can see the Girl Scout license has taken turns at several pattern companies.
Picture
Picture
Picture
Picture
So, what are the current Girl Scouts wearing?? Nothing as formal as they used to wear.
Picture
This image is for uniforms from the late 80s - early 90s.  The uniform is basically blouses and vests.
Picture
The adult uniform has morphed into sweats and hoodies.
Picture
This is the newest Brownie uniform, straight from the official Girl Scout website.  It's not even BROWN!!.  

But, I'm happy to say Girl Scout uniforms are still being made in the USA.
Picture
Why am I having this craving for a Thin Mint cookie?

At least some things stay the same - sort of.

Picture
35 Comments

Back Pack Pattern and survey results

4/15/2014

1 Comment

 
Picture
So, I'm a lucky designer. Not only does Simplicity keep me busy, they also give me a variety of projects to keep me on my toes.

This is my new backpack pattern that just shipped this week, which means it will be in stores next week and on the website soon after.

They did a great job with the photography, but I'm sad they didn't show the  pretty fabric I used to line these with.  But I can.
Picture
Here is the inside of the flower print one ...
Picture
And the denim one with wings.

I took lots of photos while sewing these bags and will share some sewing tips with you in one or two future blogs.

NOW ... I've waiting for more people to answer my Right hand/ Left hand survey before reporting back, but I'm tired of waiting any more.  


But first ... something from my sister, Christine, a right handed person.
Picture
Ha Ha ... well, we left handed people are special? different? more artistic? ... something ...


When I set up the three Left/Right questions I hypothesized that there would be a larger number of left handed people in the group of people who sew than in the percentage of lefties in the general public, which is 10%.  And that is what my results show, but I have to say, I wonder if I got a self selecting set who answered the questions ... and the group was small, only 85!

But, it is still interesting.  

For the test the required people to actually use their right and left hand on the computer moving the curser to different dots, 78% answered right hand and 22% left.

For the test with 10 questions about what hand or side of the body you used to do different things,  people answered 70% right and 30% left.  I'm guessing that people who sew, whether left or right handed, have to use both hands and so are more ambidextrous.

And, for the questions about how people would categorize themselves 74% described themselves as right handed with 44% saying they used their right hand for pretty much everything. So, that leaves 26% lefties.  But, only 8% identifying as pure left handers.  


Thank you all 85 who answered.  And for those of you who didn't, I understand really.  I am always suspicious of answering things on line.  But, I think Polldaddy is a trustworthy site. 
1 Comment

Couture vs. RTW vs. Theatrical sewing

4/14/2014

1 Comment

 
I've been thinking a lot lately about the differences between Couture sewing, Ready to wear and Theatrical sewing.  You might think home sewing is a fourth category, but I think home sewers are just trying to copy one or more of these three styles.
Picture
This is a photo of the Dior Haute Couture workroom in Paris.

We can all think of obvious difference between these three styles.  Couture is the most expensive and hence has the most hand sewing and fine finishing, the most exquisite fabrics not to mention the most elaborate or unusual designs.  But, theatrical costumes can be equally expensive with equally fine fabrics.  But, they are made to withstand very hard wear and tear. While Couture put it's emphasis on perfect fit, beautiful interior finishing as well as exterior.
Picture
Factory made garments are designed to be cut and sewn efficiently. There are, of course, many levels of ready to wear ranging from Walmart to Saks Fifth Avenue. But, the basic approach to patterning and sewing is the same.
Picture
The people who sew garments for the professional theater have more knowledge of sewing than anyone I know.  I had really forgotten that until Sheila Lenkman took me to see where she stores the costumes she rents in St. Louis.  They are all costumes that have been "built" for professional theatrical productions.  And, they have been built so well, they have a life well beyond the productions they were originally intended.

But, then there are differences you might not think about.  The style of patterns used and even pattern paper is different between these 3 sewing styles.  The way seams are finished as well as many other sewing techniques.

I plan to write a series of blogs talking about some of these things. They might not come out all in one week though.  I am going to have to do some research and consulting to be sure I am getting it right.


1 Comment

Jobs in a professional costume shop

4/11/2014

6 Comments

 
Picture
I know I've mentioned this before, but I spent a few years working in professional costume shops in New York City. As with any profession it is its own little world and the jobs have slightly different names.  Also, there are jobs you might not have thought of.

I consulted with three costuming friends for help compiling this list, one on the west coast, Lisa Logan, one in the mid-west, Sheila Lenkman and my New York costuming buddy, Martha McCain. There are some regional variations.
Picture
In New York, most of the costume shops are independent, no connected to any theater.  They bid on news and could be making costume for Broadway or an opera house clear across the country. Because of that the managing and book keeping are a little trickier than a shop that is always making costumes for the same theater.

To start off there is the 

SHOP HEAD - 
bids the shows, has the meetings with the designer – not to mention schmoozing, hires and fires, assigns sketches to the drapers, looks at all the swatches and samples the shoppers brings in (tells the designer she can't have $200 yard fabric ... hand beaded), charms the actors in the fitting room while the drapers stick pins. Serves tea to same, attends dress rehearsals and holds the designer's hand, goes out of town with a show for preview for example.

OFFICE MANAGER-

payroll, dispatches shoppers, keeps track of petty cash, creates the bible (more on that in a future blog), keeps records so costumes can be reproduced during a long run, orders mundane things like shop supplies (brown paper, muslin, safety pins…), arranges for the costumes to be delivered to the theater, feeds the cat, waters the plants

DRAPER (Cutter in Canada) -
Interprets the designer's sketch into 3-D, needs to know a lot about fashion history and sound costume construction, makes patterns (could be draping or flat pattern making), fits actors and supervises the construction. 

FIRST HAND

 - a draper’s assistant, cuts out draper's patterns, does lesser patterning job (making facing, etc), also supervises stitchers and finishers and does pretty much whatever the draper needs. From Sheila (First Hand: In some theatres they are also the cutters and do all the prep work, such as preparing fabrics, gathering notions and trims, etc. They can also supervise and organize the alterations.

STITCHER (on the west coast called "draper" ... confusing!)

- operates machines only in some shops, in others does all aspects of garment construction some places also does alterations

FINISHER

 - prepares work for the stitcher, pins garment pieces together, trims seam, presses and does all hand sewing

PRESSER
- from Lisa ("Zen Iron Maiden" at a New York shop named Matera's. There was, apparently, a woman whose only job was pressing. I guess she went into a meditative "zone" when she was working, hence the nickname. San Francisco Opera had a delightful old lady who had worked there since forever, and her job, too, was nothing but pressing. So I don't know if that's a category of job common to larger shops or not.

TAILOR

 - makes men’s wear primarily

MILLINER

 - Makes hats

BEADING LADIES

 - I don’t know if shops have this any more, but back in the 70s and 80s there were women who sat all day in front of rectangular frames balanced between 2 saw horses and hand beaded panels of garments using the tambor beading method. This from Lisa (I suspect that Eric Winterling has beading ladies. He just posted a photo of some beaded work in progress. I do remember hearing that it was cheaper to fly someone to Haiti, fabric in hand, to wait for a piece to be beaded, and then fly it back. I wouldn't have minded that job, although it was before the earthquake. I wonder if that's still done. And I remember another story about the beading ladies being so old, and so important, that when there was a NYC transportation strike, limos were dispatched to drive them to work. And at Michael-Jon's where they had to find special stools with wider bases at the bottom, because one of the old ladies kept tipping over. Talk about a "dying art" ...)

SHOPPER

 - often an entry level job, this person shops for stuff, mainly getting fabric swatches so the designer and draper can choose the best fabrics, BUT, this from Martha ...
(Entry level, maybe.  Shoppers often are recently-graduated designers who go on to fame and fortune. (Marty Pakledinaz for example.) It takes a good eye and a user-friendly personality – also young feet and a strong back.  Don't forget that shoppers often carry around a lot of shoes.)


PAINTER/DYER
- dyes fabrics, paints on designs and distresses costumes (makes them look worn)

CRAFTS ARTISAN
- responsible for shoes, socks, underwear, jewelry, accessories, etc. They will also work in tandem with the costume shop, sharing fabrics, trim, etc as needed. In some shops this person will do the dying and painting as well as millinery, jewelry, footwear, armor, foam structures, mechanical costume pieces, masks, belts, and weapon rigging. (But see, in New York the shoes were obtained by the shopper!)

OVER HIRE - this is when some is brought in on a temporary basis when there is a lot of work or if someone in the shop is doing an outside job. This is not a term heard much in New York where most people who work in costume shops come and go as the costume work comes and goes between shops.

But … at Ray Diffen’s shop, back when I worked there outside jobs were called “an Underwater Nun” and no one seems to remember why that is.

Picture
Mirka Owczarek and Teodozjia Kozlowska working on costumes for "Coppélia" at the New York City Ballet costume shop.
If you want another perspective, read this very detailed list of costume shop jobs posted on the University of California Irvine website.

In future blogs I plan to talk about how costumes are "built" for the theater.  This is another kind of sewing all together ... very interesting!
6 Comments

Sergers for home sewers

4/10/2014

2 Comments

 
Picture
This is the earliest photo I can find of a home serger or overlock machine, as they were originally called ... hence the name "Baby Lock". 

This from the Baby Lock website.

Baby Lock got its start when a group of engineers in Japan took a chance on a new product. It was a smaller version of an industrial overlock machine or a "baby lock". A St. Louis-based, family-owned company saw the benefit of this new machine, and brought it to the United States. This marked the introduction of the first home serger in the U.S. market. 

They don't give a year, but I know it was in the mid 60's, so this photo above could be a photo of their first model.  I remember the buzz about this new machine when I was in my teens which was about that time. Juki was the next company that sold sergers to the home sewer and that was in the mid-70's.

This website has the best history of the serger I've found. Sew Vac Outlet.
Picture
So ... How many of you sewers own one?  I'm curious again.  Please answer yes or no.
Then, if you don't own one ... do you want one?
There are many testimonials out there. Many along the lines of "I don't know how I ever lived without one!" and a few "I don't know how to use it, it's still in the box"

I don't do everything possible with a serger, but I'm in the "I couldn't live without one" camp.

Read some testimonials here.
Picture
If you want to learn to use a serger, there are LOADS of books, tutorials and classes you can take.  I'm showing the cover of this book because I like the photo.  It shows the many different things you can do with a serger.
Picture
I couldn't have made my Fairy Sweater without it. It can stretch and give knits a lovely "lettuce" edge.

It's the easiest way to hem chiffon, especially if it is a circular hem and it instantly makes the inside of a garment look clean and neat.

I finish my seams with a serger 90% of the time, but a serged seam can be too heavy for certain fabrics and will make an ugly shadow or impression on the outside of a garment over the seam when pressed.  Just want to be honest ... as with all things it isn't perfect.

The trickiest thing, I think, is threading. At least it isn't as hard as threading an industrial serger like I show in yesterday's blog.

I'm posting a good Youtube video about the basics of a serger and how to thread one.  BUT, this just for one brand. You really need to read the manual and get to know your machine.  There might a Youtube video for your specific model. For my first two sergers, I asked someone at the store to thread it for me, before I left the store.  Then, to change the thread, I used the tie and pull method I talked about in yesterday's blog.


I now can thread my machines from scratch, but do it as infrequently as possible.
So, if you are thinking about getting a serger you can spend as little as $50 on Ebay or up to 2 or 3 thousand.  I recommend doing a little research. Every sewing machine company makes them now, so there are many choices and plenty of reviews.  If it is your first, look for easy threading, would be my recommendation.


2 Comments

Serger mechanics

4/9/2014

2 Comments

 
Picture
So, how does a serger work? 

This is a great diagram of a 3 thread serger stitch. And below is a step by step description of what each thread is doing.
  1. When the needle enters the fabric, a loop is formed in the thread at the back of the needle.
  2. As the needle continues its downward motion into the fabric, the lower looper begins its movement from left to right. The tip of the lower looper passes behind the needle and through the loop of thread that has formed behind the needle.
  3. The lower looper continues along its path moving toward the right of the serger. As it moves, the lower thread is carried through the needle thread.
  4. While the lower looper is moving from left to right, the upper looper advances from right to left. The tip of the upper looper passes behind the lower looper and picks up the lower looper thread and needle thread.
  5. The lower looper now begins its move back into the far left position. As the upper looper continues to the left, it holds the lower looper thread and needle thread in place.
  6. The needle again begins its downward path passing behind the upper looper and securing the upper looper thread. This completes the overlock stitch formation and begins the stitch cycle all over again.
 
Sergers come in 2, 3, 4 and even 5 thread models.  Home machines are usually 3/4 model.  I use mine most often with just 3 threads for overcasting edges, the 4th thread turns it into a functional garment assembly seam as well as an overcast seam all at the same time.

These are the basic 4 kinds of stitches an overlock/serger can do.

  • An overlock stitch encases the seam and locks the edge of the fabric with threads to keep the edge from raveling and give a professional finish.
  • A cover stitch is used most commonly to create a hem. The hem fabric is folded and the stitches cover the folded, raw edge. Cover stitches are commonly found on store-bought t-shirts.
  • A flatlock stitch, as the name implies, joins two separate pieces of fabric in a seam that opens out flat.
  • A rolled hem covers the edge of fabric in a tiny roll of thread. This is most commonly seen on lightweight fabrics and table napkins.
Picture
The first serger I sat down to use, looked very much like this, an industrial machine.  At this point in my life I had been in New York for about 6 months and had been working in one of the largest costume shops as a finisher, meaning I wasn't allowed to touch any machine.  My job was to prepare garments for machine stitching by pinning the pieces together and then grading and clipping seams after the machine stitching was done as well as sew buttons, hooks and other hand sewing.  But, I really wanted to try a serger, or as we called them, Merrow machines.

My second costume shop job was in the basement of Juilliard, the famous music and theater school.  This was a smaller shop and the job distinctions were not so strict.  On my second or third day, I was asked to marrow something!!! 


SO ... I cooly walked over to the machine (pretending like I'd done this my whole life), but the thread color was completely wrong, so I grabbed all 3 threads getting ready to pull them out of the machine, like I would have done with a regular sewing machine and the person I was working for (who just happened to be Martha McCain!) said "STOP! ... let me show you how to do this"

Threading any serger is tricky, but an industrial model is even trickier than home machines which have been made user friendly.

In most costume shops I worked in there was usually only one or two people who knew how to thread one from scratch, if all the threads were pulled out, like I almost did.  

WATCH ...
So, after a serger is threaded, the best way to change the thread is to cut the old thread, leaving a good amount of extra thread, then tie REALLY good knots, lift the presser foot to release the tension and gently pull the thread until the new color is completely through.

Now, I love doing research because you never know what you will learn. At the Merrow company website I saw a Youtube link for a

Hand-Held Butt Seamer ... doesn't that sound interesting?  It puts images in my mind.

BUTT ... it wasn't quite what I thought. Watch this!
I think I've just scratched the surface of serger machine info.  Let's see what I can dig up for tomorrow.


2 Comments
<<Previous
Forward>>

    From Andrea 

    I am a commercial pattern maker who is now "sewing over 50"!
    I love to sew and hope to encourage others to come back to sewing.
    The water is fine!!

    Archives

    August 2019
    July 2019
    June 2019
    May 2019
    April 2019
    March 2019
    August 2017
    July 2017
    June 2017
    May 2017
    April 2017
    March 2017
    February 2017
    July 2016
    June 2016
    May 2016
    April 2016
    March 2016
    February 2016
    January 2016
    December 2015
    November 2015
    October 2015
    September 2015
    August 2015
    July 2015
    June 2015
    May 2015
    April 2015
    March 2015
    February 2015
    January 2015
    December 2014
    November 2014
    October 2014
    September 2014
    August 2014
    July 2014
    June 2014
    May 2014
    April 2014
    March 2014
    February 2014
    January 2014
    December 2013
    November 2013
    October 2013
    September 2013
    August 2013
    July 2013
    June 2013
    May 2013

    Archives by Subject

    To search for blog posts in specific categories, use the drop down menu above by hovering over the word "Blog"

    Enter your email address:

    Delivered by FeedBurner

    RSS Feed

    Andrea Schewe participates in Amazon's associates program.